background image


6

SAFETY INFORMATION                                                                                                                             

Please read and understand this entire manual before attempting to assemble, operate or install the 
product.  
 

z


CALIFORNIA PROPOSITION 65 WARNING: Chemicals known to the state of California to 
cause cancer, birth defects or other reproductive harm are created by combustion of propane. 

z


The installation must conform with local codes or, in the absence of local codes, with the 
National Fuel Gas Code, ANSI Z223.1 /NFPA 54, Natural Gas and Propane Installation Code, 
CSA B149.1, or Propane Storage and Handling Code, B149.2. 

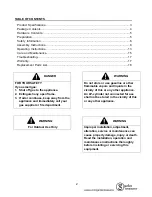
DANGER 

z


Young children should be carefully supervised when they are in the area of the item. 

z


Keep the ventilation opening(s) of the cylinder enclosure free and clear from debris. Use this 
appliance in a well-ventilated space only. Do not use it in a building, garage or any other 
enclosed area. 

z


Use this appliance in outdoor areas described below: 
(a) With walls on all sides, but at least one permanent opening at ground level and no overhead 

cover. 

(b) Within a partial enclosure that includes overhead cover and no more than two walls. These 

walls may be parallel, or at right angles to each other. 


(c) Within a partial enclosure that includes overhead cover and no more than two walls. The 

following shall apply: 
(i) One wall that is equivalent to at least 25% of the total wall area is completely open. 
(ii) 30% or more in total of the remaining wall area is open and unrestricted. 

z


Store the cylinder outdoors in a well-ventilated area (not in a building, garage, or other enclosed 
area) out of the reach of children. 

z


Do not store a spare LP-gas cylinder under or near this appliance. 

z


Never fill the cylinder beyond 80 percent full. 

WARNING 

z


Perform a leak test with a soapy solution: 
(a) To check gas connections. 
(b) After connecting a new cylinder. 
(c) Upon re-assembly after disassembly. 

Please refer to the leak test procedure indicated in this instruction manual on page 14. 

z


Replace the hose assembly prior to the appliance being put into operation if there is evidence of 
excessive abrasion or wear, or if the hose is damaged. The pressure regulator and hose 
assembly supplied with the appliance must be used. The replacement hose assembly/regulator 
shall be that specified by the manufacturer. 

z


Place the propane hose with regulator assembly out of pathways where people may trip over it or   

z


in areas where the hose will not be subjected to accidental damage.


z


The cylinder used must include a collar to protect the cylinder valve. 
 

Summary of Contents for PG171H-B

Page 1: ...H YOUR RECEIPT HERE Serial Number Purchase Date Questions problems missing parts Before returning to your retailer call our customer service department at 1 800 643 0067 8 a m 8 p m EST Monday Friday...

Page 2: ...all not be stored in the vicinity of this or any other appliance For Outdoor Use Only Improper installation adjustment alteration service or maintenance can cause property damage injury or death Read...

Page 3: ...inches Reflector Diameter 31 5 inches Rated Heat Input 45 000 BTU HR Fuel Propane LP Gas Supply 20 Lb LP Gas Cylinder Manifold Pressure 11 inches W C Injector Size Diameter 2 07 mm Safety Features The...

Page 4: ...T DESCRIPTION QUANTITY PART DESCRIPTION QUANTITY A Top Dome 1 G Deck Ring 1 B KD Dome 4 H Cylinder Assembly 1 C Burner Assembly 1 I Base 1 D Pole Assembly 1 J Wheel Assembly 1 E Table 1 K Cover 1 F Ta...

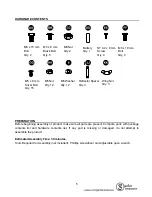
Page 5: ...ncluded Phillips screwdriver and adjustable open wrench M8X15mm Bolt Qty 2 Battery Qty 1 Wing Nut Qty 3 5 MM Wsher Qty 12 M5 Nut Qty 12 M5 X 8 mm Bolt Qty 15 ST 4 2X8mm screw Qty 4 M8 Nut Qty 2 DD KK...

Page 6: ...r c Within a partial enclosure that includes overhead cover and no more than two walls The following shall apply i One wall that is equivalent to at least 25 of the total wall area is completely open...

Page 7: ...ap on the cylinder valve that is provided with the cylinder valve Other types of caps or plugs may result in a propane leak CAUTION z Minimum clearance to the combustible materials is 44 inches z If y...

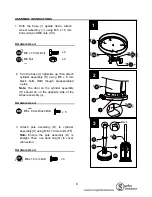
Page 8: ...though preassembled L pins Note The door on the cylinder assembly H should be on the opposite side of the wheel assembly J 3 Attach pole assembly D to cylinder assembly H using M6 x 10 mm bolts FF No...

Page 9: ...m of table E with ST4 2 x 8 mm screws EE 5 Unlock the handle on the table support assembly F then insert the table E onto the pole assembly D Once the desired height is achieved re lock handle on the...

Page 10: ...o burner assembly C through the pole assembly D Once the burner assembly C rests on pole assembly D secure with M5 x 8 mm silver bolts GG X 3 M5 X 10 mm Bolt GG 6 Insert reflector spacers JJ into the...

Page 11: ...attaching top dome A to KD domes B using M5 nuts HH M5 washers II and M5 x 8 mm bolts GG 9 Attach dome assembly to burner assembly C by securing wing nuts KK to reflector spacers JJ Wing Nut X 3 KK A...

Page 12: ...ng with those on regulator and rotate clockwise until tight HANDTIGHTENONLY DONOTUSEANYHAND TOOLSTOMAKETHISCONNECTION Be careful not to cross threads when screwing in fitting To disconnect the LP gas...

Page 13: ...g for Leaks a Make leakage solution by mixing 1 part liquid dish soap and 3 parts water b Spoon or brush several drops or use squirt bottle of the solution onto the gas hose regulator and regulator cy...

Page 14: ...er has lit continue to hold the control knob in for 30 seconds and then release 4 Turn the control knob from LOW to HIGH until the desired heat setting is achieved 5 Visually check the burner flame ag...

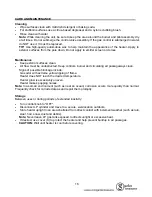
Page 15: ...ng use Note A slight pop is normal when burner is extinguished z Carbon deposits may create a fire hazard Keep dome and emitter clean at all times z Do not clean heater with combustible or corrosive c...

Page 16: ...er and circulating air passageways clean Signs of possible blockage include Gas odor with extreme yellow tipping of flame Heater does NOT reach the desired temperature Heater glow is excessively uneve...

Page 17: ...hest standards of quality and workmanship We warrant to the original consumer purchaser that all aspects of this product will be free of defects in material and workmanship for one 1 year from the dat...

Page 18: ...Assembly 0574423 4 5 Knob 2100462 6 Valve Shroud Cover 5203146 7 Igniter 2406521 8 Pole Assembly 5203148 9 Table 0574423 9 10 Table Support Assembly 2406488 11 Deck Ring 5015240 12 Cylinder Assembly...

Reviews: