background image

7

TROUBLESHOOTING

Failure to follow the instructions and warnings in this manual may result in pump damage and/or injury. Keep 

this manual for future reference.

Problem

Possible Cause & Corrective Action

The pump is not  

pumping water.

1.  Check if the power supply is correctly connected and the pump is completely submerged 

in water.

2.  Check the pump and the hose for any obstructions or kinks in the hose, clean if necessary.
3.  The pump may have air built up in it. Unplug the pump’s electrical cord from the power 

supply for approximately 15 seconds. Plug the pump’s electrical cord back into the power 

supply; this should clear out built up air. You may need to repeat this step several times.

4.  The impeller may be jammed or clogged with debris. Disconnect the power supply, and 

remove the front cover on the pump and the water leave seating. Check the impeller, 

turning it, to see if anything is jammed or broken. Rinse off the front cover and impeller 

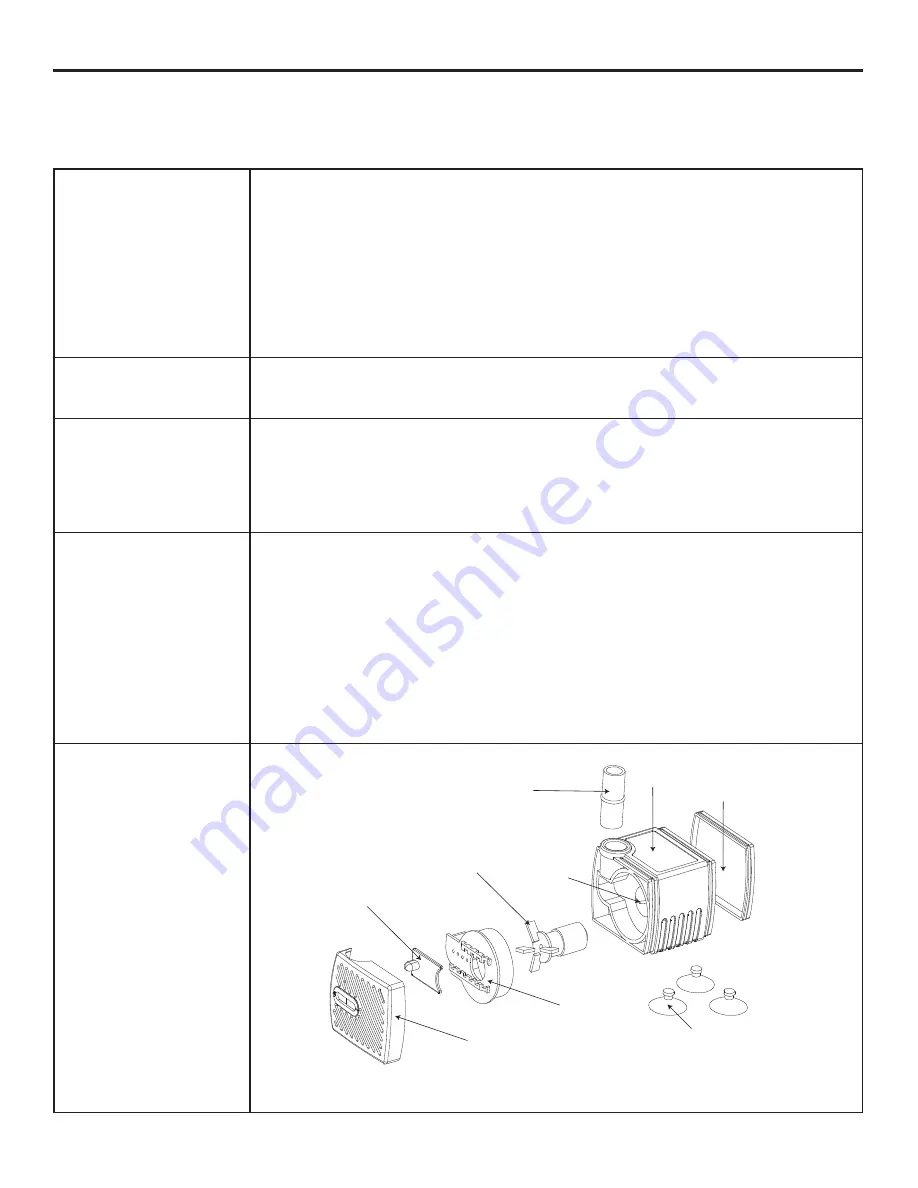
cover to remove any debris. (Fig. 8)

The water flow is not 

strong enough, or is  

too strong.

1. Check the water flow control on the pump and adjust accordingly. (Fig. 8)

The pump is making  

abnormal noises.

1. Check the water level to ensure the pump is completely submerged.
2. Disconnect the pump and check the impeller assembly: (Fig. 8)

•  Remove the front cover and water leave seating from the pump body.

• Grip the impeller and gently take it out of the pump.

• Rinse the impeller and pump body to remove any debris.

•  If any damage is found in the pump, please contact customer service.

Water is not  

flowing correctly.

1.  Check to ensure your fountain is level. If it is not, level it with support such as a shim.
2.  The impeller may be jammed or clogged with debris. Disconnect the power supply, and 

remove the front cover on the pump and the water leave seating. Check the impeller, 

turning it, to see if anything is jammed or broken. Rinse off the front cover and impeller 

cover to remove any debris. (Fig. 8)

3.  Check the water level to ensure the pump is completely submerged. Adding water can 

help to improve the water flow.

4.  Check the water outlets to ensure there is no debris clogging them. If so, remove  

the debris.

5.  Wipe the spouts down with a wet cloth to remove any build-up that may impede the  

water flow.

Fig. 8


Water 

Leave 

Seating

Water 

Leave

Water 

Outlet 

Regulator

Shaft

Back 

Cover

Suction

Cups

Front 

Cover

Pump 

Body

Summary of Contents for ALLEGRA FOUNTAIN

Page 1: ...1 OWNER S MANUAL ALLEGRA FOUNTAIN Caution Carefully Read Instructions and Procedures for Safe Operation KSN 02420372 1 UPC code 0 3464825494 5 Date of purchase _____ _____ _____ ...

Page 2: ...ntire pump if damaged Ensure that the electrical cord loops below the electrical outlet to form a Drip Loop Fig 1 This will prevent water from running down the cord into the electrical outlet CAUTION To reduce the risk of electric shock Always unplug the appliance from the electrical outlet immediately after using and before cleaning Do not connect to any voltage other than that shown on the pump ...

Page 3: ...NTENTS Thank you for purchasing your Outdoor Fountain Please read the operation and safety instructions before assembly Finial Pump Basin Cord Notch Electrical Cord Pump Reservoir Hose Notches Pedestal Tube Notches ...

Page 4: ...tain ASSEMBLY INSTRUCTIONS 1 Place the fountain on a flat level surface 2 Line up the notches on the basin with the notches on the pedestal twist and lock clockwise to secure into place Fig 2 3 Locate the pump and turn the water flow control to the Maximum setting Fig 3 4 Lead the pump s electrical cord through the tube and pull through underneath the pedestal secure in cord notch Set the pump nex...

Page 5: ...6 NOTE To help prevent mineral build up and keep the fountain clean distilled water is recommended 7 To turn on the fountain connect the electrical cord to a properly grounded outlet following GFCI outlet regulations A GFCI outlet must be used Your fountain will begin to flow Fig 7 NOTE Ensure that the electrical cord loops below the electrical outlet to form a Drip Loop 8 Once the fountain is on ...

Page 6: ...rily adjust the water flow control 5 The water flow may not function properly if the fountain is not level You can use a level to help make this determination If it is not level use shims to level the fountain before operating 6 When the fountain will not be used for extended periods of time disconnect the cord from the power supply and empty the water 7 Only use the correct power voltage as indic...

Page 7: ...e pump and adjust accordingly Fig 8 The pump is making abnormal noises 1 Check the water level to ensure the pump is completely submerged 2 Disconnect the pump and check the impeller assembly Fig 8 Remove the front cover and water leave seating from the pump body Grip the impeller and gently take it out of the pump Rinse the impeller and pump body to remove any debris If any damage is found in the...

Page 8: ...ng address Warranty Administrator Arden Companies 30400 Telegraph Road Suite 200 Bingham Farms Michigan 48025 This written statement must be accompanied with proof of purchase in the form of a sales receipt or invoice copy and must set forth at least the following information your name and address the date of purchase and a description of the claimed defect This Limited Warranty does not apply to ...

Page 9: ...9 GUIDE D UTILISATION FONTAINE ALLEGRA Attention Lisez soigneusement les consignes d utilisation et de sécurité KSN 02420372 1 Code CUP 0 3464825494 5 Date d achat _____ _____ _____ ...

Page 10: ... Remplacez complètement la pompe si elle est endommagée Assurez vous que le cordon électrique s enroule sous la prise électrique pour former un col de cygne Schéma 1 Ceci évitera que l eau ne coule le long du cordon jusque dans la prise de courant ATTENTION Pour réduire les risques de choc électrique Débranchez toujours l appareil de la prise électrique immédiatement après son utilisation et avant...

Page 11: ... votre achat de notre fontaine extérieure Veuillez lire les consignes d utilisation et de sécurité avant l assemblage Faîteau Pompe Bassin Encoche du cordon Cordon électrique Réservoir de la pompe Tuyau Encoches Piédestal Tube Encoches ...

Page 12: ...AGE 1 Placez la fontaine sur une surface plane et égale 2 Alignez les encoches du bassin avec les encoches du socle verrouillez en place en tournant dans le sens des aiguilles d une montre Schéma 2 3 Trouvez la pompe et réglez de bouton de contrôle du débit de l eau au niveau Maximum Schéma 3 4 Faites passer le cordon électrique de la pompe par le tube et tirez le complètement pour le faire sortir...

Page 13: ... de garder la pompe propre il est recommandé d utiliser de l eau distillée 7 Pour mettre la fontaine en marche branchez le cordon électrique dans une prise correctement mise à la terre conformément aux normes pour une prise de disjoncteur de fuite à la terre GFCI Une prise GFCI doit être utilisée Votre fontaine commencera à couler Schéma 7 REMARQUE Assurez vous que le cordon électrique s enroule s...

Page 14: ...glez le bouton de contrôle du débit 5 Le débit de l eau peut ne pas fonctionner correctement si la fontaine n est pas de niveau Vous pouvez utilisert un niveau pour déterminer cela Si la fontaine n est pas de niveau utilisez des cales pour la mettre de niveau avant de la mettre en marche 6 Si la fontaine n est pas utilisée pendant une longue période débranchez le cordon du circuit d alimentation e...

Page 15: ... réglez selon les besoins Schéma 8 La pompe fait un bruit anormal 1 Vérifiez le niveau d eau afin de vous assurer que la pompe est complètement immergée 2 Débranchez la pompe et vérifiez l assemblage de la turbine Schéma 8 Retirez le couvercle avant et la bague d écoulement du corps de la pompe Empoignez la turbine et retirez la délicatement de la pompe Rincez la turbine et le corps de la pompe po...

Page 16: ...t par écrit à l adresse suivante Warranty Administrator Arden Companies 30400 Telegraph Road Suite 200 Bingham Farms Michigan 48025 Cette déclaration écrite doit être accompagnée d une preuve d achat sous forme d un reçu de caisse ou copie d une facture et doit comporter au moins les informations suivantes votre nom adresse date d achat et une description du défaut faisant l objet de votre réclama...

Page 17: ...MANUAL DEL USUARIO FUENTE ALLEGRA Precaución Lee todas las instrucciones y procedimientos con cuidado para una operación segura KSN 02420372 1 Código de UPC 0 3464825494 5 Fecha de compra _____ _____ _____ ...

Page 18: ... cable de alimentación no caiga en línea recta hacia el tomacorriente sino que cuelgue holgadamente por debajo de este esta conexión se conoce como Bucle de goteo Fig 1 Esto evitará que el agua corra por el cable directamente hacia el tomacorriente PRECAUCIÓN Para reducir el riesgo de descargas eléctricas Desenchufa siempre el artefacto del tomacorriente inmediatamente después de su uso y antes de...

Page 19: ...ias por comprar la fuente para exteriores Lee las instrucciones de funcionamiento y seguridad antes de ensamblarla Remate Bomba Tina Muesca del cable Cable de alimentación Depósito de la bomba Manguera Muescas Pedestal Tubo Muescas ...

Page 20: ...ONES DE ENSAMBLAJE 1 Coloca la fuente en una superficie plana y nivelada 2 Alinea las muescas de la tina con las muescas del pedestal gira en sentido de las agujas del reloj para trabar la unidad y asegurarla en su lugar Fig 2 3 Inserta la bomba y coloca el control de flujo de agua en la configuración Máximo Fig 3 4 Pasa el cable de alimentación de la bomba a través del tubo y hálalo por debajo de...

Page 21: ...te limpia se recomienda utilizar agua destilada 7 Para encender la fuente conecta el cable de alimentación a un tomacorriente con descarga a tierra siguiendo la reglamentación del interruptor GFCI Debe usarse un tomacorriente GFCI El agua de la fuente comenzará a fluir Fig 7 NOTA Asegúrate de que el cable de alimentación no caiga en línea recta hacia el tomacorriente sino que cuelgue holgadamente ...

Page 22: ... de agua 5 El flujo de agua podría no funcionar correctamente si la fuente no está nivelada Puedes usar un nivel para comprobarlo Si la fuente no está nivelada utiliza cuñas para nivelarla antes de utilizarla 6 Si la fuente no se utilizará durante un largo período de tiempo desconecta el cable de alimentación de la corriente y vacía el agua 7 Utiliza únicamente el voltaje correcto según se indica ...

Page 23: ...jo de agua de la bomba y ajústalo según corresponda Fig 8 La bomba hace ruidos anormales 1 Revisa el nivel de agua para asegurarte de que la bomba esté sumergida por completo 2 Desconecta la bomba y revisa el impulsor Fig 8 Retira la tapa frontal y el depósito water leave del cuerpo de la bomba Toma el impulsor y retíralo con cuidado de la bomba Enjuaga el impulsor y el cuerpo de la bomba para qui...

Page 24: ...nty Administrator Arden Companies 30400 Telegraph Road Suite 200 Bingham Farms Michigan 48025 La notificación por escrito debe ser presentada junto a un comprobante de compra en forma de recibo de venta o copia de factura y debe expresar la siguiente información como mínimo tu nombre y dirección fecha de compra y descripción del defecto por el que se reclama Esta Garantía Limitada no se aplica ni ...

Reviews: