Gamatronic Electronic Industries Ltd.
Power+ Technical Guide
91
12.2
SYSTEM CONTROLLER MODULE
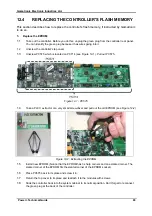
To remove a system controller module from the system:
1. Ensure that there are no cables connected to the rear plugs of the controller. If there are any,
disconnect them prior to controller removal. This includes LAN cable and the WING (optional)
connections.
2. Unscrew the mounting screws on both sides of the system controller and pull it out of the
housing.
NOTE:
Controller removal will not affect module
’
s operation and the load. Every module has its own
internal control and will keep up with proper operation, like current sharing and battery charging. Some
functions will not be available while the system controller is removed: battery test, battery conditioning
systems etc.
To insert a system controller module in to the system:
1. Confirm that the rear cables/plugs (if any) will not hinder the process; take them out of the
housing.
2. Hold the controller firmly and slide it in to the housing.
3. Screw the controller in with two mounting screws located on both sides of its front panel.
4. Connect rear external cables (if any) including LAN and WING (optional) connections.
5. If the controller was replaced with a new one, make sure that its configuration matches the
system with number of modules, battery settings, etc.
WARNING:
If the controller is not properly configured for the given Power+ system, it might produce
false alarms and incorrect DC voltage handling.
NOTE:
If the system was energized, the controller will start automatically within one minute.


