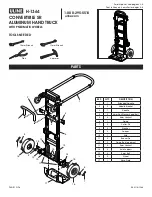
background image


Two easy ways for installation: 
Flat mount (8.1 - 8.2) 
EZ Anchor (9.1 - 9.7)


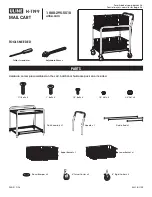
7.  Assemble pole by screwing the four 

pieces together. 


3.  Turn on switch to desired setting. 


4.  Attach top(A) to the body(B) with 

the two supplied screw caps. 


5.  Attach Side handles provided. 


6.  Screw on top Ornament. 


B
A

A
A

Summary of Contents for BAYTOWN II GS-105SG

Page 1: ...ar lighting available today GAMA SONIC solar charged lights are brighter and last all night with a typical solar charge Unique design superior light output and numerous installation options confirm th...

Page 2: ...in the US or www gamasonic com Visit our website or download the latest version of your instruction manual www gamasonic com or www gamasonic com user guides Please read the instruction manual careful...

Page 3: ...8 1 8 2 EZ Anchor 9 1 9 7 7 Assemble pole by screwing the four pieces together 3 Turn on switch to desired setting 4 Attach top A to the body B with the two supplied screw caps 5 Attach Side handles p...

Page 4: ...once Part I is flat with ground level 9 6 Remove the Turning Bar G 9 7 Screw the fixture to the Anchor 8 1 Mark three holes with the base plate as a template With an electric drill drill the holes in...

Page 5: ...how to replace your existing battery once it exceeds its life span Secondary Battery Optional Our GS 105 model features two 2 battery compartments Fig 2 This light comes with one 1 pre installed batte...

Page 6: ...Battery After several years of use the battery may need replacing 1 Unscrew the two screw caps and detach the top A Make sure the ON OFF switch is in the OFF O position 2 Unscrew the battery compartme...

Page 7: ...r solar charged light does not come on at dusk despite observance of all the instructions please try the following steps 1 Make sure that the solar lamp is not being affected by any other light source...

Reviews: