background image

16

en-us

        Faults – What to Do?

Faults – What to Do?

Faults – What to Do?

Faults often have simple explanations. Please read the 

notes in the table before calling customer service.

9

WARNING

Risk of electric shock!

Incorrect repairs are dangerous. Repairs may only 
be carried out by an authorized servicer. If the 
appliance is not functioning properly, unplug the 
power cord or switch off the fuse in the fuse box. 
Contact Customer Support.

--------

Disruption

Possible cause

Solution

The appliance does not work

The plug is not plugged in

Connect the appliance to the mains

Faulty fuse

Check in the fuse box to make sure that the 
fuse for the appliance is in working order

Power failure

Check whether other kitchen appliances 
are working

The appliance is not working and the illu-
minated ring behind the control knob is 
flashing orange and white alternately

Power failure

Check whether other kitchen appliances 
are working

The appliance does not heat up when it is 
switched on.

All the illuminated rings behind the control 
knobs light up white for 10 seconds after 
it is switched on. The illuminated ring 
around the active control knob then lights 
up orange.

Demo mode is activated

Deactivate demo mode.

~

 "Demo Mode" 

on page 17

The appliance does not heat up when it is 
switched on. 

The illuminated ring behind the control 
knob is flashing yellow and magenta alter-
nately.

Electronics fault

Contact after-sales service

The appliance switches off while operat-
ing.

The illuminated ring behind the control 
knob flashes orange and white alternately.

Safety switch off:  
The controls on the appliance 
have not been used for a long 
time.

Turn the temperature control knob to 0, 
then switch it back on, if required.

The appliance switches off while operat-
ing.

The illuminated ring behind the control 
knob flashes orange and white alternately.

Power failure in the house-
hold: 
Following a power failure, the 
appliance remains switched 
off for safety reasons.

Turn the temperature control knob to 0, 
then switch it back on, if required.

Summary of Contents for Vario 400 Series

Page 1: ...DJJHQDX Use and care manual 2 Notice d utilisation 18 Manual de instrucciones 35 VP 414 611 Teppan Yaki...

Page 2: ...ng 11 Safety shut off 11 Table of settings and tips 12 Tips for cooking and roasting 13 Using the with Teppan Yaki with cookware 14 Cleaning and maintenance 14 Cleaning the appliance 15 Faults What to...

Page 3: ...ire Always have a working smoke detector near the kitchen Never leave the cooktop unattended when in use Boilovers cause smoking and greasy spillovers may ignite 9 WARNING TO REDUCE THE RISK OF A GREA...

Page 4: ...te the ventilation system during a cooktop fire However do not reach through fire to turn it off Cooking Safety 9 WARNING Use this appliance only for its intended use as described in this manual NEVER...

Page 5: ...Secure all loose garments etc before beginning Tie long hair so that it does not hang loose and do not wear loose fitting clothing or hanging garments such as ties scarves jewelry or dangling sleeves...

Page 6: ...kware to heating element or burner will also improve efficiency Cookware not approved for use with ceramic cooktops may break with sudden temperature changes Use only pans that are appropriate for cer...

Page 7: ...spillovers may create a risk of electric shock Do not repair or replace any part of the appliance unless specifically recommended in this manual Refer all servicing to a factory authorized service cen...

Page 8: ...minum foil on the frying surface Never place objects made of plastic or cookware with plastic handles on the frying surface 9 CAUTION Malfunction Always set control knobs to the zero position when the...

Page 9: ...device comes with the following accessories Frying surface 0 Selecting the cooking zone 8 Temperature setting P Both cooking zones operating Q Only the front cooking zone is operating R Only the rear...

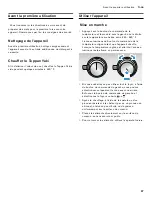
Page 10: ...ng on 1 Push in the temperature control knob and turn it clockwise or anti clockwise to the required temperature between 240 480 F The illuminated ring behind the temperature control knob flashes whil...

Page 11: ...y flashes until the appliance has cooled enough for it to be safe to touch Keeping warm setting The keeping warm setting enables you to keep food warm once you have cooked it Turn the temperature cont...

Page 12: ...420 Continue cooking at 340 Fry for 2 mins each side Continue cooking for 4 6 mins Turkey steak 0 6 in 1 5 cm 420 440 12 16 mins Poultry liver 0 4 in 1 cm 420 440 3 5 mins Fish and seafood Fish fille...

Page 13: ...rea Particularly if you are cooking food with different cooking times and the temperature requirements at the same time you can arrange the food optimally on the plate Pay attention to this also when...

Page 14: ...area You can find the ideal temperature for your application by moving the cookware Cleaning and maintenance Cleaningandmaintenance9 WARNING Risk of electrical shock Moisture entering the appliance c...

Page 15: ...iance on again Wait until the appliance has reached the set temperature again before placing food on the frying surface Appliance part surface Recommended cleaning Frying surface Use a brush and washi...

Page 16: ...rking The appliance does not heat up when it is switched on All the illuminated rings behind the control knobs light up white for 10 seconds after it is switched on The illuminated ring around the act...

Page 17: ...the control knob clockwise to position Turn the control knob counterclockwise to position 0 Wait until the illuminated ring goes out Customer Service CustomerServiceIf your appliance needs repairs ou...

Page 18: ...8 Coupure de s curit 28 Tableau de r glage et conseils 29 Conseils pour la cuisson 30 Utilisation du Teppan Yaki avec des ustensiles 31 Nettoyage et entretien 31 Nettoyage de l appareil lectrom nager...

Page 19: ...ent de s enflammer Toujours avoir un d tecteur de fum e en tat de marche pr s de la cuisine Ne laissez jamais la table de cuisson sans surveillance lorsqu elle est en utilisation Des d bordements caus...

Page 20: ...plosion de vapeur risque de se produire 4 Utiliser un extincteur uniquement si Vous savez que vous poss dez un extincteur de CLASSE ABC et vous en connaissez d j le maniement L incendie est de petite...

Page 21: ...des l ments tant qu ils n ont pas refroidi Citons notamment la table de cuisson et les surfaces situ es pr s de celle ci Ne pas chauffer ou r chauffer des contenants d aliments non ouverts L accumulat...

Page 22: ...reil est en service Ne jamais les laisser jouer aux alentours de l appareil que ce dernier soit en service ou non 9 ATTENTION Les articles d int r t pour les enfants ne doivent pas tre rang s dans un...

Page 23: ...nt install et mis la terre par un technicien agr Branchez l appareil uniquement dans une prise correctement reli e la terre Pour plus de d tails reportez vous la notice d installation Cet appareil est...

Page 24: ...mettre l alimentation hors circuit au niveau du panneau de service et le verrouiller pour viter tout mise en circuit accidentelle Avertissement issu de la proposition 65 Ce produit pourrait contenir...

Page 25: ...ient en aluminium sur la surface de cuisson Ne posez jamais d objets en plastique ni d objets avec une poign e en plastique sur la surface de cuisson 9 ATTENTION Anomalie Lorsque l appareil n est pas...

Page 26: ...S lection du foyer 8 R glage de temp rature P les deux foyers en fonctionnement Q uniquement le foyer avant en fonctionne ment R uniquement le foyer arri re en fonctionne ment Affichage Signification...

Page 27: ...urnez le vers la gauche ou la droite sur la temp rature souhait e entre 240 480 F L anneau lumineux du bouton de commande de la temp rature clignote tant que l appareil chauffe Lorsque la temp rature...

Page 28: ...p chaud pour pouvoir le toucher sans danger Niveau de maintien au chaud La position maintien au chaud vous permet de maintenir au chaud des mets apr s leur pr paration Tournez le bouton de commande de...

Page 29: ...0 min Selle d agneau point 0 6 1 po 1 5 2 5 cm Saisir 420 Poursuivre la cuisson 340 Saisir 2 min de chaque c t Poursuivre la cuis son pendant 4 6 min Steak de dinde 0 6 po 1 5 cm 420 440 12 16 min Foi...

Page 30: ...otamment lorsque vous cuisez simultan ment des aliments avec diff rents temps de cuisson et diff rentes temp ratures vous pouvez r partir les aliments cuire de mani re optimale sur la plaque Pensez au...

Page 31: ...commande En d pla ant l ustensile de cuisson vous pouvez trouver la temp rature optimale pour votre utilisation Nettoyage et entretien Nettoyageetentretien9 AVERTISSEMENT Risque de choc lectrique La p...

Page 32: ...t la temp rature r gl e l ment de l appareil surface Nettoyage recommand Surface de cuis son liminez les r sidus graisseux avec une brosse vaisselle et du savon vaisselle liminez les salissures tenace...

Page 33: ...ant V rifiez si les autres appareils de cuisine fonctionnent L appareil ne chauffe pas lors de la mise en marche Tous les anneaux lumineux derri re les boutons de commande s allument en blanc pendant...

Page 34: ...bouton de commande vers la droite sur la position Tournez le bouton de commande vers la gauche sur la position 0 Patientez jusqu ce que l anneau lumineux s teigne Service apr s vente Serviceapr s ven...

Page 35: ...te 45 Nivel para mantener calientes los alimentos 45 Desconexi n de seguridad 45 Tabla de ajustes y consejos 46 Consejos para cocer y asar 47 Utilizaci n de Teppan Yaki con recipientes de cocina 48 Cu...

Page 36: ...extiendan sobre estos Podr an prenderse fuego Siempre tenga un detector de humo en funcionamiento cerca de la cocina Nunca deje la placa sin vigilancia cuando est en uso Los derrames por hervor causa...

Page 37: ...n llam al departamento de bomberos Puede combatir el incendio de espaldas a una salida Si es posible no ponga el sistema de ventilaci n en funcionamiento si hay un incendio en la placa Pero no atravie...

Page 38: ...duras por vapor No deje que los agarradores toquen los elementos de calentamiento que est n calientes No use toallas ni otros pa os gruesos Siempre encienda la campana al cocinar a un valor de calor a...

Page 39: ...o limpie el electrodom stico cuando a n est caliente Algunos limpiadores producen emanaciones t xicas cuando se aplican en una superficie caliente Las esponjas y los pa os mojados pueden ocasionar que...

Page 40: ...limenticios dentro de este electrodom stico ni cerca de l Est espec ficamente dise ado para calentar o cocinar alimentos El uso de productos qu micos corrosivos al calentar o limpiar da ar el electrod...

Page 41: ...ialmente cancer geno o causante de da os reproductivos Por tanto su producto debe llevar en su embalaje la siguiente etiqueta de conformidad con la legislaci n de California iQFHU GDxR UHSURGXFWLYR ZZ...

Page 42: ...ar recipientes de papel de aluminio sobre la superficie de asado No colocar objetos de pl stico o con asas de pl stico sobre la superficie de asado 9 ATENCION Fallas en el funcionamiento Siempre coloq...

Page 43: ...la placa independiente 8 Ajuste de la temperatura P ambas placas independientes en funcionamiento Q solo la placa independiente delantera en funcionamiento R solo la placa independiente trasera en fun...

Page 44: ...hacia la izquierda o hacia la derecha El anillo luminoso situado detr s de la perilla de control de temperatura parpadea mientras el aparato se calienta Una vez que se ha alcanzado la temperatura prog...

Page 45: ...es los alimentos En la posici n de conservaci n en caliente los alimentos se pueden conservar calientes despu s de su preparaci n Girar la perilla de control de temperatura hasta el nivel de mantenimi...

Page 46: ...20 Asar a 340 Dorar 2 min por cada lado Asar durante 4 6 min Filete de pavo 0 6 in 1 5 cm 420 440 12 16 min H gado de ave 0 4 in 1 cm 420 440 3 5 min Pescado y marisco Filete de pescado 0 4 in 1 cm 0...

Page 47: ...es Al cocinar de manera simult nea alimentos con diferentes tiempos y puntos de cocci n se recomienda distribuir ptimamente los alimentos por la plancha Tener esto en cuenta tambi n al seleccionar la...

Page 48: ...a o la trasera Se puede encontrar la temperatura ptima para cada aplicaci n moviendo los recipientes de cocina Cuidados y limpieza Cuidadosylimpieza9 ADVERTENCIA Peligro de descarga el ctrica La humed...

Page 49: ...to a alcanzar la temperatura programada Elemento superficie Limpieza recomendada Superficie de asado Retirar los restos que contengan grasa con un cepillo para tallar los platos y lavavajillas En caso...

Page 50: ...en el suministro el ctrico Comprobar si los dem s aparatos de cocina funcionan El aparato no calienta cuando se enciende Todos los anillos luminosos situados detr s de las perillas de control se ilum...

Page 51: ...perilla de control hacia la derecha hasta la posici n Girar la perilla de control hacia la izquierda hasta la posici n 0 Esperar a que el anillo luminoso se apague Servicio de atenci n al cliente Ser...

Page 52: ...9001349583 9001349583 en us es mx fr ca 021024 BSH Home Appliances Corporation 1901 Main Street Suite 600 Irvine CA 92614 USA www gaggenau com 1 877 442 4436 2022 BSH Home Appliances Corporation...

Reviews: