background image

24

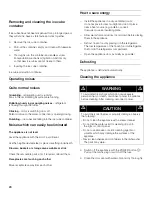
Removing and cleaning the ice cube 
container

If ice cubes have not been dispensed for a prolonged period, 
they will shrink, have a stale taste and stick together.

Remove the ice cube container.

Pull out the container, empty and clean with lukewarm 
water.

Thoroughly rub the container and endless screw 
transportation mechanism (Agitation function) dry 
so that new ice cubes cannot freeze to them.

Inserting the ice cube container.

Ice cube production continues.

Operating noises

Quite normal noises

Grumbling 

– refrigerating unit is running. 

Fans in the recirculating air system are running.

Bubbling, humming or gurgling noises 

– refrigerant 

is flowing through the tubes. 

Clicking 

– motor is switching on or off. 

Solenoid valve on the water connection is opening/closing.

Rumbling 

– ice cubes are falling into the ice cube container.

Noises which can easily be eliminated

The appliance is not level

Level the appliance with the aid of a spirit level.

Use the height-adjustable feet or place something underneath.

Drawers, baskets or storage areas wobble or stick

Check the removable parts and, if required, reinsert them.

Receptacles are touching each other

Move receptacles away from each other.

How to save energy

Install the appliance in a dry, ventilated room; 
do not expose to direct sunlight and do not place 
near a heat source (e.g. radiator, cooker). 
If required, use an insulating plate.

Allow warm food and drinks to cool down before placing 
them in the appliance.

Defrost frozen food by placing it in the refrigerator. 
The low temperature of the frozen food will refrigerate 
the food in the refrigerator compartment.

Open the appliance door as briefly as possible!

Defrosting

The appliance is defrosted automatically.

Cleaning the appliance

Switch off the appliance with the POWER button

O

Pull out the mains plug or switch off the fuse.

Clean the door seal with water only and dry thoroughly.

m

WARNING

m

To avoid electrical shock which can cause severe 
personal injury or death, disconnect power to appliance 
before cleaning. After cleaning, reconnect power.

m

CAUTION

m

To avoid personal injuries or property damage, observe 
the following:

– Do not clean the appliance with a steam cleaner.

– Do not let the water used for cleaning drip onto 

the light or control panel.

– Do not use abrasive or acidic cleaning agents or 

solvents which may damage the surfaces of the 
appliance.

– Never clean shelves and containers in the dishwasher. 

The parts may warp.

Summary of Contents for RB 491

Page 1: ...RB 491 RY 491 Gaggenau USE AND CARE GUIDE GUIDE D UTILISATION ET ENTRETIEN MANUAL DE USO Y CUIDADO...

Page 2: ...2 English 3 Fran ais 35 Espa ol 68...

Page 3: ...ixtures 10 Base 10 Installing and connecting the appliance 11 Connecting the water 11 Connection to the power supply 11 Switching on the appliance 12 Switching off and disconnecting the appliance 12 S...

Page 4: ...be eliminated 24 How to save energy 24 Defrosting 24 Cleaning the appliance 24 Odors 25 Warning messages via the display 25 Temperature alarm 25 Door alarm 26 Sensor fault 26 Low voltage 26 Water fiI...

Page 5: ...performed by a qualified individual 9 A burned out light bulb may break when being replaced NOTE Setting the refrigerator temperature controls to OFF does not remove power to the light circuit RISK O...

Page 6: ...he cable Bottles which contain a high percentage of alcohol must be sealed and stored in an upright position Keep plastic parts and the door seal free of oil and grease Otherwise parts and door seal w...

Page 7: ...bottom freezer you have opted for a modern high quality domestic appliance Your bottom freezer is distinguished by its economical energy consumption Each appliance which leaves our factory is inspecte...

Page 8: ...condiments bottles and jars 3 Motorized shelf 4 Button for motorized shelf 5 Door storage bins 6 Glass shelves in refrigerator for storing cooked food dairy products meat products 7 Gallon door bin 8...

Page 9: ...diments bottles and jars 3 Motorized shelf 4 Button for motorized shelf 5 Door storage bins 6 Glass shelves in refrigerator for storing cooked food dairy products meat products 7 Gallon door bin 8 Veg...

Page 10: ...irit level diagonal measurements etc Furniture fixtures The new appliance will be mounted securely to adjacent and overhead furniture fixtures For this reason it is essential that all attachable furni...

Page 11: ...water connection must not be behind the appliance It is recommended to place the shut off valve directly next to the appliance base unit or in another easily accessible location Connection to the pow...

Page 12: ...ce cube container Clean the appliance interior see Cleaning the appliance To prevent odors leave the doors open Door alarm If one of the appliance doors is left open an alarm signal sounds after one m...

Page 13: ...n and ALARM OFF button for 3 seconds The display shows the momentary status Motorized shelf The appliance features a motorized height adjustable shelf The height of this shelf can be adjusted when it...

Page 14: ...r down in the guides Lower the shelf to the required position and snap it into the preset openings in the guide To remove the shelves Lift the shelf at the front move it as far as the openings on the...

Page 15: ...zer compartment can be taken out for cleaning Using a screwdriver turn the locks on the pullouts by 90 To remove the drawers lift them slightly and remove To replace the drawers lift them at the front...

Page 16: ...on the display See section on Setup mode G buttons The required temperature adjustment is activated with the buttons See section Setting the temperature Select the menus in setup mode See section on S...

Page 17: ...st the required temperature Activate the setup mode with the button The symbol is displayed Set the required temperature with the warmer or colder buttons Freezer The temperature can be set from 7 F t...

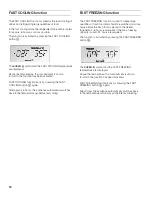
Page 18: ...nce automatically switches back to the temperature set before fast cooling FAST FREEZING function The FAST FREEZING function is used to freeze large quantities of fresh food and should be switched on...

Page 19: ...ions within one menu Press the or button To end setup mode Press the SETUP button W All modified settings are saved Settings which can be changed in setup mode NOTE A modified setting is saved when th...

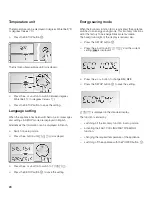
Page 20: ...to switch to FRANCAIS Press the SETUP button W to save the setting Energy saving mode When the Economy function Eco is activated the appliance switches to an energy saving mode This Economy functions...

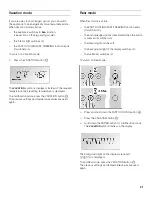
Page 21: ...CATION button The previous settings and temperature values are used again Rest mode When Rest mode is active the FAST COOLING FAST FREEZING function ends if switched on the acknowledge signal is deact...

Page 22: ...ng is damaged Check the sell by date The temperature of the supermarket freezer must be lower than 0 F 18 C If not the storage life of the food is reduced Purchase deep frozen food last Wrap in newspa...

Page 23: ...ICE button NOTE Bags and polyethylene blown film can be sealed with a film sealer Foods Storage Time Butter 6 to 9 months Milk Cream Not recommended Cream cheese Cottage cheese Hard cheese 4 to 6 mont...

Page 24: ...les are touching each other Move receptacles away from each other How to save energy Install the appliance in a dry ventilated room do not expose to direct sunlight and do not place near a heat source...

Page 25: ...odors have been eliminated Change the activated charcoal air filter See section on Changing the activated charcoal air filter Warning messages via the display If several warning messages are displaye...

Page 26: ...chase an replacement water filter contact your local dealer or call 1 800 578 6890 If the following display is indicated The filter has to be changed immediately m WARNING m To avoid serious illness o...

Page 27: ...you choose this option replace the water filter by a water filter substitute cartridge In this case the filter display might be deactivated to prevent filter change messages To deactivate the filter d...

Page 28: ...months Flush new filter for 5 minutes See warranty card for complete details Do not use with water that is microbubgically unsafe or of unknown quality wihtout adequate disuft ctun before or after the...

Page 29: ...not function The bulb is defective Change the bulb see Changing the bulb The light switch is sticking Check whether it can be moved The appliance is giving off odors Strong smelling foods have not bee...

Page 30: ...n incorrect installation or water connection The ice maker is not producing enough ice or the ice cubes are misshapen The water pressure is too low Check water pressure The water pressure must be betw...

Page 31: ...the clip and lock into position Halogen bulb at the side Halogen bulb type 10 W 12 V socket G4 Pull out the cover rail forwards To loosen the cover rail use a screwdriver Remove the disc forwards Pull...

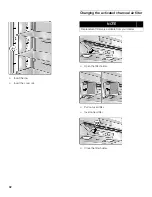
Page 32: ...disc Insert the cover rail Changing the activated charcoal air filter Open the filter holder Pull out used filter Insert a new filter Close the filter holder NOTE Replacement filters are available fro...

Page 33: ...sand eight hundred twenty five 1 825 days 5 years from the date of purchase The foregoing timeline begins to run upon the date of purchase and shall not be stalled tolled extended or suspended for any...

Page 34: ...and 6 any external elemental and or environmental forces and factors including without limitation rain wind sand floods fires mud slides freezing temperatures excessive moisture or extended exposure t...

Page 35: ...ations Sous r serve de modifications Se reserva el derecho a efectuar modificaciones Gaggenau Hausger te GmbH Carl Wery Stra e 34 D 81739 M nchen www gaggenau com Gaggenau 780 Dedham Street Canton MA...

Reviews: