background image

9

Getting to know the appliance

You will get to know your new appliance here. We 
explain the control panel and the individual controls to 

you. You are informed about the oven interior and 
accessories.

Combi-steam oven

These instructions apply to different versions of the 
appliance. Slight deviations are possible depending on 
the appliance type.

Operation is identical for all appliance versions.

Do not obstruct oven vents.

NOTICE: 

Do not place food directly on oven bottom.

1

Ventilation slots

2

Broil element behind glass ceramic

3

Socket for cleaning or descaling cartridge

4

Socket for core temperature sensor

5

Door seal

6

Drainage sieve

7

Recessed handle

Summary of Contents for BS 470 611

Page 1: ...Gaggenau Use and care manual BS 470 471 611 BS 474 475 611 BS 484 485 611 Combi steam oven...

Page 2: ...ies 17 Water filter 17 Operation with or without water filter 17 Change water filter 17 Activating the appliance 18 Standby 18 Activate appliance 18 Operating the appliance 18 Oven interior 18 Inserti...

Page 3: ...Acrylamide in foodstuffs 57 Additional information on products accessories replacement parts and services can be found at www gaggenau com and in the online shop www gaggenau com zz store Safety Defi...

Page 4: ...pliance if it is not working properly or if it has been damaged Contact an authorized servicer Do not obstruct oven vents Do not repair or replace any part of the appliance unless specifically recomme...

Page 5: ...r surfaces of the appliance may become hot enough to cause burns Among these surfaces are oven vent openings surfaces near these openings and oven doors Exercise caution when opening the appliance Sta...

Page 6: ...be left alone or unattended in the area where the appliance is in use They should never be allowed to play in its vicinity whether or not the appliance is in use CAUTION Items of interest to children...

Page 7: ...hen using Steam mode with a perforated cooking pan always slide the baking pan underneath it The pan will catch any drippings The oven bottom and the evaporator dish must always remain clear Always pl...

Page 8: ...ains in the oven Always remove fruit juice immediately when safe to touch and wipe up first with a damp and then a dry cloth Your appliance s oven interior consists of high grade stainless steel Corro...

Page 9: ...ctions apply to different versions of the appliance Slight deviations are possible depending on the appliance type Operation is identical for all appliance versions Do not obstruct oven vents NOTICE D...

Page 10: ...e 3 Rotary selector With the rotary selector you can select the temperature and make other settings 4 Function selector The function selector is used to select the type of heating the cleaning functio...

Page 11: ...and operation mode are occasionally shown automatically These messages either disappear automatically after a few seconds or must be confirmed with Cooling fan Your appliance has a cooling fan The co...

Page 12: ...r 30 humidity 85 450 F 30 230 C Default temperature 340 F 170 C Cooking without added liquid For pastries With this setting no steam is generated and the venti lation flap is closed Any steam escaping...

Page 13: ...tly reheated The steam ensures that the food does not dry out Reheat plated meals at 250 F 120 C and baked goods at 360 F 180 C S t Basic settings Your appliance can be individually adjusted in the ba...

Page 14: ...sic settings chapter Setting the language The default language appears in the display 1 Select the desired display language with the rotary selector 2 Confirm with Note When the language is changed th...

Page 15: ...he month setting with the C symbol 3 Set the month with the rotary selector 4 Switch to the year setting with the C symbol 5 Set the year with the rotary selector 6 Confirm with Setting the temperatur...

Page 16: ...nce enters the standby mode and the standby display appears The appliance is now ready for operation Calibrate the appliance before steaming for the first time The appliance sets the boiling point Cal...

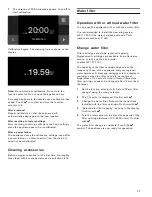
Page 17: ...with or without a water filter It is recommended to install the descaling system GF 111 700 if the water hardness exceeds 7 dH carbonate hardness 5 dH Change water filter Filter cartridges should be...

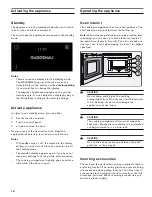
Page 18: ...after activation The cooking compartment lighting goes out after a little while if the door is open Operating the appliance Oven interior The cooking compartment has four shelf positions The shelf po...

Page 19: ...steam to the oven interior You can add moisture to food while cooking for example bread and rolls Misting is only possible with these heating functions Convection 30 Humidity Convection 0 Humidity Br...

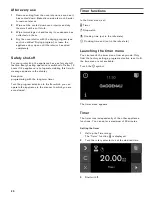
Page 20: ...ated during this time A message appears in the display Exception programming with the long term timer Turn the program selection to 0 after which you can operate the appliance in the manner to which y...

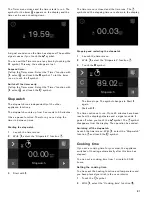
Page 21: ...the Stopwatch function p 3 Start with I The timer menu is closed and the time runs The p symbol and the elapsing timer are shown in the display Stopping and restarting the stopwatch 1 Launch the time...

Page 22: ...program selection to 0 Note You can also change the heating function and temperature during the cooking time End of cooking time You can defer the end of the cooking time until later Example it is 2 p...

Page 23: ...that easily perishable foodstuffs must not be left in the oven for too long Note You must activate the Sabbath mode in the factory setting in order to operate the mode Follow these steps 1 Set the pro...

Page 24: ...lights will be on during this time Note that easily perishable foodstuffs must not be left in the oven for too long Setting the Yom Tov mode 1 Set the program selector to 2 Touch the symbol The sugges...

Page 25: ...Insert the core temperature probe in the socket in the oven interior Set the heating function and temperature Touch the symbol With the rotary selector enter the required temperature and confirm it w...

Page 26: ...rogrammed recipe 1 Turn the function selector to any heating type The i symbol is displayed 2 Touch the i symbol 3 Use the rotary selector to select the desired recipe 4 Touch the symbol 5 Use the C s...

Page 27: ...NING Risk of electric shock Use of a wrong core temperature probe can damage the insulation Use only the core temperature probe intended for this appliance 9 WARNING Risk of burns The oven interior an...

Page 28: ...to rise somewhat due to the residual heat in the cooking compartment If at the same time you adjust a programming with the core temperature probe and the cooking time timer then the programming switch...

Page 29: ...0 F 55 60 C 158 176 F 70 80 C Ostrich steak 140 149 F 60 65 C Lamb Leg of lamb medium well done 140 149 F 60 65 C 158 176 F 70 80 C Saddle of lamb medium well done 131 140 F 55 60 C 149 167 F 65 75 C...

Page 30: ...activated it may be deactivated when the power returns Activating the child lock Requirement Program selector is set to 0 Touch the 0 symbol for at least 6 seconds The child lock is activated The sta...

Page 31: ...nd choose the desired display with the rotary selector The selection is displayed Display screen Minimized Standard When Minimized is set only the most import ant details are displayed after a short t...

Page 32: ...s and restore appliance to factory set tings with or cancel with Note When restoring factory settings the per sonal recipes are also deleted After restoring the factory settings you will see the Initi...

Page 33: ...Wet clothes and sponges can cause burns from steam Cleaning agents Pay attention to the information in the table to ensure that the various surfaces are not damaged by incorrect cleaning agents Do not...

Page 34: ...Hot soapy water Clean with a dish cloth and dry with a soft cloth Do not use oven spray and other aggres sive oven cleaners or abrasive materials Scouring pads rough sponges and pan cleaners are also...

Page 35: ...filter is removed before the cleaning program is started the cooking compartment will not be clean at the end of the program The appliance door is locked during the cleaning program Do not try and op...

Page 36: ...eaning or after steaming The drying program takes 20 minutes Starting the drying program 1 Remove accessories from the cooking compartment Wipe out the cooking compartment Thoroughly remove residues o...

Page 37: ...am can only be started if the appliance has cooled down below 104 F 40 C Remove all accessories from the cooking compartment before you start the descaling program wire rack cooking containers core te...

Page 38: ...rn the drain filter on the cooking compartment floor to the left and remove it Remove food residues from the drain sieve Rinse out under running water 10 Insert the drain filter and turn right to the...

Page 39: ...ill not start a message appears in the display No water in the appliance Check water intake No steam visible Steam is not visible above 212 F 100 C This is normal Grill heating element is only hot at...

Page 40: ...rs our customer service is there for you We work hard to help solve problems quickly and without unnecessary service calls getting your appliance back up and running correctly in the least amount of t...

Page 41: ...grease filter or back panel of the oven The combination steam oven must shut properly Keep the seal surfaces clean at all times Do not place too many items close together on wire racks or containers T...

Page 42: ...the filling in advance Unpeeled boiled potatoes approx 2 oz apiece perforated 212 100 100 30 35 Unpeeled boiled potatoes approx 4 oz apiece perforated 212 100 100 45 50 Brussels sprouts perforated 21...

Page 43: ...in broth Tilapia 150 g 5 oz perforated 180 190 80 90 100 10 12 Gilthead bream 200 g 7 oz perforated 180 190 80 90 100 12 15 Fish fillet 200 300 g 7 11 oz perforated 180 190 80 90 100 12 15 Fish terrin...

Page 44: ...n relax The circulation of the meat juice slows down and there is less loss of juice when cutting into the meat Food Cooking container Temperature in F C Humidity in Cooking time in min Observations E...

Page 45: ...0 15 C above the desired core temperature Toward the end of the cooking time you can reduce the temperature to 140 F 60 C This way you can extend the cooking time e g if your guests arrive late If you...

Page 46: ...e or no oil the skin gets crispier Food Cooking container Temperature in F C Humidity in Cooking time in min Observations Duck whole 3 kg 6 lb unperforated 1 300 320 150 160 2 430 220 60 0 80 90 20 30...

Page 47: ...ot even in the refrigerator It is not suitable for reheating Vacuum pack bags When using the sous vide cooking method only use heat resistant vacuum pack bags designed for this purpose Do not cook the...

Page 48: ...many types of fish fall apart easily after cooking using the sous vide method if you wish to flash fry it this should be done before the sous vide cooking stage Fry the food for longer if has not been...

Page 49: ...tip Vacuum seal along with some butter and salt Can easily be used for making dishes such as salad Potatoes skin on whole or halved 800 g 1 lb 12 oz perforated 200 95 50 Recipe tip Vacuum seal along...

Page 50: ...n half and deseed Vanilla sauce 0 5 l 2 cup perforated 180 82 18 20 Recipe tip 0 5 l 2 cup milk 1 egg 3 egg yolks 80 g 3 oz sugar 1 vanilla pod Food Cooking container Temperature in F C Type of heatin...

Page 51: ...g 1 l of water 9 oz 2 pint of water unperforated 212 100 100 55 65 Food Cooking container Temperature in F C Humidity in Cooking time in min Observations Cr me br l e 130 g 4 oz unperforated 195 90 1...

Page 52: ...rature in F C Humidity in Cooking time in min Observations Disinfect e g baby bottles canning jars Wire rack 212 100 100 20 25 Drying fruit or vegetables perforated 175 210 80 100 0 180 300 e g tomato...

Page 53: ...perforated 320 340 160 170 0 60 30 45 For yeast risen sheet cakes with moist topping e g plum cake or onion tart 0 and with dry topping e g streusel 60 humidity Plaited loaf 500g 4 cup flour unperfora...

Page 54: ...ies in the unperforated cooking insert The specified times are lengthened Food Cooking container Temperature in F C Humidity in Cooking time in min Observations Dough mixture 600 g 5 cup flour Bowl wi...

Page 55: ...ises during thawing It must never come into contact with other foodstuffs Germs could be transmitted Slide the unperforated cooking insert underneath the food Pour away the collected thawing liquid fr...

Page 56: ...elapsed Do not remove the canning jars from the appliance until they have completely cooled down Extracting juice soft fruits You can effortlessly and cleanly extract berry juice in the steam oven Pl...

Page 57: ...tray To do this loosen the knurled screws at the front of the slide in tray and pull the tray out toward the front Place the wire rack directly on the bottom of the cooking compartment and place the f...

Page 58: ......

Page 59: ......

Page 60: ...ce Corporation 1901 Main Street Suite 600 Irvine CA 92614 1 877 442 4436 USA www gaggenau usa com 2017 BSH Home Appliances Gaggenau Hausger te GmbH Carl Wery Stra e 34 81739 M nchen GERMANY 9000975761...

Reviews: