


Pag. 50 / 57 0MNLIBRAPROK10NPENUA 01
Now switch on UPS 3 (the added UPS).
With the lever of SW1 in the start position in one UPS only and the lever in the cont position on all the others, check
that all the UPSs are operating normally and that the system is sharing the output power.
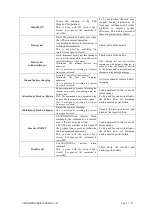
Example of hot removal
With hot removal, it is not necessary to shut down all the UPSs of the system in order to remove one.
A)UPS parallel cable type
RJ45
B) RJ45 female/RJ45 female
shielded adaptor cable
UPS
BYPASS CABLE
N.B.: if the UPS to be
removed has SW1 in the start
position, one of the other
UPSs (UPS 1 or UPS2) must
be in the start position.
One UPS in the system must
have SW1 in the start
position and LED
Phase I Shut down the UPS
(3) that is to be removed.
Remove the signal cables of
the UPS to be removed.
Phase II-III Connect the RJ45
female/RJ45 female shielded
adaptor cable (not provided)
between cables A.
Check that all the UPS are operating normally and that the system is sharing the output power.
UPS 3
A
UPS 1
A
UPS 2
A
I
II
III
B
UPS 1
UPS 2
UPS 3
UPS 1
UPS 2
Summary of Contents for LibraPro
Page 2: ...Pag 2 57 0MNLIBRAPROK10NPENUA 01...
Page 6: ...Pag 6 57 0MNLIBRAPROK10NPENUA 01 This page is left blank intentionally...
Page 25: ...0MNLIBRAPROK10NPENUA 01 Pag 25 57 This page is left blank intentionally...
Page 35: ...0MNLIBRAPROK10NPENUA 01 Pag 35 57 This page is left blank intentionally...
Page 51: ...0MNLIBRAPROK10NPENUA 01 Pag 51 57 This page is left blank intentionally...
Page 53: ...0MNLIBRAPROK10NPENUA 01 Pag 53 57 This page is left blank intentionally...


