12
a
f
b
d e
c
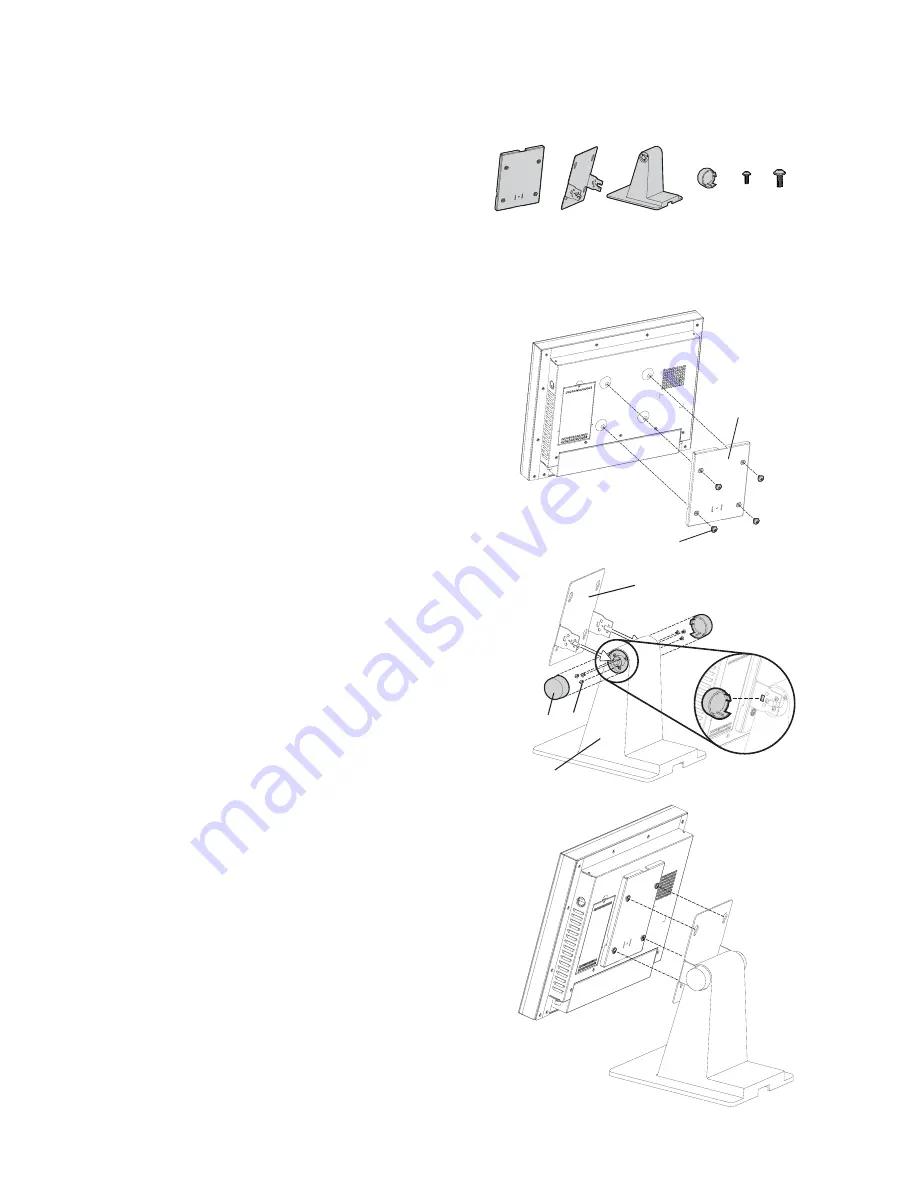
Desktop Stand Assembly
4-4.
VESA bracket assembly
Align the standard VESA mounting
1.
holes of the VESA bracket (a) and
the display and fix them with the
screws provided (f) (x4).
Stand bracket assembly
Align the guide slot of the stand
2.
bracket (b) into the hinge shaft of
the stand (c).
Fasten the screws (e) (x3) on each
3.
sides to fix the stand bracket (b) to
the stand (c).
Align the hinge cover (d) (x2) into
4.
the right position of the stand
bracket (b) and fix it until you hear
a click sound.
Align the screws (f) (x4) on the
5.
VESA bracket (a) pre-installed on
the display to the four tear drop
holes of the stand bracket (b) pre-
installed with the stand.
Accessories items
a. VESA bracket
b. Stand bracket
c. Stand
d. Hinge cover x2
e. Screws for both sides of stand x6
f. Screws for VESA bracket x 4
a
b
c
d
e
f
Summary of Contents for POS790
Page 1: ...USER MANUAL Point of Sale Hardware System VERSION V1 4 DECEMBER 2010...
Page 30: ...23 Version B68 v1 0 For B68 Motherboard 6 1 Jumper Setting 6 Motherboard Layout 6 1 1...
Page 36: ...29 Version B78 v2 2 For B78 Motherboard 6 2 Motherboard Layout 6 2 1...
Page 41: ...34 Version B98 v1 0 For B98 Motherboard 6 3 Motherboard Layout 6 3 1...
Page 46: ...39 Version C48 v2 1 For C48 Motherboard 6 4 Motherboard Layout 6 4 1...


