


1. INSTALLATION
2
• Select a location where the cables have sufficient slack to allow for maintenance
and service.
• A magnetic compass may receive interference if it is placed too close to this unit.
Observe the compass safe distances noted in the safety instructions (page ii) to
prevent interference to the magnetic compass.
1.1.1
Desktop (bracket) installation
Before mounting the Display Unit on a desktop, remove the unit from the attached
bracket.
1. Unfasten the two knob bolts, one on either side of the Display Unit. Do not discard
the knob bolts.
2. Place the Display Unit face-down on a soft, firm surface, then remove the bracket.
To remove the bracket, gently push the bracket arms on either side of the Display
Unit outwards.
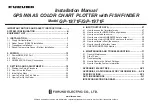
3. Place the bracket at the mounting location, then secure the bracket in place with
the supplied self-tapping screws (4.8
u
22 SUS304, 4 pieces).
Note:
Orient the bracket so that the slots in the bracket arms face forwards, as
shown in the figure below.
4. Loosely fasten the knob bolts, removed at step 1, to the Display Unit. Leave ap-
proximately 10 mm of thread exposed.
5. Fit the Display Unit to the bracket, then fasten the knob bolts. Take care that the
Display Unit is seated properly at the back of the bracket slots.
6. Connect the required cables to the rear of the Display Unit.
If there is no NMEA2000 connections in your configuration, fit the supplied
NMEA2000 connector cap to the NMEA2000 connector, at the rear of the Display
Unit.
If your configuration has NMEA2000 connections, discard the connector cap.
Slots face forwards
Slots face forwards
4.8×22 SUS304,
four locations
1. INSTALLATION
3
1.1.2
Flushmount (console) installation
Before mounting the Display Unit in a desktop or console, remove the unit from the
attached bracket.
1. Unfasten the two knob bolts, one on either side of the Display Unit. Do not discard
the knob bolts.
2. Place the Display Unit face-down on a soft, firm surface, then remove the bracket.
To remove the bracket, gently push the bracket arms on either side of the Display
Unit outwards.
3. Remove one side of the adhesive protection sheet on the Flush Mount Gasket,
then fit the gasket to the rear of the Display Unit.
4. Mark and cut the installation hole, then drill four bolt holes, referring to the Flush
Mount Template at the back of this manual.
5. Fit the supplied threaded rods (M4
u
40 SUS304, 4 pieces) to the locations indicat-
ed in the figure below. Do not use tools, such as pliers, to fit the rods, as the thread
may be damaged.
6. Connect the required cables to the rear of the Display Unit.
If there is no NMEA2000 connections in your configuration, fit the supplied
NMEA2000 connector cap to the NMEA2000 connector, at the rear of the Display
Unit.
If your configuration has NMEA2000 connections, discard the connector cap.
7. Remove the adhesive protection sheet from the Flush Mount Gasket.
Attach Flush Mount Gasket along
the indicated dashed line.
Attach the threaded rods
to the four bolt-holes


