background image

8

EN

Set up for Use

• Unless stated, all operations described are based on remote control 

use. Some operations can be carried out using the buttons on the 
control panel.

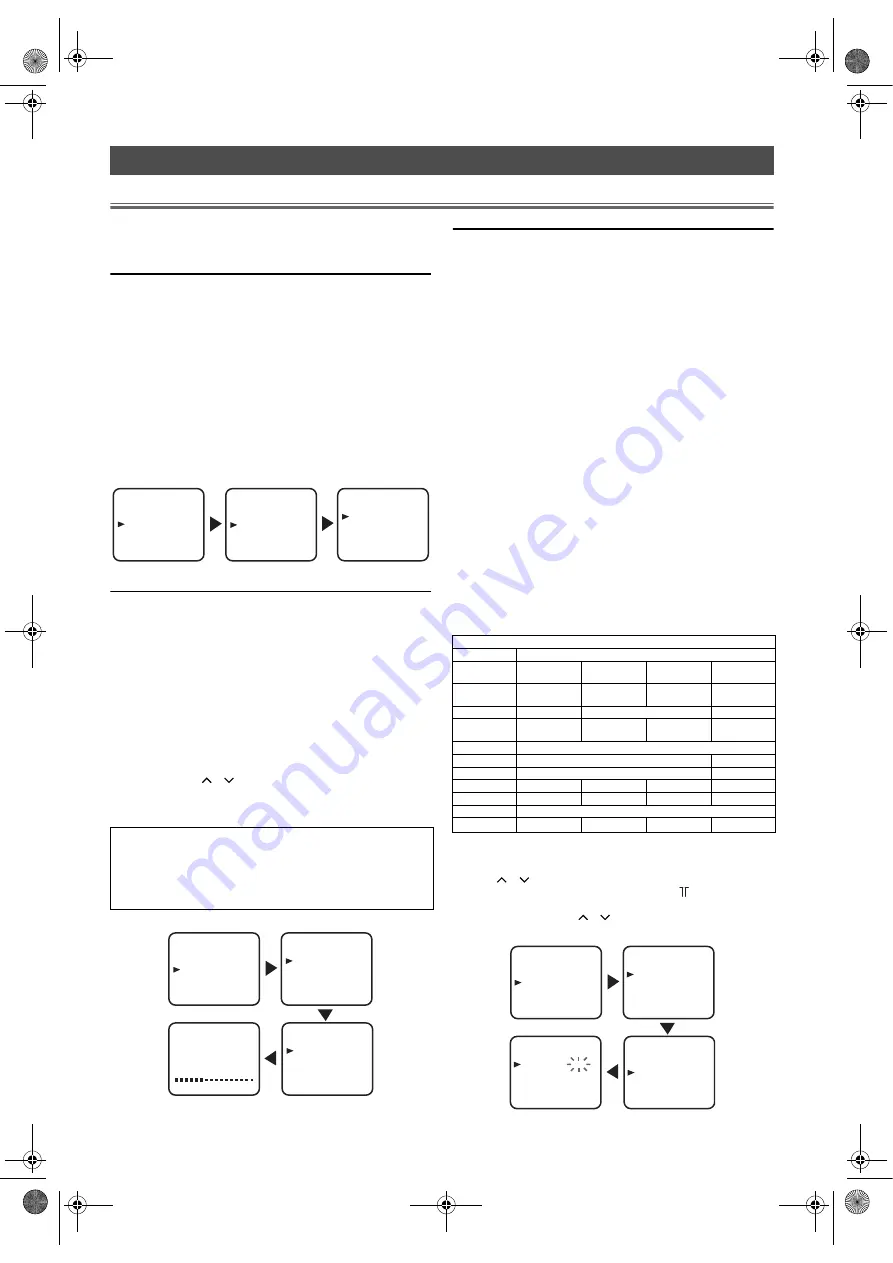
Language Selection

If you want to change the language of the on-screen menu, follow the 
procedure below.

1)

Connect the power cord to a standard AC outlet.

Note: •

If some digits appear in the corner of the screen, press 

STANDBY-ON

 without unplugging the power cord.

2)

Press 

STANDBY-ON

 to turn on the TV.

3)

Press 

SETUP

 so that the menu display appears on the TV screen.

4)

Press 

Cursor


K


/


L

 to point to “INITIAL”, then press 

ENTER

.

5)

Press 

Cursor


K


/


L

 to point to “LANGUAGE”, then press 

ENTER

.

6)

Press 

Cursor


K


/


L

 repeatedly to select your desired language, 

then press 

ENTER

 .

• The selected language will be indicated by yellow.

7)

Press 

SETUP

 to exit.

Automatic Channel Presetting

You can programme the tuner to scan only the channels that you can 
receive in your area.

1)

Press 

STANDBY-ON

 to turn on the TV.

2)

Press 

SETUP

 so that the menu display appears on the TV screen.

3)

Press 

Cursor


K


/


L

 to point to “INITIAL”, then press 

ENTER

 .

4)

Press 

Cursor


K


/


L

 to point to “CH TUNING”, then press 

ENTER

 .

• On DVD mode, this function is not available.

5)

Press 

Cursor


K


/


L

 to point to “AUTO”, then press 

ENTER

.

• The tuner scans and memorises all the active channels in your area. 

When “AUTO” is completed, the lowest memorised channel 
reappears on the screen, and you can use 

PROG. 

+/-

 on the 

control panel or 

 / 

 (prog.)

 on the remote control for the 

memorised channels.

• If you press 

SETUP

 during the scanning, this operation will stop 

and the lowest memorised channel will appear on the TV screen.

Manual Channel Presetting

You can preset a channel manually and individually.

1)

Follow the steps 

1)

 to 

4)

 in the “Automatic Channel Presetting”.

2)

Press 

Cursor


K


/


L

 to point to “MANUAL”, then press 

ENTER

 . 

3)

(Only for LDD-C2006)
Press 

Cursor


K


/


L

 to point to “SYSTEM”, then press 

ENTER


to display the desired system.

4)

Press 

Cursor


K


/


L

 to point to “POSITION”, then press 

ENTER

 .

5)

Press 

the Number buttons

 or 

Cursor


K


/


L

 to select your 

desired position number, then press 

ENTER

 .

• You can select position number 01-99.
• If “ON” appears on the right side of “SKIP”, press 

Cursor


K


/


L

 to point to “SKIP”. Then, press 

ENTER

 to 

select “OFF”.

• If you want to remove scrambled signals, press 

Cursor


K


/


L

 repeatedly to point to “DECODER”. Then, 

press 

ENTER 

to select “ON”.

6)

Press 

Cursor


K


/


L

 to point to “CHANNEL”, then press 

ENTER

 .

7)

Press 

Cursor


K


/


L

 to start scanning.

• The tuner will begin to search up or down automatically. 

When a channel is found, the unit will stop searching and the 
picture will appear on the TV screen.

• You can select desired channel number by using 

the Number buttons

. You must refer to the following 

Channel Plan table and press three digits to select the channel 
number. 
(To select channel 24, press “

0

” button first and then press “

2

” 

and “

4

”.)

• If this is the channel you want, press 

ENTER

.

This unit can receive Hyper and Oscar frequency bands.

8)

Press 

SETUP

 to exit.

Note: •

To confirm that a channel has been added, press 

 / 

 (prog.)

.

If you insert the RF cable plug into the   Aerial input jack 
after manual channel presetting, a picture will be distorted. 
In this case, press 

 / 

 (prog.)

 to select the same channel 

again.

TV OPERATION

(Only for LDD-B2006)

Sorting of TV channels from P01 to P05 will be performed 
automatically as follows.

P01 : BBC1

P04 : CH4

P02 : BBC2

P05 : CH5

P03 : ITV

SETUP

BACK LIGHT [BRIGHT]
INITIAL

LANGUAGE

DEUTSCH

ENGLISH
ESPAÑOL

FRANÇAIS
ITALIANO

NEDERLANDS

SVENSKA

POLSKI

INITIAL

CH TUNING
LANGUAGE

SETUP

BACK LIGHT [BRIGHT]
INITIAL

INITIAL

CH TUNING
LANGUAGE

CH TUNING

AUTO
MANUAL
MOVE

AUTO

START                FINISH

Channel Plan

TV Channel

CH 

Indication

PAL I

PAL B/G

SECAM D/K

SECAM L

01–10

IRA–

IRJ,GAP

F1–F10

02–12

E2–E12

13–20

A-H

(only ITALY)

21–69

E21–E69

74–78

X, Y, Z, Z+1, Z+2

80–99, 100

S1–S20, GAP

71–86

B–Q

90–106

S4–S20

121–141

S21–S41

142–153

R1–R12

SETUP

BACK LIGHT [BRIGHT]
INITIAL

INITIAL

CH TUNING
LANGUAGE

CH TUNING

AUTO
MANUAL
MOVE

MANUAL

POSITION
CHANNEL
DECODER
SKIP

  P55
  055
[OFF]
[OFF]

L4670EA(EN).fm  Page 8  Tuesday, May 15, 2007  5:36 PM

Summary of Contents for LDD-A2006

Page 1: ...ecifications 30 Pin Connection 31 Declaration of Conformity Back cover TV OPERATION DVD OPERATION Supplied Accessories Remote control Two R6 AA batteries Owner s Manual Quick Setup Guide Only for LDD...

Page 2: ...refore it can break when the product is dropped or applied with impact Be careful not to be injured by broken glass pieces in case the LCD panel breaks The LCD panel is a very high technology product...

Page 3: ...VIDEO Input allows you to get better picture detail and clarity for the playback of S VHS VCR tapes Video Discs Satellite System Video Game or Video Cameras Dolby Digital Sound This unit can handle D...

Page 4: ...g menus 19 PICTURE Press to adjust the picture 20 SOUND SELECT Press to change sound modes 21 ENTER Press to determine the setting mode from the menu on the TV screen Press to select or adjust from a...

Page 5: ...ck of an external devices or set top box 40 S VIDEO input jack AV IN2 Connect to the S video output jack of a video camera or VCR using the S video cable not supplied Note The S VIDEO jack is given pr...

Page 6: ...ls of TV can be delivered The video and audio signals of DVD and external devices cannot be delivered Connecting Connecting the Cable 1 Insert the RF cable plug into the Aerial input jack at the back...

Page 7: ...igitalTM allows you to enjoy the surround sound while producing the effect of being in a movie theatre or a concert hall If output is Dolby Digital encoded audio connect to a Dolby Digital decoder and...

Page 8: ...ystem 4 Press Cursor K L to point to POSITION then press ENTER 5 Press the Number buttons or Cursor K L to select your desired position number then press ENTER You can select position number 01 99 If...

Page 9: ...cted 1 Follow the steps 1 to 4 in the Automatic Channel Presetting 2 Press Cursor K L repeatedly to point to MOVE then press ENTER 3 Press Cursor K L repeatedly to select the position number you want...

Page 10: ...vices If the picture on the TV screen is black and white select the system manually by using COLOR SYSTEM Each time you press COLOR SYSTEM TV screen will change as follows LDD A2006 LDD B2006 LDD D200...

Page 11: ...ection 1 Press SETUP so that the menu display appears on the TV screen 2 Press Cursor K L to point to BACK LIGHT 3 Press ENTER to select the mode you wish 4 When done press SETUP to exit Status Displa...

Page 12: ...12 EN L4670EA EN fm Page 12 Tuesday May 15 2007 5 36 PM...

Page 13: ...or put stickers onto the disc These may be damage the disc and the unit may not read it correctly Unplayable Discs NEVER play back the following discs Otherwise malfunction may result DVD RAM CD i Pho...

Page 14: ...ound This is not a malfunction Press PLAY B or EJECT A on the control panel or insert a disc to switch TV mode to DVD mode Press prog or INPUT SELECT to switch DVD mode to TV mode Depending on the TV...

Page 15: ...n be recognised Up to 8 hierarchies can be recognised The name of group and track can be displayed in up to 25 characters Unrecognizable characters will be replaced with asterisks The ninth and deeper...

Page 16: ...odak Picture CDs The Picture CD is a service to convert photographs taken by a conventional film camera into digital data and write the data on a CD You can enjoy picture images on the TV set by playi...

Page 17: ...gital format x1 3 and x0 8 Rapid Play with Voice plays back in slightly faster slower speed while keeping the sound quality as in the normal playback 1 During playback press MODE repeatedly until SPEE...

Page 18: ...de the code will be displayed every time you change the audio language setting If you choose any other languages will be displayed instead Refer to page 26 For discs with DivX files the screen display...

Page 19: ...e digit track press 0 first then the number of the track e g for track 3 press 0 3 For the disc with more than 100 tracks to play a single or a double digit track press 0 first then the number of the...

Page 20: ...below every time you press the button 3 Press BACK to exit the menu Note Repeat Chapter Title is not available with some scenes Repeat playback does not function during A B Repeat playback The Repeat...

Page 21: ...ng of the current track Press STOP C twice and PLAY B next so that playback restarts from the first track in the original order However your programmed playback can be restarted when you follow the ab...

Page 22: ...l Tracks repeat A B A B repeat 2 Press DISPLAY again Current track number total tracks elapsed time and remaining time of the current disc and current playback status will be displayed For Audio CDs w...

Page 23: ...splay Setting You can change the display functions 1 In Stop mode press SETUP twice 2 Press Cursor s B to select CUSTOM then press ENTER CUSTOM mode screen will appear 3 Press Cursor s B to select DIS...

Page 24: ...is required to change the PARENTAL LEVEL This feature prevents your children from viewing inappropriate materials 1 In Stop mode press SETUP twice 2 Press Cursor s B to select CUSTOM then press ENTER...

Page 25: ...ww divx com vod for more details Note You cannot play back the DivX VOD files obtained with different registration codes on this unit You cannot play back the DivX VOD files of which rental period has...

Page 26: ...alay 5965 Malayalam 5958 Maltese 5966 Maori 5955 Marathi 5964 Moldavian 5961 Mongolian 5960 Nauru 6047 Nepali 6051 Norwegian NOR 6061 O R Occitan 6149 Oriya 6164 Oromo Afan 6159 Panjabi 6247 Pashto Pu...

Page 27: ...re Adjust COLOUR control Poor reception on some channels Try a new channel if OK then possible station trouble Is antenna connected to terminal on the back of the set If outside antenna is being used...

Page 28: ...D Panel D V D Completely distorted picture or black white picture with DVD Make sure the disc is compatible with this unit No audio at digital output Check the digital connections Refer to page 7 Chec...

Page 29: ...the Disc Lens If the player still does not perform properly when it is operated while referring to the relevant sections and to Troubleshooting Guide in this Owner s Manual the laser optical pickup un...

Page 30: ...y ITALY 21 69 E21 E69 74 78 X Y Z Z 1 Z 2 80 99 100 S1 S20 GAP 71 86 B Q 90 106 S4 S20 121 141 S21 S41 142 153 R1 R12 Terminals Coaxial digital audio output One pin jack 500 mVpp 75 ohm S Video input...

Page 31: ...V DC RGB Mode L 0 0 4 V CVBS Mode 7 RGB Input Blue 0 7 Vp p 75 17 Video Output Signal Ground 8 Function Select Switching Control L 0 0 2 0 V DC Power Off TV Mode M 4 5 7 0 V DC Wide Screen Mode 16 9...

Page 32: ...EEC Low Voltage Directive 73 23 EEC CE Marking 93 68 EEC We declare that the following product LCD TV DVD Model LDD A2006 LDD B2006 LDD C2006 LDD D2006 Trade Name Funai is in compliance with following...

Reviews: