FUNAI LCD-A2706 Owner'S Manual Download Page 4

4

EN

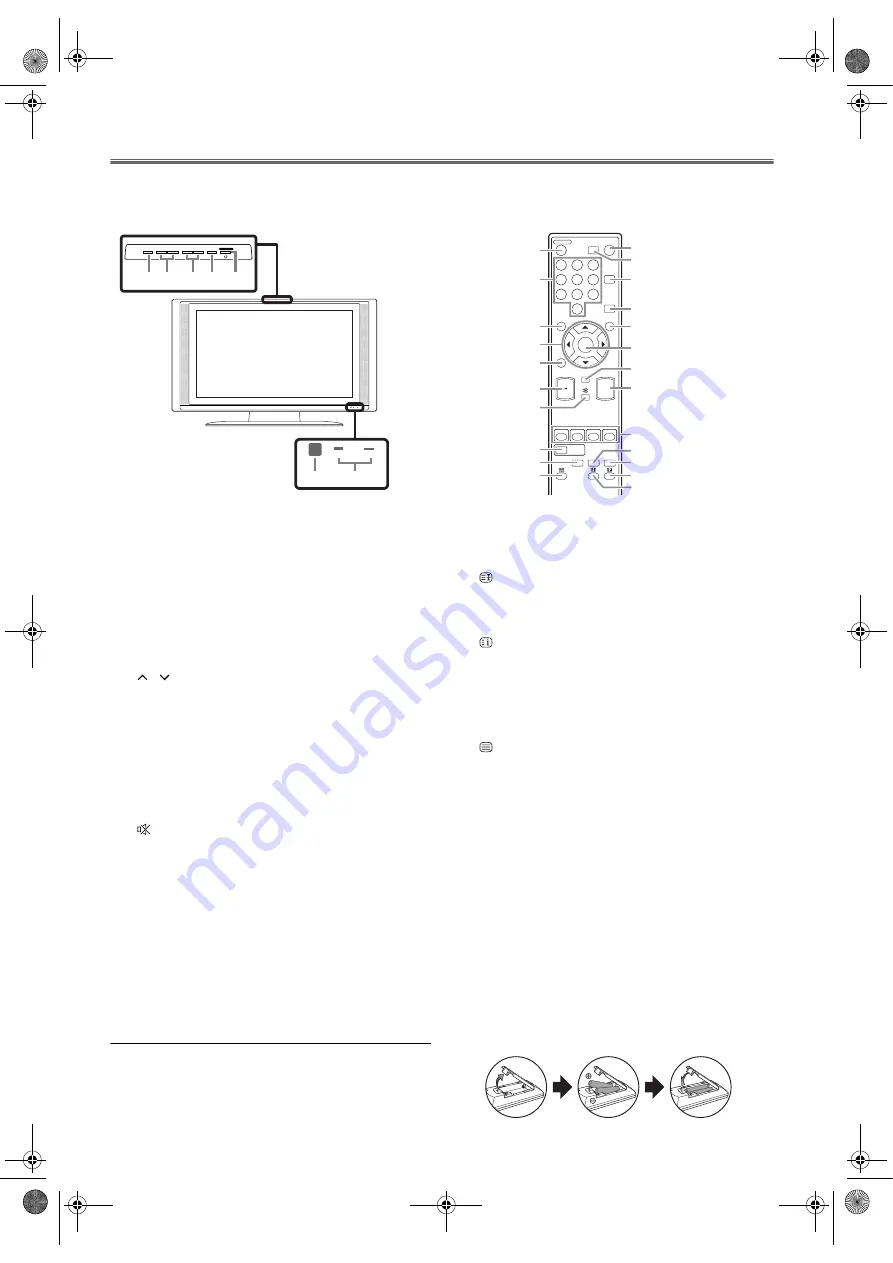
OPERATING CONTROLS AND FUNCTIONS

This manual describes the LCD-A2706, LCD-A2726, LCD-A3206, LCD-A3207, LCD-B2706, LCD-B2726, LCD-B3206, LCD-C2706, 

LCD-C2707, LCD-C2717, LCD-C2726, LCD-C3206, LCD-C3207, LCD-D2706, LCD-D2707, LCD-D2717, LCD-D2726, LCD-D3206 

and LCD-D3207. These models are different in size and shape, but operate identically. The LCD-A3206 / LCD-A3207 / LCD-B3206 / 

LCD-C3206 / LCD-C3207 / LCD-D3206 / LCD-D3207 is illustrated.

CONTROL PANEL

REMOTE CONTROL

1.

SETUP

Press to display the menu on the TV screen.

2.

VOL. 

+/-

 (control panel) / 

+/-

 (vol.) (remote control)

Press to control the volume level. 

VOL. 

+

 (control panel)

Same function as 

ENTER


(remote control)

.

VOL. 

-

 (control panel)

Same function as 

BACK


(remote control)

.

3.

PROG. 

+/-

 (control panel) 

Press to select item you want to adjust in the picture control 

mode.

Press to select the setting mode from the menu on the TV 

screen.

Press to go to the next page or the previous page of Teletext.

PROG. 

+/-

 (control panel) /

 / 

 (prog.) (remote control)

Press to select memorised channel.

4.

INPUT SELECT

Press to select TV or external input mode. 

5.

STANDBY-ON

Press to turn the TV ON or OFF (standby).

6.

STANDBY/POWER indicator

Lights up in green when power is on.
Lights up in red when power is in standby mode.

7.

0-9 number buttons

Press two digits to directly access the desired channel. 

Remember to press “

0

” before a single digit channel.

8.

 (mute)

Press to mute the sound portion of the TV programme 

(Volume level display turns LIGHT RED from LIGHT 

WHITE). Press this button again or press 

VOL. 

+/-

 on the 

control panel or 

+/-


(vol.)

 on the remote control to restore 

sound.

9.

PROG RETURN

Press to go back to the previously viewed channel. For 

example, pressing this button once will change channel 

display from P03 (present channel) to P10 (previously 

viewed channel) and pressing it a second time will return 

from P10 to P03.

10.

SOUND SELECT

Press to change sound modes.

11.

SLEEP

Press to set the Sleep Timer.

12.

DISPLAY

Press to display the channel number or input source on the 
screen. If you press it again, the display will disappear.

13.

COLOR SYSTEM 

Press to select the input signal from the tuner or external 
devices.

14.

 (hold)

Press to hold the current page of Teletext.

15.

RED/GREEN/YELLOW/CYAN

Press to directly select the page numbers of Teletext shown 
at the bottom of the TV screen.

16.

 (index)

Press to go back to the start page of Teletext.

17.

REVEAL

Press to call up the hidden information of Teletext.

18.

SUB CODE

Press to select subpages of Teletext.

19.

EXPAND

Press to enlarge fonts of Teletext.

20.

 (text)

Press to switch Teletext on or off, or transparent mode.

21.

Cursor 

K

 / 

L

 / 

s

 / 

B


buttons

Press to select the setting mode from the menu on the TV 
screen.
Press to select item you want to adjust in the picture control 
mode.
Press to go to the next page or the previous page of Teletext.

22.

ENTER

Press to determine the setting mode from the menu on the 
TV screen.
Press to select or adjust from a particular menu 
(for example: Language Selection, Channel Presetting, or 
Picture Adjustment).

23.

BACK

Press to return to the previously displayed menu.

24.

SCREEN MODE

Press to select aspect ratios available for the screen.

25.

Infrared sensor window

Receives the infrared rays transmitted from the remote 
control.

Installing the Batteries

1)

Open the battery compartment cover.

2)

Insert “R6” penlight batteries into battery compartment in the 
direction as indicated by the polarity (

+/

–) markings. Batteries 

installed with incorrect polarity may damage the remote unit.

3)

Close the cover.

4)

Push the cover on its top side until it clicks in order to fit the 

cover completely to the compartment.

STANDBY

POWER

6

25

SETUP

VOL.

PROG.

INPUT SELECT

1 2

3 4 5

STANDBY

POWER

+

+

STANDBY-ON

SLEEP

SCREEN

MODE

SOUND

SELECT

INPUT

SELECT

DISPLAY

SETUP

BACK

PROG RETURN

RED

REVEAL

COLOR
SYSTEM

EXPAND SUB CODE

GREEN

YELLOW

ENTER

+

<

<

-

CYAN

STANDBY-ON

1

2

3

4

5

6

7

8

9

0

4

5

1

21

2

13

20

17

8

7

11

24

10

22

3

18

19

14
16

15

9

12

23

L5950EA(EN).fm  Page 4  Friday, March 30, 2007  2:46 PM

Summary of Contents for LCD-A2706

Page 1: ...f there is no signal input from the antenna terminal and no user operation for 15 minutes the TV will turn itself off automatically HDMI Input COMPONENT Input S VIDEO Input Supplied Accessories Remote control Two R6 AA batteries Owner s Manual Model Serial Number To aid reporting in case of loss or theft please record the TV s model and serial numbers in the space provided The numbers are located ...

Page 2: ...3207 LCD B2706 LCD B2726 LCD B3206 LCD C2706 LCD C2707 LCD C2717 LCD C2726 LCD C3206 LCD C3207 LCD D2706 LCD D2707 LCD D2717 LCD D2726 LCD D3206 LCD D3207 Trade Name Funai is in compliance with following Regulations EN55013 2001 A1 2003 EN55020 2002 A1 2003 EN61000 3 2 2000 EN61000 3 3 1995 A1 2001 EN60065 2002 EN60825 1 1994 A1 1996 A2 2001 Help Phone Number in the UK only for LCD B2706 LCD B3206...

Page 3: ...se cover must be refitted If the fuse cover is lost or damaged the plug must not be used until a replacement available from the appliance manufacturer is obtained It is important that the colour of the replacement fuse cover corresponds with the rating marking on the base of the plug If the plug has to be changed because it is not suitable for your socket or becomes damaged it should be cut off an...

Page 4: ...to set the Sleep Timer 12 DISPLAY Press to display the channel number or input source on the screen If you press it again the display will disappear 13 COLOR SYSTEM Press to select the input signal from the tuner or external devices 14 hold Press to hold the current page of Teletext 15 RED GREEN YELLOW CYAN Press to directly select the page numbers of Teletext shown at the bottom of the TV screen ...

Page 5: ...evices 30 VIDEO input jack VIDEO Connect to the video output jack of external devices 31 AUDIO L R input jacks VIDEO Connect to the left right audio output jacks of external devices Note The AUDIO L input jack is for mono input The sound is heard from both speakers Use this jack for monaural audio equipment to be hooked up 32 Aerial input jack Connect to an antenna or cable system AUDIO HDMI IN IN...

Page 6: ... you connect or the HDMI audio setting Audio sometimes makes no sound if you select Bitstream etc When your video device has the DVI output jack 1 Connect the DVI output jack of your video device to the HDMI input jack of this unit Use the HDMI cable commercially available 2 Connect the audio output jacks of your video device to the HDMI AUDIO input jacks of the unit Note This TV accepts 480i 480p...

Page 7: ...e 2 Connect the audio output jacks of your device to the VIDEO AUDIO L R input jacks of the unit Note If you connect to the S VIDEO jack and the VIDEO jack at the same time S video connection will have priority ANALOGUE AUDIO VIDEO CONNECTION This is the general method to connect this TV to video devices with the video and audio output jacks such as VCR Camcorder Video Game etc 1 Connect the video...

Page 8: ... turn on the TV 2 Press SETUP so that the menu display appears on the TV screen 3 Press Cursor K L to point to INITIAL then press ENTER 4 Press Cursor K L to point to CHANNEL TUNING then press ENTER 5 Press Cursor K L to point to AUTO then press ENTER The tuner scans and memorises all the active channels in your area When AUTO TUNING is completed the lowest memorised channel reappears on the scree...

Page 9: ...on Some TV channels transmit encoded TV signals which can only be viewed with a purchased or hired decoder You can connect such a decoder to SCART1 jack of this unit The following function will automatically activate the connected decoder for the desired TV channel 1 Press STANDBY ON to turn on the TV 2 Press prog or the Number buttons to select the TV channel which you would like to allocate the ...

Page 10: ...the Sound Mode You can select each mode by pressing SOUND SELECT on the remote control Each mode is indicated on the TV screen as following During reception of stereo broadcasts During reception of bilingual broadcasts SETUP BRIGHT AUTO BACK BACK SELECT OK ENTER PICTURE BACK LIGHT HDMI AUDIO INITIAL INITIAL CHANNEL TUNING LANGUAGE BACK BACK BACK SELECT OK ENTER CHANNEL BACK BACK SELECT OK ENTER AU...

Page 11: ...will change as follows LCD A2706 LCD A3206 LCD A3207 LCD B2706 LCD B3206 LCD D2706 LCD D2707 LCD D2717 LCD D3206 LCD D3207 LCD A2726 LCD B2726 LCD D2726 for tuner input TV AUTO or PAL for external input SCART S VIDEO VIDEO AUTO PAL NTSC3 58 or NTSC4 43 LCD C2706 LCD C2707 LCD C2717 LCD C2726 LCD C3206 LCD C3207 for tuner input TV AUTO SECAM or PAL for external input SCART S VIDEO VIDEO AUTO SECAM ...

Page 12: ... if you connected to digital device with HDMI jack for digital audio input signal Select ANALOGUE if you connected to analogue devices with analogue jacks for analogue audio input signal Back Light Selection 1 Press SETUP so that the menu display appears on the TV screen 2 Press Cursor K L to point to BACK LIGHT then press ENTER 3 Press Cursor K L to select the desired mode BRIGHT NORMAL DARK then...

Page 13: ... with horizontal elongation necessary to fill the screen CINEMA will display a 4 3 picture without changing its horizontal to vertical ratio to fill the screen A little bit of the top and bottom edges of the image will be cut off WIDE will expand a 4 3 picture to entire screen with non linearity When the video signal is sending HD High Definition video signal FULL will display a picture at 16 9 si...

Page 14: ...rself There are no user serviceable parts inside Turn the unit off unplug the power cord and take the unit to a Service Centre for servicing Cabinet Cleaning Wipe the front panel and other exterior surfaces of the TV with a soft cloth immersed in lukewarm water and wrung dry Never use a solvent or alcohol Do not spray insecticide liquid near the TV Such chemicals may cause damage and discoloration...

Page 15: ...ous point on Screen POSSIBLE REMEDY Try a new channel if OK then possible station trouble Is TV plugged in Power at outlet Is TV s STANDBY ON on Is antenna connected to terminal on the back of the set If outside antenna is being used check for broken wire Check for local interference Turn off with STANDBY ON and then turn it on after about a minute Adjust COLOUR control Adjust CONTRAST BRIGHTNESS ...

Page 16: ...V Channel CH Indication PAL I PAL B G SECAM D K SECAM L 01 10 IRA IRJ GAP F1 F10 02 12 E2 E12 13 20 A H only ITALY 21 69 E21 E69 74 78 X Y Z Z 1 Z 2 80 99 100 S1 S20 GAP 71 86 B Q 90 106 S4 S20 121 141 S21 S41 142 153 R1 R12 Terminals S Video input Mini DIN 4 pin jack Video input RCA connector x 1 Audio input RCA connector x 2 AUDIO VIDEO 21 pin scart jack with RGB Input x 2 Component Audio Video ...

Reviews: