– 8 –
EN
9F21
OPERATING CONTROLS AND FUNCTIONS
OPEN/CLOSE
PAUSE
SEARCH
POWER
SKIP
PLAY
DVD/CD PLAYER
STOP
SEARCH
2
11
12
3
8
7
4
5
1
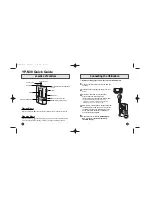
FRONT PANEL
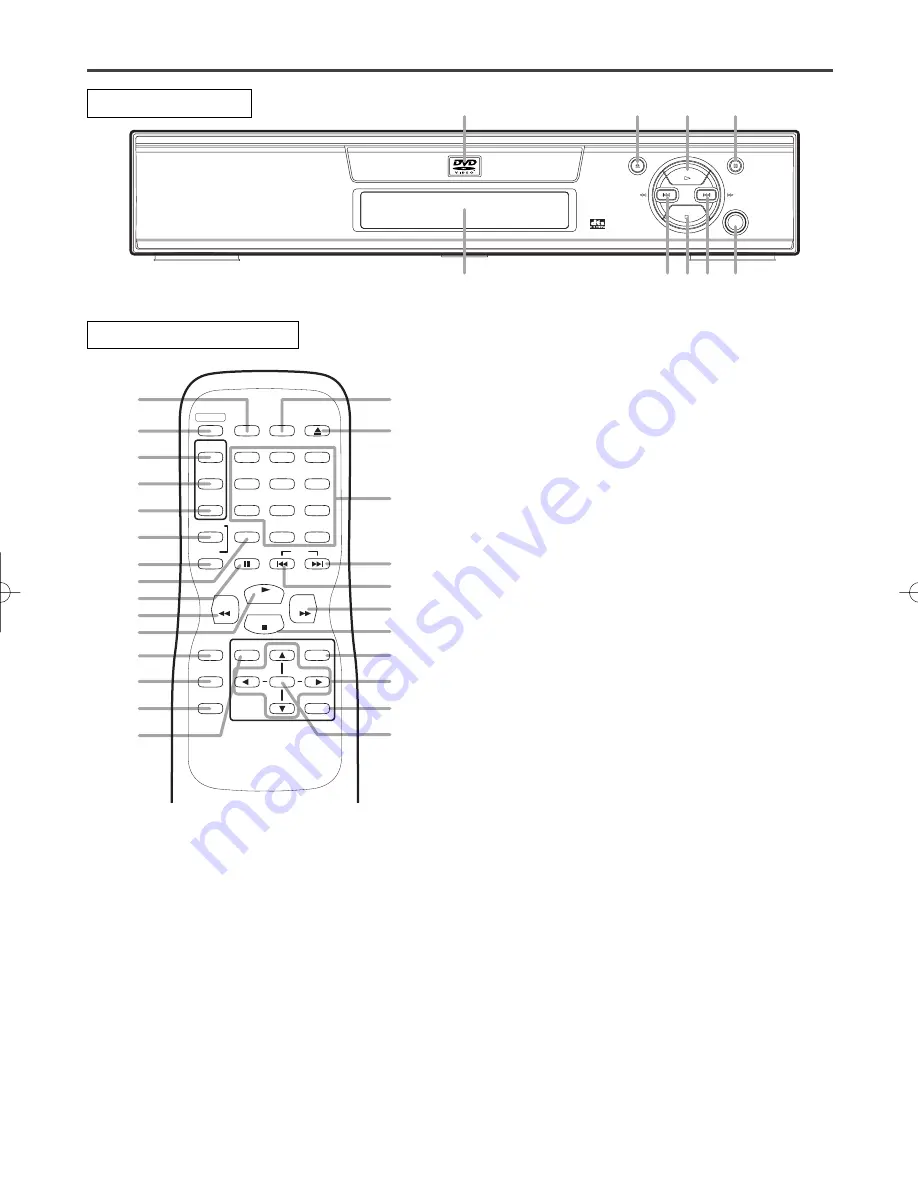
REMOTE CONTROL
13
5
14
15
16
17
18
19
3
20
2
30
21
22
23
26
27
25
24
28
4
10
9
29
11
6
RETURN
ZOOM
MODE
MENU
SKIP
PAUSE
A-B
REPEAT
ANGLE
AUDIO
SUB
TITLE
CLEAR
TITLE
STOP
PLAY
FWD
REV
SETUP
ENTER
OPEN/
CLOSE
SEARCH
MODE
DISPLAY
1
2
3
4
5
6
7
8
9
0
+10
POWER
1.
Display, Remote Sensor Window
2.
PLAY Button [page 13]
Starts playback of the disc contents.
3.
PAUSE Button [page 14]
Pauses the current disc operation.
4.
STOP Button [page 14]
Stops operation of the disc.
5.
POWER Button [page 13]
Press to turn the power on and off.
6.
SEARCH MODE Button [pages 15,16]
Press to locate a desired point.
7.
SKIP UP/FWD Button (main unit)
Plays back from the beginning of the next chapter or
track. Hold down to fast forward playback.
8.
SKIP DOWN/REV Button (main unit)
Plays back from the beginning of the current chapter
or track. Hold down to fast reverse playback.
9.
SKIP UP Button (remote control)
Plays back from the beginning of the chapter or track.
10.
SKIP DOWN Button (remote control)
Plays back from the beginning of the current chapter
or track.
11.
OPEN/CLOSE Button [page 13]
Press to insert discs into or remove them from the tray.
12.
Disc loading tray
13.
DISPLAY Button [page 20]
Displays the current status on the TV screen for
checking purposes.
14.
AUDIO Button [page 18]
Press to select a desired audio language or sound mode.
15.
SUBTITLE Button [page 19]
Press to select a desired subtitle language.
16.
ANGLE Button [page 19]
Press to change the camera angle to see the sequence
being played back from a different angle.
17.
REPEAT Button [page 16]
Repeats playback of the current disc, title, chapter or
track.
18.
A-B REPEAT Button [page 17]
Repeats playback of a selected section.
19.
CLEAR Button [pages 17]
Resets a setting.
20.
REV Button
Fast reverse playback to a desired point.
21.
SETUP Button [page 21]
Press to enter the setup mode or to change setup items.
22.
MODE Button [pages 16,17]
Activates program playback or random playback mode.
23.
TITLE Button [page 14]
Displays the title menu.
24.
ENTER Button
Press to accept a setting.
25.
RETURN Button
Returns to the previous operation.
26.
Arrow Buttons
Use when making settings while watching the
display on a TV screen.
27.
MENU Button [page 13]
Displays the DVD menus.
28.
FWD Button [page 15]
Fast forwards playback to a desired point.
29.
Numeric Buttons [page 16]
30.
ZOOM Button
Enlarges part of a DVD-reproduced image.
E5505UD 01.3.30 1:12 PM Page 8