background image

EN

10

PREPARATION

EN

Connection to a TV

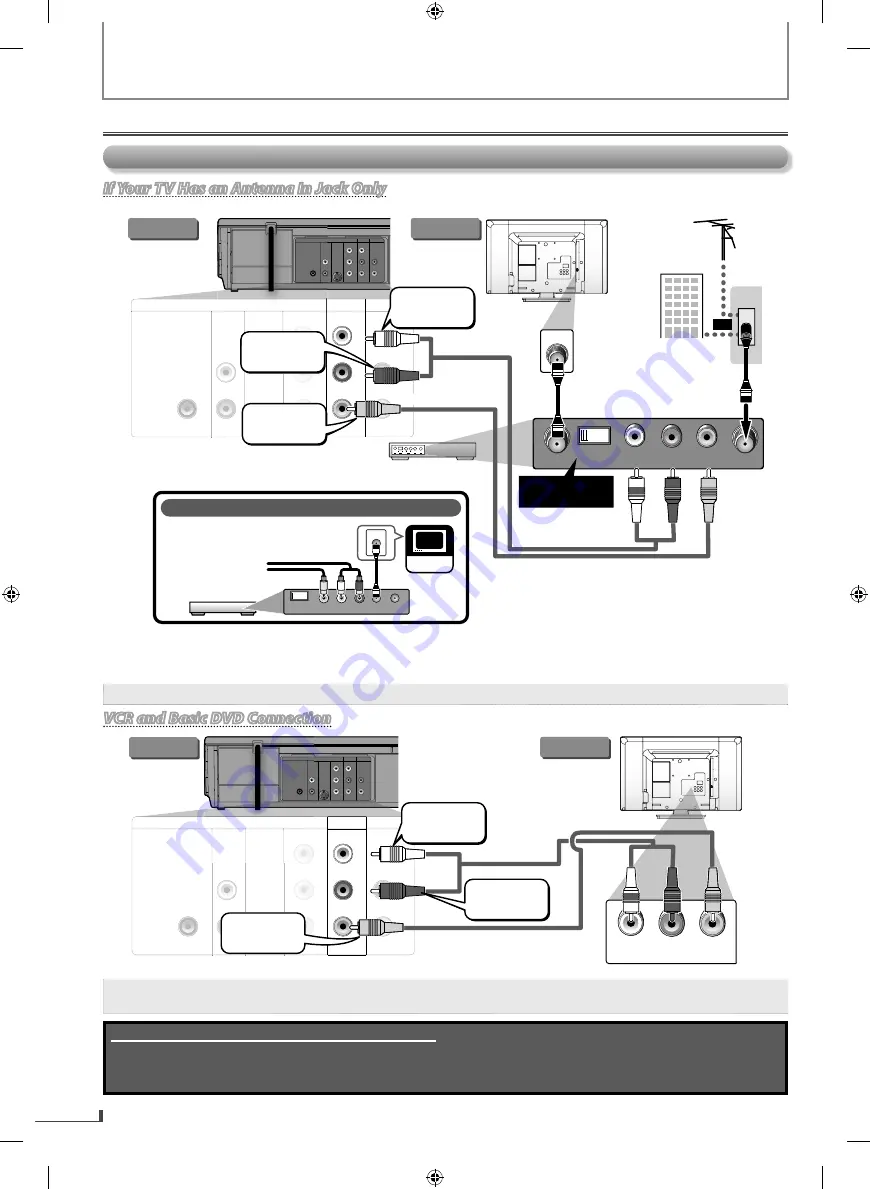
If Your TV Has an Antenna In Jack Only

y

y

If Your TV Has an Antenna In Jack Only

Before connecting, make sure the Power on the devices are turned Off.

rear of your RF 

m

odulator 

(not supplied)

DIGITAL

AUDIO OUT

COAXIAL

A

D

VCR

DVD/VCR

AUDIO IN

VIDEO IN

AUDIO OUT

VIDEO OUT

L

L

R

R

B

C

R

AUDIO IN

ANT. INv

TO TV

R

L

CHANNEL

4

3

VIDEO IN

Set channel 

3 or 4

ANT. IN

(White)

(Red)

To audio L

 input jack

(White)

(Red)

(Red)

To audio R

 input jack

(Yellow)

(Yellow)

(Yellow)

To video

 input jack

DIGITAL

AUDIO OUT

COAXIAL

AUDIO

OUT

DVD

VCR

DVD/VCR

S-VIDEO

OUT

COMPONENT

VIDEO OUT

AUDIO IN

VIDEO IN

AUDIO OUT

VIDEO OUT

L

L

Y

R

R

C

B

C

R

RF coaxial

cable

VHF / UHF

antenna

cable TV co

m

pany

or

(White)

(White)

(Red)

(Red)

(Red)

(Red)

(White)

(Red)

(Yellow)

(Yellow)

(Yellow)

(Yellow)

(Yellow)

(Yellow)

(Yellow)

(Yellow)

To audio L

To audio L

 input jack

 input jack

To audio L

 input jack

To audio R

To audio R

 input jack

 input jack

To audio R

 input jack

To video

To video

 input jack

 input jack

To video

 input jack

RF coaxial cable

RF 

m

odulator (not supplied)

(White)

(White)

(White)

(Red)

(Red)

(Red)

this unit

TV

If your TV only has an Antenna Input
(no A / V inputs), you will need an 
RF modulator (NOT INCLUDED) to 
connect this player 
to the TV.

RF modulator

AUDIO IN

R

L

VIDEO IN

CHANNEL

4

3

TO TV

TV

ANT. IN

ANT. IN

No Antenna (RF) Output!

AUDIO

OUT

DVD

S-VIDEO

OUT

COMPONENT

VIDEO OUT

DIGITAL

AUDIO OUT

COAXIAL

AUDIO

OUT

DVD

To audio R 

output jack

To audio L 

output jack

To video 

output jack

RCA

audio cable

A

RCA

RCA

CA video cable

i

video cable

After making the connection illustrated above;

1) Set your RF 

m

odulator’s channel 3/4 switch to either 3 or 4, whichever the TV channel is least used in your area.

2) Turn on your TV and choose the sa

m

e channel as you set the RF 

m

odulator’s channel 3/4 switch to.

Note:

•  The quality of picture may become poor if this unit is connected to an RF modulator.

VCR and Basic DVD Connection

VCR and Basic DVD Connection

AUDIO IN

R

L

VIDEO

IN

DIGITAL

AUDIO OUT

COAXIAL

VCR

DVD/VCR

NT

T

AUDIO IN

VIDEO IN

AUDIO OUT

VIDEO OUT

L

L

Y

R

R

C

B

C

R

(White)

(White)

(White)

(Red)

(Red)

(Red)

To audio L

To audio L

 input jack

 input jack

To audio L

 input jack

DIGITAL

AUDIO OUT

COAXIAL

AUDIO

OUT

DVD

VCR

DVD/VCR

S-VIDEO

OUT

COMPONENT

VIDEO OUT

AUDIO IN

VIDEO IN

AUDIO OUT

VIDEO OUT

L

L

Y

R

R

C

B

C

R

(White)

(White)

(Red)

(Red)

(Red)

(Red)

(White)

(Red)

To audio R

To audio R

 input jack

 input jack

To audio R

 input jack

(Yellow)

(Yellow)

(Yellow)

(Yellow)

(Yellow)

(Yellow)

(Yellow)

(Yellow)

To video

To video

 input jack

 input jack

To video

 input jack

(White)

(Red)

(Red)

(Yellow)

(Yellow)

(Yellow)

To audio L

 input jack

To audio R

 input jack

To video

 input jack

(White)

(Red)

this unit

TV

To audio R 

output jack

To audio L 

output jack

AUDIO

OUT

DVD

S-VIDEO

OUT

COMPONEN

VIDEO OUT

DIGITAL

AUDIO OUT

COAXIAL

AUDI

OUT

DVD

To video 

output jack

RCA video cable

RCA audio cable

RCA video cable 

Note:

• Connect this unit directly to your TV. If an RCA audio/video cables are connected to a VCR, pictures may be

distorted due to the copy protection system.

Supplied cables used in this connection are as follows:

RCA audio cable (L/R) 

x

 1

RCA video cable 

x

 1

Please purchase the rest of the necessar

y

 cables at 

y

our local store.

Connections

Summary of Contents for DV220FX4

Page 1: ...TIONS PREPARATION ADVANCED PLAYBACK BASIC OPERATIONS RECORDING OPTIONAL SETTINGS TROUBLESHOOTING INFORMATION 2013 Funai Electric Co Ltd DV220FX4 DV220FX4 A DVD Player VCR with Line in Recording Owner s Manual ...

Page 2: ...convenience receptacles and the point where they exit from the apparatus 11 Only use attachments accessories specified by the manufacturer 12 Use only with the cart stand tripod bracket or table specified by the manufacturer or sold with the apparatus When a cart is used use caution when moving the cart apparatus combination to avoid injury from tip over 13 Unplug this apparatus during lightning s...

Page 3: ...Avoid a place with drastic temperature changes Install the unit in a horizontal and stable position Do not place anything directly on top or bottom of the unit Depending on your external devices noise or disturbance of the picture and or sound may be generated if the unit is placed too close to them In this case please ensure enough space between the external devices and the unit Depending on the ...

Page 4: ...18 Black Level Setting 18 Subtitle Language and Audio Language 19 On Screen Display 19 RECORDING RECORDING Recording OTR One touch Timer Recording 20 Timer Recording 21 Note for Timer Recording OTR 21 Satellite Link k 22 Dubbing a Cassette Tape 22 OPTIONAL SETTINGS OPTIONAL SETTINGS Changing the DVD Settings in the setup menu 23 PARENTAL Setting 24 INITIALIZE 25 TROUBLESHOOTING TROUBLESHOOTING Tro...

Page 5: ...CD ROM for personal computers the discs with labels scratches stains blemishes etc HD DVD Blu ray disc Caution The sound may not be heard on the following disc super audio CD Note Only the sound recorded on the normal CD layer can be delivered The sound recorded on the high density super audio CD layer cannot be delivered Any other discs without compatibility indications Note Unfinalized discs can...

Page 6: ...ssette tape counter and L1 L2 Pulse para visualizar la hora actual el contador del casete y L1 o L2 7 VCR 7 VCR VCR VCR p 13 p 13 Press to activate VCR mode Pulse para activar el modo de VCR 8 E D p 15 DVD mode Press to search forward backward through a disc Pulse para buscar hacia adelante o hacia atrás en el disco Press D to begin slow forward playback in the pause mode DVD Pulse D para iniciar ...

Page 7: ...tte tape Pulse para comenzar la reproducción de un disco o casete 25 C p 14 DVD mode Press to stop disc playback Pulse para detener la reproducción del disco VCR mode Press to stop the playback recording of a cassette tape Pulse para detener la reproducción o grabación de un casete 26 G DVD p 15 Press to skip chapters titles DVD Pulse para saltar capítulos o títulos DVD Press to skip tracks CD Pul...

Page 8: ...here 13 AUDIO IN jack VCR k p 22 Connect an RCA monaural audio cable from the audio output jack of your camcorder and other such devices here 14 E VCR p 15 Press to rewind the cassette tape or to view the picture rapidly in reverse during playback rewind search 15 D VCR p 15 Press to rapidly advance the cassette tape or view the picture rapidly in forward during playback forward search 16 C A VCR ...

Page 9: ...R and DVD viewing You can enhance your DVD picture and sound quality with an S video cable component video cables or a digital audio coaxial cable Please purchase the necessary cables at your local store Refer to pages 11 12 Rear Panel DIGITAL AUDIO OUT COAXIAL AUDIO OUT DVD VCR DVD VCR S VIDEO OUT COMPONENT VIDEO OUT AUDIO IN VIDEO IN AUDIO OUT VIDEO OUT L L Y R R CB CR 3 5 4 6 7 8 L1 1 2 Install...

Page 10: ...utput jack To video output jack RCA audio cable A RCA RCA CA video cable i video cable After making the connection illustrated above 1 Set your RF modulator s channel 3 4 switch to either 3 or 4 whichever the TV channel is least used in your area 2 Turn on your TV and choose the same channel as you set the RF modulator s channel 3 4 switch to Note The quality of picture may become poor if this uni...

Page 11: ...k To audio L To audio L input jack input jack To audio L input jack DIGITAL AUDIO OUT COAXIAL AUDIO OUT DVD VCR DVD VCR S VIDEO OUT COMPONENT VIDEO OUT AUDIO IN VIDEO IN AUDIO OUT VIDEO OUT L L Y R R CB CR this unit TV AUDIO OUT DVD S VIDEO OUT COMPONE VIDEO OU DIGITAL AUDIO OUT COAXIAL AUDI OUT DVD RCA audio cable Basic Audio Connection To audio R output jack To audio L output jack and V I D E O ...

Page 12: ...T AUDIO IN VIDEO IN AUDIO OUT VIDEO OUT L L Y R R CB CR this unit or Dolby Digital decoder digital audio receiver DIGITAL AUDIO COAXIAL IN DIGITAL AUDIO COAXIAL IN DIGITAL AUDIO OUT COAXIAL OUT DVD VCR DVD VCR OUT NT T AUDIO IN VIDEO IN AUDIO OUT VIDEO OUT L L Y R R CB CR To coaxial input jack To coaxial input jack digital audio coaxial cable To coaxial output jack digital audi i it l dio ital aud...

Page 13: ...ting will be lost after a power failure or this unit has been unplugged for more than 30 seconds Turning On Unit for the First Time Press VCR first Please note most instructions in this manual refer to remote control use 1 Be sure your TV s input is set to VIDEO Name may vary with TV manufacturer See your TV manual for details 2 Press LANGUAGE SELECT menu appears 3 Use to select your on screen lan...

Page 14: ...a arriba Press DVD to switch to the DVD mode Pulse DVD para cambiar al modo de DVD 4 Press to start playback Pulse para comenzar la reproducción PLAY DISC IN DVD VCR AUDIO REC REC TIMER REC TRACKING SOURCE PLAY DISC IN AUDIO TRACKING DVD VCR SOURCE If the protection tab has removed playback will start automatically Depending on the disc playback will start automatically without pressing In case th...

Page 15: ...et STILL MODE to FIELD in DISPLAY menu if pictures in the pause mode are blurred page 23 For VCR to prevent damage to the cassette tape still mode will automatically stop after 5 minutes Slow Forward Playback DVD Video DVD Video DVD Video DVD Video DVD Video Press DVD first Press PAUSE F during playback then press g repeatedly to select the desired forward speed Using G on this unit Pressing and h...

Page 16: ... Angles Some DVD may contain scenes which have been shot simultaneously from the various angles You can change the camera angle if appears on the TV screen If the ANGLE ICON is set to OFF in OTHERS menu will not appear page 23 DVD Video DVD Video DVD Video DVD Video DVD Video Press DVD first 1 During playback press ANGLE Each time you press ANGLE camera angle changes Stereo Sound Mode This unit al...

Page 17: ...e cassette tape The time search is not available for programmed and random playback of a DVD or an audio CD or during recording of the VCR Repeat Playback Repeat function is available only during playback DVD Video DVD Video DVD Video DVD Video DVD Video AudioCD Audio AudioCD CD Audio AudioCD CD Press DVD first 1 During playback press REPEAT Each time you press REPEAT repeat function changes as be...

Page 18: ...back Settings Black Level Setting Adjust the black level to make the dark areas of the picture brighter DVD Video DVD Video DVD Video DVD Video DVD Video Press DVD first 1 During playback press MODE once 2 Use s or B to adjust the black level ON makes the dark areas brighter OFF shows the original picture as recorded 3 Press RETURN to exit Programmed Playback You can change the playback order of c...

Page 19: ...deo Subtitle Language and Audio Language This unit allows you to select a subtitle if available or an an audio language if multiple languages are available for audio language during DVD playback DVD Video DVD Video DVD Video DVD Video DVD Video Press DVD first To Change the Subtitle Language g g g g g g To Change the Subtitle Language 1 During Playback press SUBTITLE Each time you press SUBTITLE d...

Page 20: ...Before Turn on the TV How to set the timer recording or satellite link refer to pages 21 22 Tape speed Recording playback time Type of tape T60 T120 T160 SP mode 1hour 2hours 2 2 3hours SLP mode 3hours 6hours 8hours LP mode cannot be Recorded LP mode can be Played back Press until desired duration recording time is selected Pulse hasta que se seleccione el tiempo de duración de grabación deseado C...

Page 21: ... s while the program number blinks 4 Press CLEAR to exit 5 Press TIMER SET to return to the timer standby mode To Cancel a Timer Recording in Progress g g g g To Cancel a Timer Recording in Progress Press C A on the unit Note for Timer Recording OTR If a power failure occurs or the cassette tape does not have the erase protection tab the TIMER REC indicator blinks and timer recording cannot be per...

Page 22: ...is not set to output signals satellite link will remain in standby mode To Cancel the Satellite Link on Standby y y To Cancel the Satellite Link on Standby Press TIMER SET on the remote control or C A on this unit Progress g To Cancel the Satellite Link in Prog g g To Cancel the Satellite Link in Progress To Cancel the Satellite Link in Progress Press C A on this unit Note Recording picture will b...

Page 23: ...4 3PAN SCAN forafullheightpicturewithbothsidesadjusted Select 16 9 WIDE if a wide screen TV is connected to this unit STILL MODE AUTO FIELD FRAME Set the type of still image in pausing playback Select AUTO usually AUTO automatically selects the best resolution setting FRAME or FIELD based on the data characteristics of the pictures Some pictures may be blurred when you select AUTO in the still mod...

Page 24: ... Level 1 only DVD software intended for children with those intended for adult and general use prohibited TIPS FOR LEVELS 8 ADULT DVD software of any grades adult general children can be played back 7 NC 17 no one under 17 admitted 6 R restricted under 17 requires accompanying parent or adult guardian 5 PGR parental guidance recommended 4 PG13 unsuitable for children under 13 3 PG parental guidanc...

Page 25: ...set the settings to factory default 1 Press SETUP to call up the setup menu 2 Use to select then press 3 Press to select YES then press INITIALIZE_INITIALIZE INITIALIZE YES 4 Press 1 2 or 3 to select the desired language SELECT MENU LANGUAGE 1 ENGLISH 2 FRANÇAIS 3 ESPAÑOL The next time you operate the player menu language will be the one you have selected ...

Page 26: ...tracking control for a better picture by pressing TRACKING K L Connect the video cable firmly Video or color fades in and out when making a copy of a cassette tape You cannot copy a copyrighted cassette tape No picture and sound Please confirm to connect to DVD VCR AUDIO OUT and DVD VCR VIDEO OUT DVD No picture Connect the video cable firmly Insert a correct video disc that can be played back on t...

Page 27: ...yback picture is blurred or interrupted while the TV broadcast is showing clear the dirt may have accumulated on the video heads or the usage of rental or worn cassette tapes can cause this problem If a streaky or snowy picture appears during playback the video heads in your unit may need to be cleaned 1 Please visit your local audio video store and purchase a good quality VHS video head cleaner 2...

Page 28: ...his warranty does not apply a to damage caused by accident abuse misuse neglect misapplication or non supplied product b to damage caused by service performed by anyone other than company approved Authorized Service Location c to a product or a part that has been modified without written company per mission or d if any serial number has been removed or defaced or e product accessories or consumabl...

Reviews: