background image

16

EN

Calling up a Menu Screen during Playback

• Press 

MENU

 to call up the DVD menu.

• Press 

TOP MENU

 to call up the title menu.

Note: •

Contents of menus and corresponding menu 
operations may vary between discs. Refer to the 
manual accompanying the disc for details.
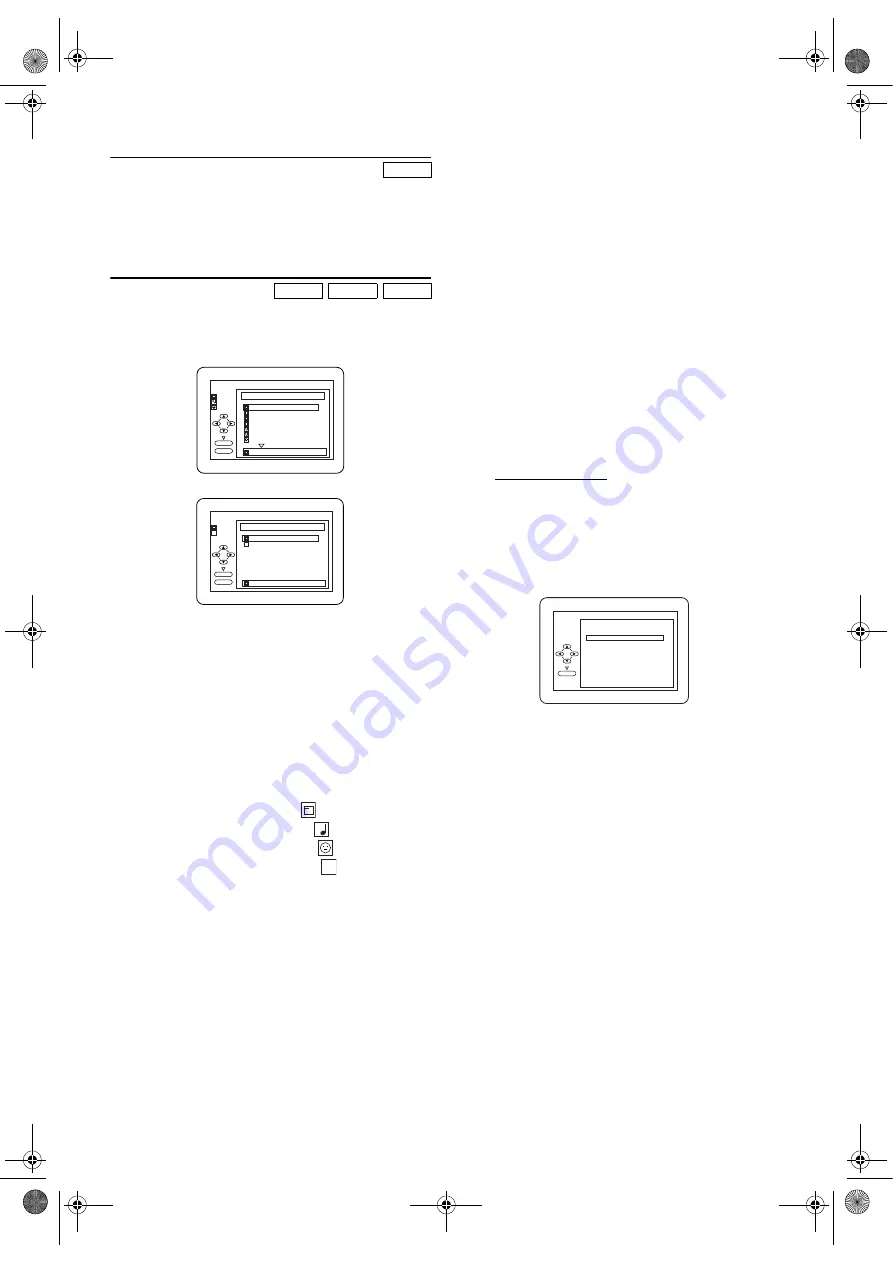
MP3 / JPEG / DivX

®

 Playback

Insert an MP3/JPEG/DivX

®

-format disc, then the FILE LIST 

will automatically appear on the TV screen, and the number 
of tracks is displayed on the front panel.

1)

Press 

K

 or 

L

 to select the desired group or track.

Example: MP3/JPEG

Example: DivX

®

•If a group is selected, press 

B

 or 

ENTER

 to go on to the 

track selection screen. Press 

K

 or 

L

 to choose a track, 

then press 

PLAY


B

 or 

ENTER

.

•If a track is selected, press 

PLAY


B

 or 

ENTER

 to start 

playing the tracks. Playback will start from the selected 
track and will play one after another.

•Press 

s

 to go back to the previous hierarchy (except for 

the top hierarchy).

•Press 

TOP MENU

 to return to the first item.

2)

Press 

STOP 

C

 to stop playback.

Note: •

Folders are known as Groups, and files are known as 
Tracks.

 Folders are accompanied by 

 icon.

MP3 files are accompanied by 

 icon.

JPEG files are accompanied by 

 icon.

DivX

®

 files are accompanied by 

 icon.

A maximum of 255 folders can be recognised.

A maximum of 999 files can be recognised.

Up to 8 hierarchies can be recognised.

The name of group and track can be displayed in up 
to 25 characters. Unrecognizable characters will be 
replaced with asterisks. The ninth and deeper 
hierarchies cannot be displayed.

Unplayable groups or tracks may be displayed 
depending on the recording conditions. 

For MP3 file recorded in Variable Bit Rate (VBR), the 
unit may not display the actual elapsed time.

Progressive JPEGs (JPEG files saved in the progressive 
format) can not be played back on this unit.

High resolution JPEG files take longer to be 
displayed.

When playing back the files recorded in high bit rates,
the images can be interrupted in some occasions.

 Although DivX

®

 logo has been obtained for this 

player, it may not be able to play back some data, 
depending on the disc characteristics, bit rates, or 
audio format settings, etc.

 Use the software recognised by DivX

®

, Inc. when you

make DivX

®

 files.

 When using tools or utilities to make up DivX

®

 files,

read their instruction manual beforehand.

 A DivX

®

 file whose file size exceeds 2GB cannot be

played back.

 If a large-sized DivX

®

 file is selected, it may take a 

while to start the playback (over 20 seconds 
sometimes).

 If DivX

®

 files wrote on CD discs cannot be played 

back, rewrite them on a DVD disc and try to play 
back.

 For more information for DivX

®

, please visit

http://www.divx.com.

Constant bitrate of image between 500 kbps and 
1,500 kbps is recommended if you make DivX

®

 files 

on a CD-R/RW.

 If you insert a CD-R/RW with DivX

®

 files that are 

mixed with MP3 or JPEG files, the Playback Media 
Selection screen will be displayed. Please select 
“Video” and proceed to step 

1)

.

 Press 

TOP MENU

 to call up the Playback

Media Selection screen in Stop mode.

  If you select “Audio & Picture”, instead of “Video” on 

the Playback Media Selection screen, this unit can 
play back MP3/JPEG files.

DVD-V

MP3

JPEG

DivX

®

folder name 4

folder name 1

folder name 3

folder name 2

folder name 1

DISC NAME

FILE LIST

FOLDER
MP3

ENTER

PLAY

file name 3

file name 2

file name 1

1/2

JPEG

folder name 1

file name 2

folder name 1

DISC NAME

FILE LIST

FOLDER
DivX

ENTER

PLAY

D

X

D

X

3

D

X

Audio & Picture

Video

Please select the media to play back.

ENTER

E8G06ED(EN).fm  Page 16  Friday, July 27, 2007  8:51 PM

Summary of Contents for D8A-A4110DB

Page 1: ...5 Automatic Operations 15 DVD Operation 15 Basic Playback 15 General Features 15 Disc Menus 15 Title Menu 15 Calling up a Menu Screen during Playback 16 MP3 JPEG DivX Playback 16 Dual Playback 17 Slid...

Page 2: ...make sure that the Timer Recording mode is OFF 9 This product is in Stand by mode when it turns off while the power cord is connected 10 Do not place any combustible objects on the device candles etc...

Page 3: ...ited This product incorporates copyright protection technology that is protected by U S patents and other intellectual property rights Use of this copyright protection technology must be authorized by...

Page 4: ...indicated by each mark is still working OPEN CLOSE CHANNEL VCR DVD STOP PLAY OUTPUT REW F FWD PLAY REC OTR STOP EJECT VIDEO STANDBY ON PAL 1 2 3 4 5 6 7 8 9 10 11 12 13 14 15 16 17 18 19 20 DVD outpu...

Page 5: ...nu selections 22 AUDIO To change audio languages on a DVD or DivX DVD To change sound modes of a CD DVD To change sound modes VCR 23 PAUSE F To pause playback DVD To advance playback one frame at a ti...

Page 6: ...or the best picture quality for DVD and VCR features 2 Use S VIDEO OUT for the better picture quality or COMPONENT VIDEO OUT for the best picture quality for DVD features only Sound 1 Use SCART Output...

Page 7: ...ints for connecting to an MD deck or DAT deck The audio source on a disc in a Dolby Digital Multi channel surround format cannot be recorded as digital sound by an MD or DAT deck Unless connected to a...

Page 8: ...e the language used on the TV screen menus follow the steps below Use the remote control for this procedure 1 Press VCR then SETUP 2 Press K or L to select INITIAL then press B 3 Press K or L to selec...

Page 9: ...ress K or L to select POSITION then press B When a weak signal is received in Manual Tuning mode you can change the background to solid blue or the static screen by pressing C RESET 6 Press the Number...

Page 10: ...to turn on and then press PLAY B 4 Press STOP C to stop playback Tracking Adjustment Tracking adjustment will be activated automatically Digital Tracking function when you start playback When playing...

Page 11: ...ce you select the Picture Select mode it stays in effect even after you turn off the unit Auto Return When Timer Recording is finished the unit will automatically rewind the tape to the beginning wher...

Page 12: ...ack time using E 60 E 120 E 180 or E 240 tapes in each mode Skipping Unwanted Programme Material During Recording 1 Press PAUSE F when you want to temporarily halt recording You can check the remainin...

Page 13: ...fter pressing T SET the indicator will appear To Stop a Timer Programme Which Has Already Started Press STOP EJECT on the unit Note STOP C on the remote control will not function in the Timer Recordin...

Page 14: ...ecording unit 6 Begin playback of the tape in the playing VCR 7 To stop recording press STOP EJECT on the recording unit then stop playback of the tape in the playing VCR Note For best results during...

Page 15: ...u recorded it may appear on the screen In this case refer to Title Menu 5 Press STOP C to stop playback Note A prohibited icon may appear at the top right on the TV screen during operation warning tha...

Page 16: ...he actual elapsed time Progressive JPEGs JPEG files saved in the progressive format can not be played back on this unit High resolution JPEG files take longer to be displayed When playing back the fil...

Page 17: ...CDs The Picture CD is a service to convert photographs taken by a conventional film camera into digital data and write the data on a CD You can enjoy picture images on the TV set by playing back the P...

Page 18: ...SPLAY menu if pictures in the pause mode are blurred Refer to page 23 Step by Step Playback 1 During playback press PAUSE F Playback will be paused and sound will be muted 2 The disc advances by one f...

Page 19: ...played every time you change the Audio language setting If you choose any other languages will be displayed instead Refer to page 25 For discs with DivX files the screen only displays MP3 MP2 or Dolby...

Page 20: ...Note SKIP H G are not available when playback is stopped Chapter Title Search Using SEARCH 1 During playback press SEARCH once for the Chapter Search twice for the Title Search 2 Enter the desired ch...

Page 21: ...h tracks will be played 1 In Stop mode press MODE The PROGRAM screen will appear Example Audio CD 2 Press K or Lto select a track then press ENTER Up to 99 tracks can be stored Press CLEAR to erase th...

Page 22: ...DISPLAY repeatedly until on screen information disappears 1 During playback press DISPLAY Current track number total tracks elapsed time and remaining time of the current track and current playback st...

Page 23: ...PAN SCAN When viewing a 16 9 on a 4 3 aspect TV screen a full height picture with both sides trimmed is presented 16 9 WIDE If a wide screen TV is connected to this unit select this setting Press K o...

Page 24: ...s K or L to select PARENTAL LEVEL then press ENTER 6 Press K or L to select the desired level then press ENTER For details see below 7 Press SETUP to exit PARENTAL LEVEL ALL All parental locks are can...

Page 25: ...ambodian 5759 Catalan 4947 Chinese CHI 7254 Corsican 4961 Croatian 5464 Czech CZE 4965 Danish DAN 5047 Dutch DUT 6058 English ENG 5160 Esperanto 5161 Estonian 5166 F H Faroese 5261 Fiji 5256 Finnish F...

Page 26: ...Picture freezes momentarily during playback Check the disc for fingerprints scratches and clean with a soft cloth wiping from centre to edge Disc cannot be played Ensure the disc label is facing up C...

Page 27: ...a disc becomes dirty clean it with a cleaning cloth Wipe the disc from the centre out Do not wipe in a circular motion Do not use solvents such as benzine thinner commercially available cleaners or a...

Page 28: ...5 EC We Funai Europe GmbH Gasstrasse 18 Haus 1 22761 Hamburg Germany declare that the following product DVD CD PLAYER VIDEO CASSETTE RECORDER Model D8A A4110DB Trade Name Funai is in compliance with f...

Reviews: