background image

15

KNOW YOUR PRODUCT

Driving fasteners

This tool has three firing methods: 

Single fire, Sequential fire

 and 

Bump fire.


This allows for driving fasteners in different ways for precise accuracy or speed. 

The tool will be fitted with a select fire switch from the box. If the user wants to 

use bump fire, they must 

change the select fire switch 

to the multiple firing 

position. 

 Single fire - fires one fastener only (fig. 6-7)


This method will fire one fastener only when the tool is pushed against the work 

surface and each time the trigger is pressed, this is an accurate and more precise 

method of firing fasteners.

1.

  Grip the handle firmly.

2.

  Press the safety striker on the material until it is compressed completely and 

press the trigger to fire one fastener.

3.

  To fire again; first remove the safety striker from the material. 

Note:

 Aways remove your finger from the trigger after the fastener is driven into 

the workpiece.

4.

 Repeat the procedure for the next fastener.

Fig. 6

Fig. 7

WARNING! 

 Do not operate the tool without fasteners in the magazine. 

Remove finger from trigger when not firing fasteners.

OPERATION

WARNING! 

 Always wear eye protection. Make sure the eye protection 

chosen has side shields or provides protection from flying debris both from 

the front and sides.

Summary of Contents for FBABN-G15

Page 1: ...hock fire and or serious injury Save all warnings and instructions for future reference 0921 15G DA SERIES AIR BRAD NAIL GUN 15 GAUGE DA SERIES NAILS 100 NAIL CAPACITY MAGAZINE 32 64MM NAIL LENGTH INS...

Page 2: ...ax pressure 120psi 8 3bar Nail type 15 Gauge DA Series Brad Nail length 32 64 mm Magazine capacity 100pcs Air inlet 1 4 Nitto style male connector Weight tool only 2 05kg SPECIFICATIONS MODEL NO FBABN...

Page 3: ...Cover latch 3 360 Exhaust deflector 4 Depth adjustment selector 5 Handle 6 Trigger 7 Magazine 8 Air Inlet quick connector 9 Hex keys x 4 10 Oil bottle 11 Spare Drive Guide Cover KNOW YOUR PRODUCT OIL...

Page 4: ...DUCT Page 03 INTRODUCTION Page 05 SAFETY INSTRUCTIONS Page 06 SET UP AND PREPARATION Page 12 OPERATION Page 15 MAINTENANCE Page 19 TROUBLE SHOOTING Page 20 DESCRIPTION OF SYMBOLS Page 21 CONTENTS Page...

Page 5: ...atic in line filter a pressure regulator and automatic oiler is recommended as it increases the products service life The in line oiler should be checked regularly and filled with air tool oil It is m...

Page 6: ...otection the tool operator and all persons in the working area must wear safety goggles and ear protection i Air tools should not be used in a potentially explosive environment j The tool must be used...

Page 7: ...the vicinity of operation This appliance is not intended for use by persons including children with reduced physical sensory or mental capabilities or lack of experience and knowledge unless they hav...

Page 8: ...d for electric cable installation and may damage the insulation of electric cables thereby causing electric shock or fire hazards Do not carry tool with finger on the trigger Keep the tool pointed in...

Page 9: ...ial such as steel dropping or pushing across the floor using the tool as a hammer applying excessive force of any kind Hold the fastener driving tool during the work operation in such a way that no in...

Page 10: ...protection shall be worn The risks to others shall be assessed by the operator Ensure tool is always safely engaged on the workpiece and cannot slip Ensure the tool is correctly lubricated during use...

Page 11: ...he tool before use to ascertain the correct mode is selected This tool has contact actuation Bump Fire Its intended uses are for production applications such as pallets furniture manufactured housing...

Page 12: ...Ensure the tool is in the off position before connecting to the air supply WARNING Ensure that the compressed air does not exceed 120psi 8 3bar while operating the tool Too high an air pressure and u...

Page 13: ...o operator preference 1 To adjust rotate the exhaust deflector in the desired direction for the current application fig 2 Fig 2 WARNING Do not attempt to modify this tool or create accessories not rec...

Page 14: ...magazine fig 3 2 Slide the magazine latch all the way to the rear of the magazine You will need to depress the small leaver to allow the latch to slide over the nails fig 4 3 With the magazine latch b...

Page 15: ...is pressed this is an accurate and more precise method of firing fasteners 1 Grip the handle firmly 2 Press the safety striker on the material until it is compressed completely and press the trigger t...

Page 16: ...ill fire fig 8 OPERATION cont WARNING Do not clamp or hold the trigger with anything other then your hand Sequential fire fires one fastener after the other when the trigger is pressed This method wil...

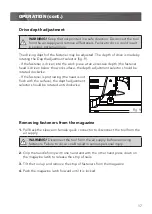
Page 17: ...do so could result in serious personal injury Drive depth adjustment The driving depth of the fastener may be adjusted The depth of drive is made by rotating the Depth adjustment selector fig 9 If th...

Page 18: ...nect the tool from the air supply 2 Remove fasteners from the tool 3 Pull the front guide latch releasing the front guide fig 10 4 Pivot front guide forward Use a flat blade screwdriver not included t...

Page 19: ...Store the tool in a dry and safe place out of reach of children Oil the air tool after each use with air tool oil After approximately 300 000 nails the air gun will require servicing If any servicing...

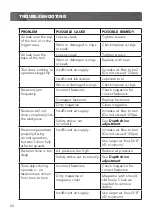
Page 20: ...gazine Clean magazine Fastener will not drive completely into the workpiece Insufficient air supply Increase air flow to tool Do not exceed 120psi Safety striker set incorrectly See Depth drive adjust...

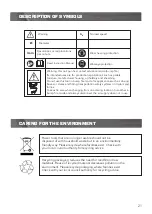
Page 21: ...ers and lorries Take extra care when changing from one driving location to another in bump fire mode and always disconnect the air supply when not in use DESCRIPTION OF SYMBOLS CARING FOR THE ENVIRONM...

Page 22: ...1 AUS 0800 647 840 NZ 1 x Air Brad nail gun 4 x Hex keys 2 5 3 4 5mm 1 x Oil bottle 1 x Instruction manual 1 x Spare Drive Guide Cover Note The manufacturer s liability shall be deemed void if the too...

Page 23: ...vailable to you under law The warranty covers manufacturer defects in materials workmanship and finish under normal use 1 YEAR WARRANTY Your product is guaranteed for a period of 12 months from the or...

Reviews: