


When the [OK] is touched, the display returns to “Set
Temp. Auto Return” screen.
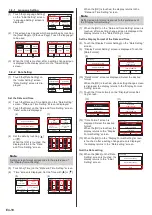
Set the Return Time and Temperature
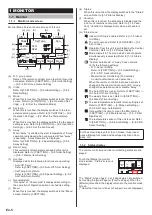
(4) Touch the [Return Time/Return Temp.] on the “Set
Temp. Auto Return” screen.
(5) “Setting” screen is displayed. When the [Cool/Dry] or
[Heat] on the “Setting” screen is touched, the time and
temperature setting screen is displayed.
(4)
(5)
Enable /Disable
[Enable]
Set Temp. Auto Return
Cancel
OK
Cool/Dry
Heat
Return Time / Return Temp.
60min. / 84°F
60min. / 74°F
Setting
Cool/Dry
60min. / 84°F
Heat
60min. / 74°F
Back
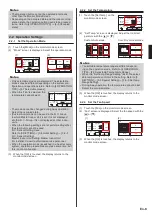
(6) Set the time and temperature
by touching [ ] or [ ]. The
time can be set within the 10
to 240 min. range in 10 min.
increments.
When the [OK] is touched, the
display returns to the “Setting”
screen.
84
60
°F
Cool/Dry
Cancel
OK
Return
Time
Return
Temp.
min
Schedule
Temp.
Note
When [Schedule Temp.] is touched, the weekly timer icon
is displayed at the temperature display. When "---ºF (or
---ºC)" is displayed at the temperature display, schedule
is not set. Refer to [3-4 Weekly Timer Setting].
(7) When the [Back] is touched, the display returns to the
“Set Temp. Auto Return” screen.
Apply the setting.
(8) Touch the [OK] on the “Set
Temp. Auto Return” screen.
After the setting change
screen is displayed, the
display returns to the “Special
Setting” screen.
Enable /Disable
[Enable]
Set Temp. Auto Return
Cancel
OK
Cool/Dry
Heat
Return Time / Return Temp.
60min. / 84°F
60min. / 74°F
3-5-3 Set Temp. Range Setting (for administrator)
(1) Touch the [Set Temp. Range
Setting] on the “Special Set-
ting” screen. When the “Pass-
word Verification” screen is
displayed, enter the password
and touch the [OK].
Back
Special Setting
Set Temp.
Range Setting
Set Temp.
Auto Return
Anti Freeze
Economy
Next
Page
Page 1/ 2
“Set Temp. Range Setting” screen is displayed.
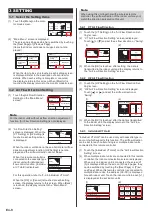
Enable the Set Temp. Range Setting
(2) Touch the [Enable/Disable] on the “Set Temp. Range
Setting” screen.
(3) “Enable/Disable” screen is displayed. Touch the [Enable]
on the “Enable/Disable” screen.
(2)
(3)
–
–
–
–
–
48°F
64°F
88°F
88°F
–
Enable /Disable
[Disable]
Set Temp. Range Setting
Cancel
OK
Lower Limit
Upper Limit
Heat
Cool/Dry
Enable/Disable
Cancel
OK
Enable
Disable
When the [OK] is touched, the display returns to the “Set
Temp. Range Setting” screen.
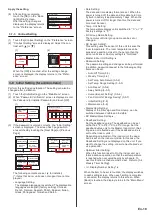
Set the Lower Limit and Upper Limit
(4) Touch the [Lower Limit - Upper Limit] on the “Set Temp.
Range Setting” screen.
(5) “Setting” screen is displayed. Touch the [Cool/Dry] or
[Heat] on the “Setting” screen.
(4)
(5)
–
–
–
48°F
64°F
88°F
88°F
Enable /Disable
[Enable]
Set Temp. Range Setting
Cancel
OK
Lower Limit
Upper Limit
Heat
Cool/Dry
[64°F – 88°F]
[48°F – 88°F]
Cool/Dry
Heat
Setting
Back
(6) Each setting screen is dis-
played. Set the temperature
upper limit and lower limit by
touching [ ] or [ ].
88
°F
64
°F
Cool/Dry
Cancel
OK
Lower Limit
Upper Limit
When the [OK] is touched, the display returns to the
“Setting” screen. If the [Back] on the “Setting” screen is
touched, the display returns to the “Temp. Range Set-
ting” screen.
Note
The settable upper limit value and lower limit value may
be different depending on the indoor unit model and set-
ting at installation.
Apply the setting.
(7) Touch the [OK] on the “Set
Temp. Range Setting” screen.
After the setting change
screen is displayed, the
display returns to the “Special
Setting” screen.
–
–
–
48°F
64°F
88°F
88°F
Enable /Disable
[Enable]
Set Temp. Range Setting
Cancel
OK
Lower Limit
Upper Limit
Heat
Cool/Dry
3-5-4 Anti Freeze (for administrator)
(1) Touch the [Anti Freeze] on
the “Special Setting” screen.
When the “Password Verifica-
tion” screen is displayed, enter
the password and touch the
[OK].
Back
Special Setting
Set Temp.
Range Setting
Set Temp.
Auto Return
Anti Freeze
Economy
Next
Page
Page 1/ 2
On/Off of the Anti Freeze
(2) “Anti Freeze” screen is dis-
played. Select the [On] or [Off]
on the “Anti Freeze” screen.
Anti Freeze
Cancel
OK
On
Off
When the [OK] is touched, data transmission is per-
formed and after the setting change screen is displayed,
the display returns to the “Special Setting” screen.
Note
When this function is used together with Away Setting,
setting by Away Setting is necessary. Refer to [3-5-5
Away Setting].
En-13
En-14
Summary of Contents for UTY-RNRUZ2
Page 26: ......