Fujitsu RCF24LBL Installation Manual Download Page 6

En-6

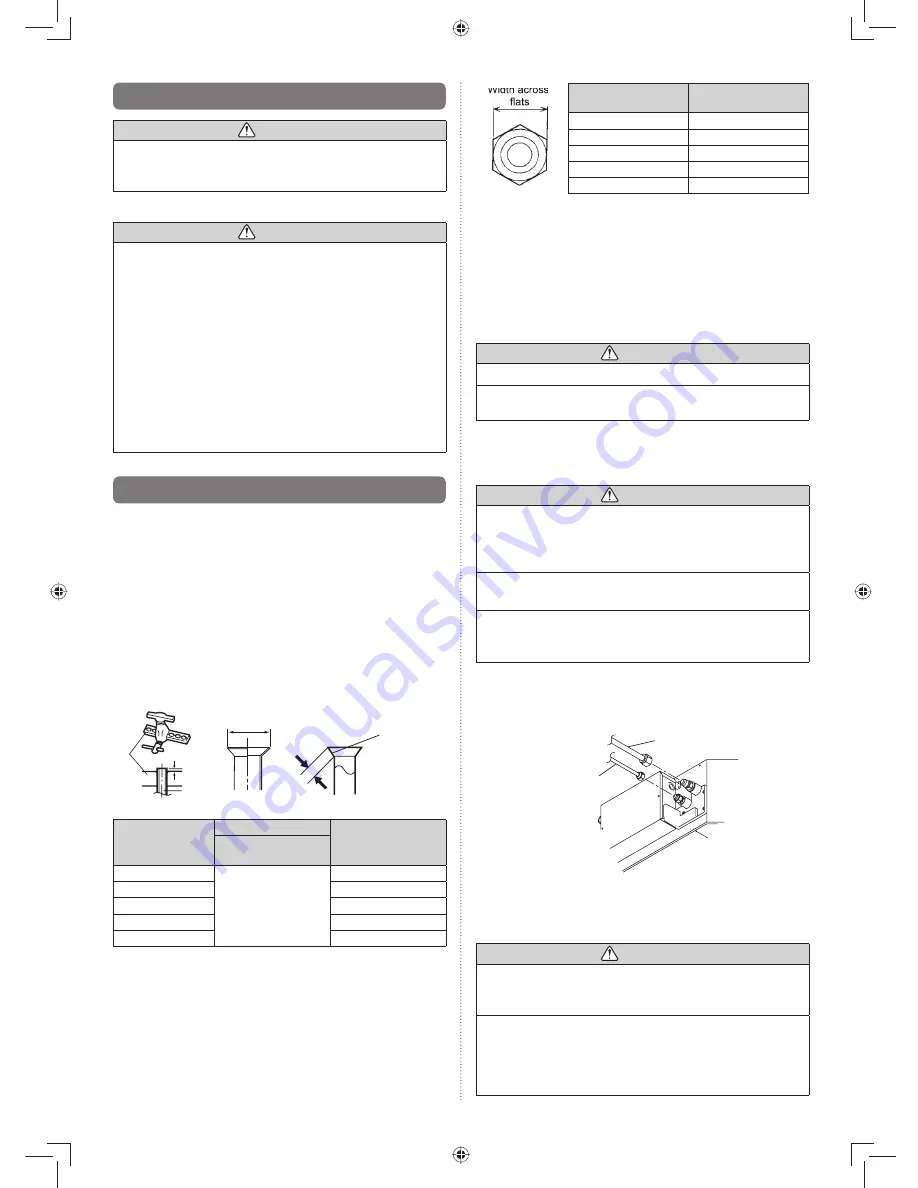
Pipe outside

diameter [mm (in.)]

Width across 

fl

 ats

of Flare nut [mm]

6.35 (1/4)

17

9.52 (3/8)

22

12.70 (1/2)

26

15.88 (5/8)

29

19.05 (3/4)

36

4.3.2 Bending pipes

If pipes are shaped by hand, be careful not to collapse them.

• 

Do not bend the pipes at an angle more than 90°.

• 

When pipes are repeatedly bend or stretched, the material 

• 

will harden, making it dif

fi

 cult to bend or stretch them any 

more. 
Do not bend or stretch the pipes more than three times.

• 

 CAUTION

To prevent breaking of the pipe, avoid sharp bends. 

• 

If the pipe is bent repeatedly at the same place, it will 

• 

break.

4.3.3. Pipe connection

 CAUTION

Be sure to apply the pipe against the port on the indoor 

• 

unit and the outdoor unit correctly. If the centering is im-
proper, the 

fl

 are nut cannot be tightened smoothly. If the 

fl

 are nut is forced to turn, the threads will be damaged.

Do not remove the 

fl

 are nut from the indoor unit pipe until 

• 

immediately before connecting the connection pipe.

Do not use mineral oil on 

fl

 ared part. Prevent mineral 

• 

oil from getting into the system as this would reduce the 
lifetime of the units.

Detach the caps and plugs from the pipes.

(1) 

Center the pipe against the port on the indoor unit, and 

(2) 

then turn the 

fl

 are nut by hand.


Indoor unit

Connection pipe
(Liquid)

Connection pipe
(Gas)

When the 

fl

 are nut is tightened properly by your hand, 

(3) 

hold the body side coupling with a separate spanner, then 
tighten with a torque wrench. (See the table below for the 

fl

 are nut tightening torques.

 CAUTION

Hold the torque wrench at its grip, keeping it in the right 

• 

angle with the pipe, in order to tighten the 

fl

 are nut cor-

rectly.

Tighten the 

fl

 are nuts with a torque wrench using the 

• 

speci

fi

 ed tightening method. Otherwise, the 

fl

 are nuts 

could break after a prolonged period, causing refrigerant 
to leak and generate a hazardous gas if the refrigerant 
comes into contact with a 

fl

 ame.

Width across

4.2. Pipe requirement

 CAUTION

Refer to the Installation Manual of the outdoor unit for 

• 

description of the length and the diameter of connecting 
pipe or for difference of its elevation.

Use pipe with water-resistant heat insulation.

• 

 CAUTION

Install heat insulation around both the gas and liquid 

• 

pipes. Failure to do so may cause water leaks. 
Use heat insulation with heat resistance above 120 °C. 
(Reverse cycle model only) 
In addition, if the humidity level at the installation loca-
tion of the refrigerant piping is expected to exceed 70%, 
install heat insulation around the refrigerant piping. If the 
expected humidity level is 70-80%, use heat insulation 
that is 15 mm or thicker and if the expected humidity ex-
ceeds 80%, use heat insulation that is 20 mm or thicker. 
If heat insulation is used that is not as thick as speci

fi

 ed, 

condensation may form on the surface of the insulation. 
In addition, use heat insulation with heat conductivity of 
0.045W/(m·K) or less (at 20 °C).

4.3. Flare connection (pipe connection)

4.3.1. Flaring

Use special pipe cutter and 

fl

 are tool exclusive for R410A.

• 

Cut the connection pipe to the necessary length with a 

(1) 

pipe cutter.
Hold the pipe downward so that cuttings will not enter the 

(2) 

pipe and remove any burrs.
Insert the 

fl

 are nut (always use the 

fl

 are nut attached to 

(3) 

the indoor and outdoor units respectively) onto the pipe 
and perform the 

fl

 are processing with a 

fl

 are tool.  Leak-

age of refrigerant may result if other 

fl

 are nuts are used.

Protect the pipes by pinching them or with tape to prevent 

(4) 

dust, dirt, or water from entering the pipes.

B

Die

A

Pipe

Check if [L] is flared uniformly
and is not cracked or scratched.

L

Pipe outside 

diameter 

[mm (in.)]

Dimension A [mm]

Dimension B

-

0

0.4 

[mm]

Flare tool for R410A, 

clutch type

6.35 (1/4)

0 to 0.5

9.1

9.52 (3/8)

13.2

12.70 (1/2)

16.6

15.88 (5/8)

19.7

19.05 (3/4)

24.0

When using conventional 

fl

 are tools to 

fl

 are R410A pipes, 

the dimension A should be approximately 0.5 mm more than 
indicated in the table (for 

fl

 aring with R410A 

fl

 are tools) to 

achieve the speci

fi

 ed 

fl

 aring. Use a thickness gauge to meas-

ure the dimension A.

Summary of Contents for RCF24LBL

Page 1: ...material 5 4 2 Pipe requirement 6 4 3 Flare connection pipe connection 6 4 4 Installing heat insulation 7 5 INSTALLING DRAIN PIPES 7 6 ELECTRICAL WIRING 6 1 Electrical requirement 8 6 2 Wiring method 9 7 REMOTE CONTROLLER SETTING 7 1 Load batteries R03 LR03 2 10 7 2 Installing the Remote control unit holder 11 8 DECORATION PANEL INSTALLATION 8 1 Remove the intake grille 11 8 2 Installing the panel...

Page 2: ... 6 times higher than the R22 failure to use dedicated piping material or improper installation can cause rupture or injury Furthermore it can cause serious accidents such as water leakage electric shock or fire Tool name Changes Gauge manifold The pressure in the refrigerant system is extremely high and can not be measured with a conven tional gauge To prevent erroneous mixing of other refrigerant...

Page 3: ... unit to fall water leakage electric shock or fire The following installation parts are furnished Use them as required Keep the Installation Manual in a safe place and do not dis card any other accessories until the installation work has been completed Name and Shape Q ty Description Coupler heat insulation Large 1 For indoor side pipe joint gas pipe Coupler heat insulation Small 1 For indoor side...

Page 4: ...gh salt content such as at the seaside It will deteriorate metal parts causing the parts to fall or the unit to leak water Area filled with mineral oil or containing a large amount of splashed oil or steam such as a kitchen It will deteriorate plastic parts causing the parts to fall or the unit to leak water Area that generates substances that adversely affect the equipment such as sulfuric gas ch...

Page 5: ...AUTION Be more careful that foreign matter oil water etc does not enter the piping than with refrigerant R410A models Also when storing the piping securely seal the openings by pinching taping etc While welding the pipes be sure to blow dry nitrogen gas through them 4 1 Selecting the pipe material CAUTION Do not use existing pipes Use pipes that have clean external and internal sides without any c...

Page 6: ...quirement CAUTION Refer to the Installation Manual of the outdoor unit for description of the length and the diameter of connecting pipe or for difference of its elevation Use pipe with water resistant heat insulation CAUTION Install heat insulation around both the gas and liquid pipes Failure to do so may cause water leaks Use heat insulation with heat resistance above 120 C Reverse cycle model o...

Page 7: ...rain pipe with downward gradient 1 50 to 1 100 and so there are no rises or traps in the pipe Use general hard polyvinyl chloride pipe VP25 outside di ameter 32 mm 1 1 4 and connect it with adhesive polyvi nyl chloride so that there is no leakage When the pipe is long install supporters Do not perform air bleeding Always heat insulate the indoor side of the drain pipe When desiring a high drain pi...

Page 8: ...g sure that there are no external forces of the wires applied to the terminal connections Improperly connected or secured wires can cause seri ous accidents such as overheating the terminals electric shock or fire Do not modify the power cables use extension cables or use any branches in the wiring Improper connections insufficient insulation or exceeding the allowable current can cause electric s...

Page 9: ... Power supply cable or Transmission cable 20 mm 40 mm or more Earth wire How to connect wiring to the terminals For strand wiring Use crimp type terminals with insulating sleeves as shown 1 in the figure below to connect to the terminal block Securely crimp the crimp type terminals to the wires using 2 an appropriate tool so that the wires do not come loose Sleeve Crimp type terminal Use the speci...

Page 10: ...es NOTE Never mix new and used batteries or batteries of different types Batteries should last about one year under normal use If the Remote Control Unit s operating range becomes appreciably reduced replace the batteries and press the RESET button with the tip of a ballpoint pen or other small object 6 2 3 Wiring procedure Remove the control box cover and install each connection 1 wire Screw Cont...

Page 11: ...trol unit and the photocell as the criteria However when installing the remote control unit check that it operates positively Install the remote control unit holder to a wall pillar etc with the tapping screw Mount the holder 1 Screws Set the remote control unit 2 Insert Press in To remove the remote control unit when use at hand 3 Slide up Pull out 8 DECORATION PANEL INSTALLATION Installation acc...

Page 12: ...relative to the air conditioner body Install so that there is no gap between the grille assem bly and the air conditioner body The decoration panel equips with an accessory to prevent the grill completely open Be sure to read the INSTALLATION SHEET included with the decoration panel before installation 8 2 Installing the panel to indoor unit Install the decoration panel on the indoor unit 1 DRAIN ...

Page 13: ...indoor unit according to the installation conditions Incorrect settings can cause the indoor unit malfunction After the power is turned on perform the FUNCTION SETTING according to the installation conditions using the remote controller The settings may be selected between the following two Function Number or Setting Value Settings will not be changed if invalid numbers or setting values are selec...

Page 14: ...Do not change this setting in the 3 way outlet mode Setting the Outlet Directions Select the setting values in the table below for using a 3 way outlet The setting value is factory set to 00 Setting Description Function Number Setting Value 4 way 22 00 3 way 01 Setting the Filter Sign The indoor unit has a sign to inform the user that it is time to clean the filter Select the time setting for the ...

Page 15: ...gnal code of the remote control unit Note that the air conditioner cannot receive a signal code if the air conditioner has not been set for the signal code Press the START STOP button until only the clock is 1 displayed on the remote control unit display Press the MODE button for at least five seconds to display 2 the current signal code initially set to Press the SET TEMP button to change the sig...

Page 16: ...tting value Master Slave 9 4 Special installation methods This possible only the wired remote control Option CAUTION When setting DIP switches do not touch any other parts on the circuit board directly with your bare hands Be sure to turn off the main power 9 4 1 Simultaneous multi system operation By combining with an outdoor unit 2 units for twin and 3 units for triple indoor units can be switch...

Page 17: ...ng Refrigerant circuit address setting Function number 02 Unit number Setting value Master Slave setting Function number 51 Unit number Setting value Make sure that the indoor unit with the unit number 00 is connected to the outdoor unit using a transmission cable 9 4 2 Group control system A number of indoor units can be operated at the same time using a single remote controller 1 Wiring method i...

Page 18: ...nit toward the air condi tioner and press the test run button with the tip of a ball point pen etc Transmitter section Test run button To end test operation press the remote control unit START STOP button When the air conditioner is run by pressing the test run but ton the OPERATION Lamp and TIMER Lamp will simulta neously flash slowly Using the wired remote control Option For the operation method...

Page 19: ...h abnormal Pres sure sensor abnormal 7 times 6 times Compressor temperature error 7 times 7 times Low pressure error 8 times 2 or 3 times Active filter abnormal 8 times 4 times P F C circuit error 8 times 6 times P F C printed circuit board error 9 times 2 times Refrigerant circuit address set up error 9 times 3 times Master unit Slave unit set up error 9 times 4 times Connected the indoor number ...

Page 20: ...exchanger temperature sensor middle error 28 Indoor heat exchanger temperature sensor inlet error 09 Float switch operated 0c Outdoor discharge pipe temperature sensor error 06 Outdoor heat exchanger temperature sensor outlet error 0A Outdoor temperature sensor error 0E Heat sink thermistor Inverter error 15 Compressor temperature sensor error 1d 2 way valve temperature sensor error 1E 3 way valve...

Reviews: