


186
Upgrade and Maintenance Manual
GX2460 M1
Front Panel
12.2 Replacing the front panel cable
12.2.1 Preliminary steps
Ê
"Locating the defective server" on page 39
Ê
"Shutting down the server" on page 40
Ê
"Disconnecting the power cord" on page 41
Ê
"Getting access to the component" on page 42
12.2.2 Removing the front panel cable
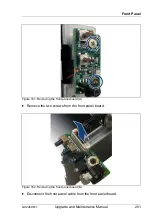
Figure 136: Disconnecting the front panel cable
Ê
Disconnect the front panel cable from the system board.
Field Replaceable Unit
(FRU)
Hardware: 10 minutes
Software: 5 minutes
Tools:
Phillips PH1 / (+) No. 1 screw driver / long screw driver
Summary of Contents for PRIMERGY GX2460 M1
Page 16: ...16 Upgrade and Maintenance Manual GX2460 M1 Contents ...
Page 26: ...26 Upgrade and Maintenance Manual GX2460 M1 Before you start ...
Page 56: ...56 Upgrade and Maintenance Manual GX2460 M1 Basic hardware procedures ...
Page 78: ...78 Upgrade and Maintenance Manual GX2460 M1 Power supply unit PSU ...
Page 96: ...96 Upgrade and Maintenance Manual GX2460 M1 Hard disk drive HDD and solid state drive SSD ...
Page 108: ...108 Upgrade and Maintenance Manual GX2460 M1 Fans ...
Page 158: ...158 Upgrade and Maintenance Manual GX2460 M1 Expansion cards and riser modules ...
Page 242: ...242 Upgrade and Maintenance Manual GX2460 M1 Appendix A ...
Page 244: ...244 Upgrade and Maintenance Manual GX2460 M1 Appendix B ...
Page 250: ...RAID Card RAID Card HDD Back Plane 411T61300070 SAS MLC1 SAS MLC2 SATA 0 3 SATA 4 7 C17 C17 ...


