background image

E-15

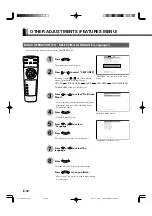
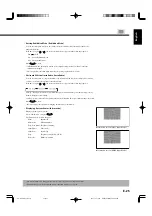
Adjusting Screen Position (Position)

Horizontal position (Horizontal)

: Moves screen to the right.

: Moves screen to the left.

Vertical position (Vertical)

: Moves screen up.

: Moves screen down.

Press 

 to store.

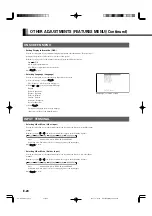
Adjusting Screen Size (Size)

Screen width (Width)

: Increases width.

: Reduces width.

Screen height (Height)

: Increases height.

: Reduces height.

Press 

 to store.

“Position” adjustment screen

“Size” adjustment screen

English

* On-screen information disappears if you do not take any action for about 60 seconds.

* Functions may not be available with some models and some device options.

* The adjustment range varies with the display signal. You can adjust the display quality to the value you want within the adjustable range.

 E-Plasma-wide2 (12-17)

03.6.11, 5:26 PM

Page 15

Adobe PageMaker 6.5J/PPC

Summary of Contents for Plasmavisioin

Page 1: ...3 Usage Using the Remote Control E 4 E 5 Connecting the Display to External Equipment E 6 E 7 Basic Operations E 8 Selecting Input Mode E 9 Watching Pictures on the Wide Screen E 10 E 11 Adjustments Adjusting Pictures PICTURE Menu E 12 E 13 Adjusting Screen Position and Size POSITION SIZE Menu E 14 E 15 Adjusting Audio AUDIO Menu E 16 E 17 Other Adjustments FEATURES Menu E 18 E 25 Initialization o...

Page 2: ...ead these instructions 2 Keep these instructions 3 Heed all warnings 4 Follow all instructions 5 Do not use this apparatus near water 6 Clean only with dry cloth 7 Do not block any ventilation openings Install in accordance with the manufacturer s instructions 8 Do not install near any heat sources such as radiators heat registers stoves or other apparatus including amplifier s that produce heat 9...

Page 3: ...doors plugs receptacles and the point where they exit from the product For added protection for this product during a lightning storm or when it is left unattended and unused for long periods of time unplug it from the wall outlet and disconnect the cable system This will prevent damage to the product due to lightning and power line surges Do not overload wall outlets extension cords or convenienc...

Page 4: ...FT 1 4 See P E 24 When you use two or more displays you can use these buttons to control up to four displays by assigning a unique number to each display PUTTING BATTERIES IN THE REMOTE CONTROL Remote Control 1 To remove the cover slide it outwards while pressing it down 2 Place two AA batteries in the remote control Make sure that the batteries are properly oriented 3 Close the cover until it sna...

Page 5: ...ent such as benzene or thinner EFFECTIVE RANGE FOR THE REMOTE CONTROL Point the remote control at the display s signal receiver when using it Make sure that there are no obstacles between the remote control and the display s signal receiver Information The remote control may not function properly if you use a high frequency fluorescent lamp If you experience problems move the lamp or use the remot...

Page 6: ...ffective pixels You may find however that some pixels constantly remain lit or dimmed The display has a fan to prevent its internal temperature from rising Be careful with the air delivered by the fan It may be very hot Contact your dealer if you find that the display does not seem to function properly when used with other audio visual equipment You may need to move your display if it produces deg...

Page 7: ... output To video input With a VCR To S video output To audio output To audio input To RGB output mD sub To audio output To audio input To RGB1 input mD sub With a computer Note Unplug the power cord from the AC outlet before you connect external components Also refer to the instructions for the component to be connected When inputting voice see Selecting input terminals page E 22 Terminal layout m...

Page 8: ...p turns red TURNING OFF THE POWER 1 Press to increase the volume Press to reduce the volume Any value between 0 and 40 can be selected No Audio appears if you press or after you have selected No Audio for Audio Input See P E 22 Note that the volume level remains stored even when you turn OFF the power ADJUSTING THE VOLUME When the volume adjustment button is pressed 2 3 Functions may not be availa...

Page 9: ... 1 VIDEO INPUT MODE RGB INPUT MODE S video mode Press to select a desired input mode Each time you press a different input mode appears The sequence is as follows RGB1 Displays pictures from equipment connected to the RGB1 mD sub terminal RGB2 Displays pictures from equipment connected to the RGB2 BNC x 5 terminal 1 RGB2 mode RGB1 mode English Functions may not be available with some models and so...

Page 10: ...or bar for profit making purposes or for a public audience may constitute a copyright infringement For films try to select a mode having the same aspect ratio as the original picture this enables the director s original intentions to be preserved Reference See P E 14 E 15 for how to adjust the picture size and position Press The currently selected mode will appear Press to select a desired picture...

Page 11: ... size Wide2 Wide Ideal for displaying vertically extended pictures such as squeezed pictures and recorded HDTV programs Zoom1 Zoom Enlarges horizontally extended pictures equally in all directions to maintain the aspect ratio constant 4 3 16 9 1 85 1 2 35 1 Wide1 Displays natural looking pictures of standard size on the wide screen Zoom2 Reduces the height of horizontally extended pictures with ca...

Page 12: ...u finish Repeat steps 3 4 5 and 6 when you wish to make changes to other options 1 2 BASIC OPERATIONS EX ADJUSTING TINT Tint PICTURE selected in the main menu screen Tint selected in the PICTURE Menu screen Video Input Mode You can make changes to all picture adjustment options in the PICTURE Menu The changes you make will be stored for a selected input mode Therefore you need to select a desired ...

Page 13: ...t up when User is selected in Color Temp Press or to select Red Green or Blue and press to make adjustments Press to store Color Temp setup is switched to User The initial value of User Color Temp is adjusted individually at the factory On screen information disappears if you do not take any action for about 60 seconds Functions may not be available with some models and some device options The adj...

Page 14: ...o the right Moves screen to the left Press to store Press when you finish Repeat steps 3 to 7 when you wish to make changes to other options BASIC OPERATION EX ADJUSTING HORIZONTAL DIRECTION OF SCREEN POSITION POSITION SIZE selected from the main menu screen You can make changes to all screen adjustment options in the POSITION SIZE Menu The changes you make will be stored for the selected input mo...

Page 15: ... height Height Increases height Reduces height Press to store Position adjustment screen Size adjustment screen English On screen information disappears if you do not take any action for about 60 seconds Functions may not be available with some models and some device options The adjustment range varies with the display signal You can adjust the display quality to the value you want within the adju...

Page 16: ...ou finish Repeat steps 3 to 6 when you wish to make changes to other options Audio Input menu will not be displayed when No Audio is selected See P E 22 BASIC OPERATION EX ADJUSTING VOLUME BALANCE Balance AUDIO selected in the main menu screen Balance selected in the AUDIO Menu screen You can make changes to all sound adjustment options in the AUDIO Menu The changes you make will be stored for the...

Page 17: ...en bass and treble for easy listening even with weak volume Each time you press or one of the available choices appears in the following sequence On Off On Corrects bass and treble Off Loudness dose not function On screen information disappears if you do not take any action for about 60 seconds Functions may not be available with some models and some device options The adjustment range varies with...

Page 18: ...u appears Press or to select Language Press The Language selection screen will appear Press or to select the language Press The menu is displayed in the selected language Press when you finish Repeat steps 3 to 8 when you wish to make changes to other options 1 2 BASIC OPERATION EX SELECTING LANGUAGE Language FEATURES selected in the main menu screen On Screen Menu screen You can make the followin...

Page 19: ... adjustment Press to make adjustments Press to store Adjusting Clamp Position Clamp Position for RGB Adjusts clamp pulse in accordance with the input signal received from connected equipment Press to make adjustments Press to store Selecting the Optimum Dynamic Range of Images Auto Calibration for RGB Receives a white screen signal and adjusts the dynamic range of images to the optimum 1 Select Au...

Page 20: ...nguage Russian can only be set with the E model OTHER ADJUSTMENTS FEATURES MENU Continued ON SCREEN MENU Selecting Video Mode Video Input You can use this option to select the desired video mode of pictures it will receive to the Video Input terminal Each time you press or one of the available modes appears in the following sequence Auto Automatically selects NTSC PAL and SECAM Other than Auto You...

Page 21: ... by FUNCTION to set up Mask Each time you press or one of the available choices appears in the following sequence Off Does not mask Number Masks the fringe top bottom right and left of the screen by the number of pixels specified 5 Press to store Selecting D SUB Input D SUB Input You can use this option to select the signal system it will receive to D SUB Input terminal 1 Select D SUB Input and pr...

Page 22: ... a signal 4 Can specify background color Press or to select background color Each time you press or one of the available choices appears in the following sequence Black White Black Mutes images in Black background White Mutes images in White background Switches approx 20 seconds after the display stops receiving signals 5 Press to store DPMS selection screen Audio Input selection screen Selecting ...

Page 23: ...ther modes Displays pictures when a signal is received through the selected input mode terminal Press to store When using the display continuously When switching between RGB and video input modes only occasionally 1 Select Time for Mode Time with Screen Orbiter 2 Select a desired range for Moving Area with Screen Orbiter This causes the screen saver pattern to move in the same range at regular int...

Page 24: ... each signal Press to store In Auto mode the resolution of VGA WVGA 480P XGA WXGA SXGA and SXGA may not be automatically distinguished Switch to the fixed display when the image is not displayed properly Specifying RGB Input Signal Code Setting You can use this option to specify and display the type of RGB input signal by code number Each time you press or one of the available choices appears in t...

Page 25: ...rs in the following sequence 90 Deg Displays text from left to right when the display is installed with the power indicator lamp at the top Normal Displays text normally 90 Deg Displays text from left to right when the display is installed with the power indicator lamp at the bottom Press to store Be sure to make this setup when changing the direction of installation Displaying System Status Infor...

Page 26: ...e of having completed the initialization will be displayed after initializing Press when you finish 1 2 You can also use the switches on the display s control panel to accomplish these steps FACTORY DEFAULT selected in the main menu screen Displays the message of whether to proceed the initialization 3 4 5 Displays the message of having completed the initialization You can restore the values of th...

Page 27: ...an 48 3 51 8 or 58 4 61 4 Hz Change the setting of your PC etc Remove the power plug from the receptacle and inform your dealer about how the lamp flashed The power indicator lamp flashes differently depending on the type of problem CLEANING AND MAINTENANCE Problem Power does not turn ON No pictures are displayed Remote control does not function properly The display makes a snapping sound The disp...

Reviews: