73
T r o u b l e s h o o t i n g
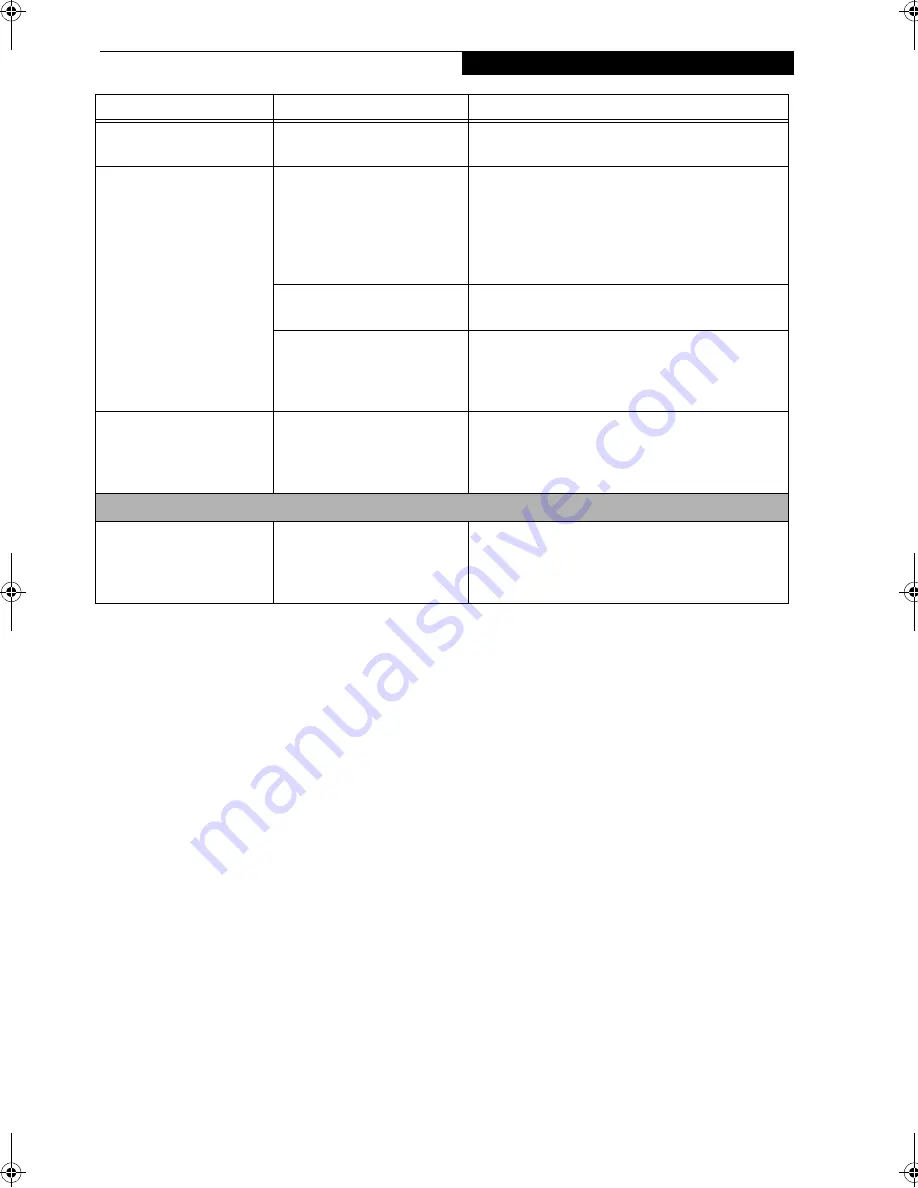
The Display is dark when
on battery power.
The default is set on low
brightness to conserve power.
Press [Fn] + [F7] to increase brightness and adjust
Power Control under battery settings.
You have connected an
external monitor and it
does not display any
information.
Your BIOS setup is not set to
enable your external monitor.
Toggle the video destination by pressing [Fn] and
[F10] together, or check your BIOS setup and enable
your external monitor. (See the Video Features
submenu, located within the Advanced Menu of the
BIOS.
(See BIOS Setup Utility on page 27 for more
information)
Your external monitor is not
properly installed.
Reinstall your device.
(See Mini-VGA Port on page 44
for more information)
Your operating system soft-
ware is not setup with the
correct software driver for
that device.
Check your device and operating system
documentation and activate the proper driver.
You have connected an
external monitor and it
does not come on.
Your external monitor
is not compatible with
your LifeBook notebook.
See your monitor documentation and the
External Monitor Support portions of the
Specifications section.
(See Specifications on page 85
for more information)
Miscellaneous Problems
An error message is
displayed on the screen
during the operation of
an application.
Application software often
has its own set of error
message displays.
See your application manual and help displays
screens for more information. Not all messages are
errors some may simply be status.
Problem
Possible Cause
Possible Solutions
P Series.book Page 73 Monday, May 13, 2002 2:44 PM
Summary of Contents for LifeBook P2000
Page 2: ...L i f e B o o k P 2 0 0 0 N o t e b o o k ...
Page 6: ...L i f e B o o k P 2 0 0 0 N o t e b o o k ...
Page 7: ...1 Preface ...
Page 8: ...L i f e B o o k P 2 0 0 0 N o t e b o o k ...
Page 10: ...2 L i f e B o o k P 2 0 0 0 N o t e b o o k S e c t i o n O n e ...
Page 11: ...3 2 Getting to Know Your LifeBook Notebook ...
Page 12: ...4 L i f e B o o k P 2 0 0 0 N o t e b o o k S e c t i o n T w o ...
Page 31: ...23 3 Getting Started ...
Page 32: ...24 L i f e B o o k P 2 0 0 0 N o t e b o o k S e c t i o n T h r e e ...
Page 39: ...31 4 User Installable Features ...
Page 40: ...32 L i f e B o o k P 2 0 0 0 N o t e b o o k S e c t i o n F o u r ...
Page 53: ...45 5 Using the Integrated Wireless LAN ...
Page 54: ...46 L i f e B o o k P 2 0 0 0 N o t e b o o k S e c t i o n F I v e ...
Page 70: ...62 L i f e B o o k P 2 0 0 0 N o t e b o o k S e c t i o n F i v e ...
Page 71: ...63 6 Troubleshooting ...
Page 72: ...64 L i f e B o o k P 2 0 0 0 N o t e b o o k S e c t i o n S i x ...
Page 85: ...77 7 Care and Maintenance ...
Page 86: ...78 L i f e B o o k P 2 0 0 0 N o t e b o o k S e c t i o n S e v e n ...
Page 90: ...82 L i f e B o o k P 2 0 0 0 N o t e b o o k S e c t i o n S e v e n ...
Page 91: ...83 8 Specifications ...
Page 92: ...84 L i f e B o o k P 2 0 0 0 N o t e b o o k S e c t i o n E i g h t ...
Page 100: ...92 L i f e B o o k P 2 0 0 0 N o t e b o o k S e c t i o n E i g h t ...
Page 101: ...93 9 Glossary ...
Page 102: ...94 L i f e B o o k P 2 0 0 0 N o t e b o o k S e c t i o n N i n e ...


