15
G e t t i n g t o K n o w Y o u r L i f e B o o k
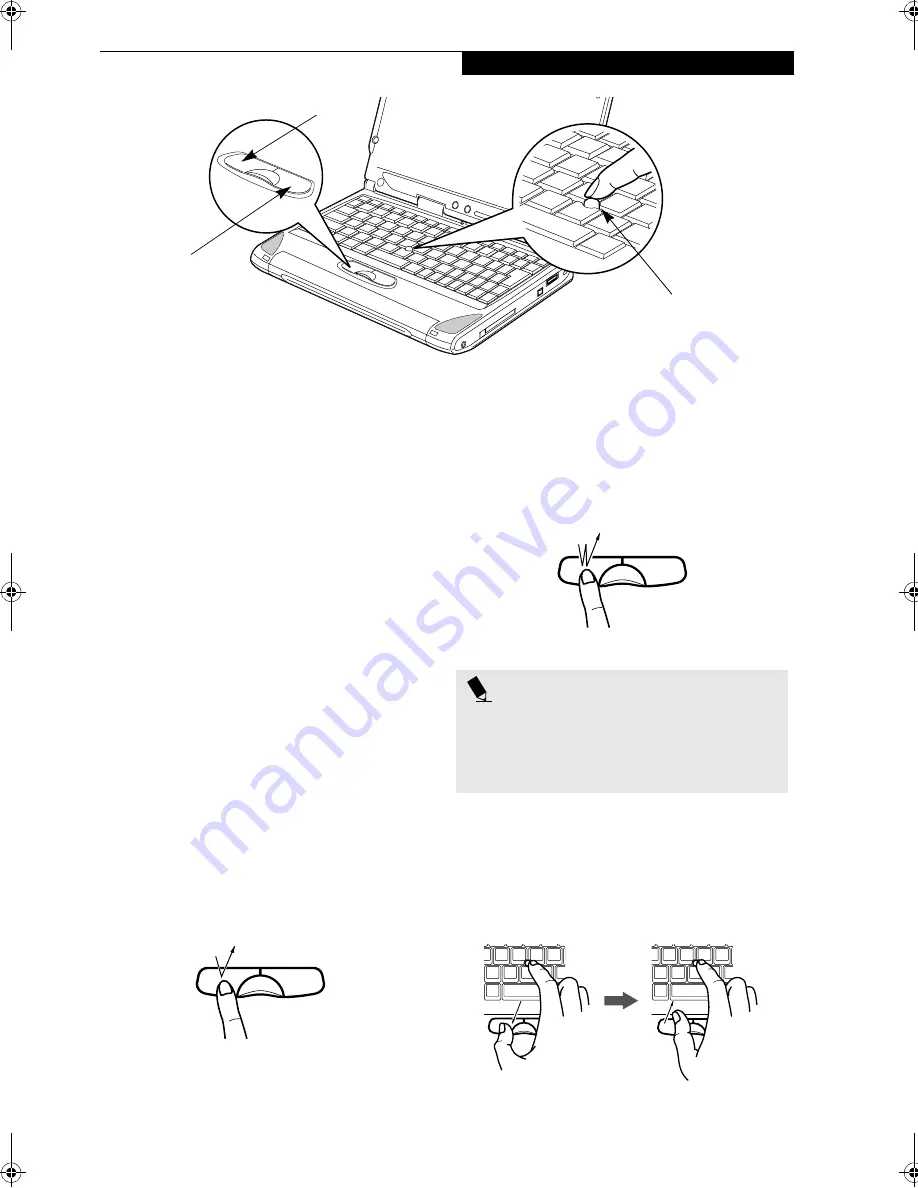
Figure 2-13 Quick Point pointing device
Quick Point
Pointing Device
The Quick Point is built into your LifeBook notebook. It
is used to control the movement of the cursor to select
items on your display panel. The Quick Point is
composed of a cursor control at the center of the
keyboard and three buttons on the palm rest of your
notebook. The cursor control works the same way a
mouse ball does, and moves the cursor around the
display. It only requires light pressure with the tip of
your finger, and the more pressure you use, the faster the
cursor will move. The left button functions the same as a
left mouse button while the right button has the same
function as a right mouse button. When used with the
cursor control, the middle button allows you to scroll up
and down a screen. The actual functionality of the
buttons may vary depending on the application that is
being used.
(Figure 2-13)
CLICKING
Clicking means pushing and releasing a button. To left-
click, move the cursor to the item you wish to select,
press the top button once, and then immediately release
it. To right-click, move the cursor to the item you wish
to select, press the bottom button once, and then imme-
diately release it.
(Figure 2-14)
Figure 2-14 Clicking
DOUBLE-CLICKING
Double-clicking means pushing and releasing the top
button twice in rapid succession. This procedure does
not function with the right button. To double-click,
move the cursor to the item you wish to select, press
and release the top button twice.
(Figure 2-15)
Figure 2-15 Double-clicking
DRAGGING
Dragging means pressing and holding the top button,
while moving the cursor. To drag, move the cursor to
the item you wish to move. Press and hold the top
button while moving the item to its new location
and then release it.
(Figure 2-16)
Figure 2-16 Dragging
Cursor Control
Left Button
Right Button
P O I N T S
■
If the interval between clicks is too long, the
double-click will not be executed.
■
Parameters for the Quick Point can be adjusted
from the Mouse Properties dialog box located in
the Windows Control Panel.
P Series.book Page 15 Monday, May 13, 2002 2:44 PM
Summary of Contents for LifeBook P2000
Page 2: ...L i f e B o o k P 2 0 0 0 N o t e b o o k ...
Page 6: ...L i f e B o o k P 2 0 0 0 N o t e b o o k ...
Page 7: ...1 Preface ...
Page 8: ...L i f e B o o k P 2 0 0 0 N o t e b o o k ...
Page 10: ...2 L i f e B o o k P 2 0 0 0 N o t e b o o k S e c t i o n O n e ...
Page 11: ...3 2 Getting to Know Your LifeBook Notebook ...
Page 12: ...4 L i f e B o o k P 2 0 0 0 N o t e b o o k S e c t i o n T w o ...
Page 31: ...23 3 Getting Started ...
Page 32: ...24 L i f e B o o k P 2 0 0 0 N o t e b o o k S e c t i o n T h r e e ...
Page 39: ...31 4 User Installable Features ...
Page 40: ...32 L i f e B o o k P 2 0 0 0 N o t e b o o k S e c t i o n F o u r ...
Page 53: ...45 5 Using the Integrated Wireless LAN ...
Page 54: ...46 L i f e B o o k P 2 0 0 0 N o t e b o o k S e c t i o n F I v e ...
Page 70: ...62 L i f e B o o k P 2 0 0 0 N o t e b o o k S e c t i o n F i v e ...
Page 71: ...63 6 Troubleshooting ...
Page 72: ...64 L i f e B o o k P 2 0 0 0 N o t e b o o k S e c t i o n S i x ...
Page 85: ...77 7 Care and Maintenance ...
Page 86: ...78 L i f e B o o k P 2 0 0 0 N o t e b o o k S e c t i o n S e v e n ...
Page 90: ...82 L i f e B o o k P 2 0 0 0 N o t e b o o k S e c t i o n S e v e n ...
Page 91: ...83 8 Specifications ...
Page 92: ...84 L i f e B o o k P 2 0 0 0 N o t e b o o k S e c t i o n E i g h t ...
Page 100: ...92 L i f e B o o k P 2 0 0 0 N o t e b o o k S e c t i o n E i g h t ...
Page 101: ...93 9 Glossary ...
Page 102: ...94 L i f e B o o k P 2 0 0 0 N o t e b o o k S e c t i o n N i n e ...


