background image

1BEFOREUSES


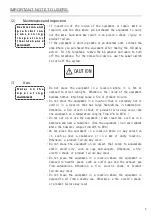
CLEAR FACEPLATE

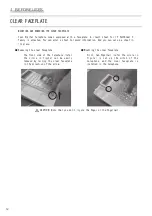
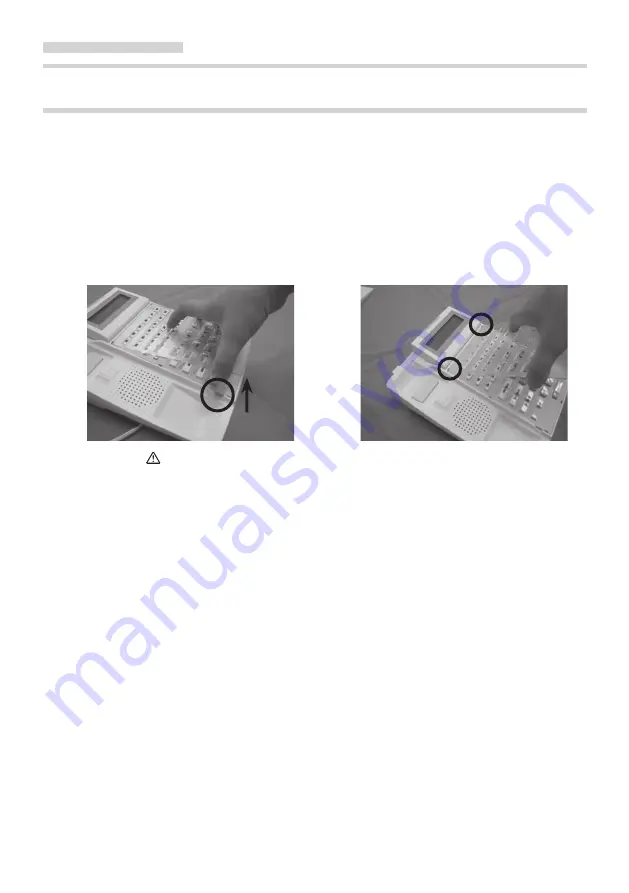
MOUNTING AND REMOVING THE CLEAR FACEPLATE 

Your  Digital  Telephone  comes  equipped  with  a  faceplate.  A  insert  sheet  for  IP  Pathfinder  S 
family is attached. You can alter a sheet to record information. And you can set up a sheet in 
its place. 

■ Removing the clear faceplate 

■ Mounting the clear faceplate 

The  front  side  of  the  telephone (refer 

First, two fingernail (refer the circle in 

the  circle  in  figure)  can  be  easily 

figure)  is  set  up  the  ditch  of  the 

removed  by  raising  the  clear  faceplate 

telephone,  and  the  clear  faceplate  is 

in the direction of the arrow. 

installed in the telephone.

CAUTION Note that you don't injure the finger or the fingernail.

1


Summary of Contents for IP Pathfinder S

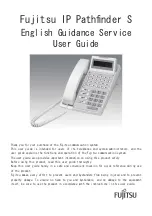
Page 1: ...r guide also provides important information on using this product safely Before using this product read this user guide thoroughly Keep this user guide handy in a safe and convenient location for quick reference during use of the product Fujitsu makes every effort to prevent users and bystanders from being injured and to prevent property damage To ensure no harm to you and bystanders and no damage...

Page 2: ...to use this Product for High Safety Required Use please consult with our sales representatives in charge before such use CAUTION This is a Class A product In a domestic environment this product may cause radio interference in which case the user may be required to take corrective actions VCCI A This telephone system is designed for use in Japan only and cannot be used in any other country The spec...

Page 3: ...ly DANGER WARNING indicates a hazardous situation could result in serious personal injury if the user does not perform the procedure correctly WARNING CAUTION indicates a hazardous situation could result in minor or moderate personal injury if the user does not perform the procedure correctly This alert signal also indicates that damages to the product or other property may occur if the user does ...

Page 4: ...gets through openings and inside the equipment Otherwise a fire electric shock or product failure may occur Do not place the equipment in a location that is not stable such as on a wobbly stand or in a location that is at an incline Otherwise the equipment may be drop off or fall over because of a problem with balance which may cause an injury or product failure Placing the AC adapter or the equip...

Page 5: ...ght Otherwise the inside of the equipment becomes hotter which may cause a fire or product failure Do not place the equipment in a location that is extremely hot or cold or in a location that has large fluctuations in temperature Otherwise a fire electric shock or product failure may occur Use the equipment at a temperature ranging from 0 to 40 Do not set up or use the equipment in wet locations s...

Page 6: ...ilure 2 Maintenance and inspection I I n n s s p p e e c c t t i i o o n n a a n n d d c cl le ea an ni in ng g 3 Disposal N No ot te es s o on n d di is sp po os sa al l o of f t th he e p pr ro od du uc ct t If drops of water are found on the equipment wipe them up with a dry cloth Drops of water left on the equipment may cause a fire electric shock or product failure If the equipment is dirty c...

Page 7: ...CH DIALING 17 ABBREVIATED DIALING 17 SYSTEM ABBREVIATED DIALING 17 ABBREVIATED DIALING DISPLAY 17 USEFUL OPERATIONS 18 EXTENSION CAMP ON 18 THREE WAY CONFERENCE 18 GROUP PICK UP 18 3 LOCAL TELEPHONE DIRECTORY TO REGISTER A DIRECTORY DATA 19 TO MAKE A CALL USING THE LOCAL TELEPHONE DIRECTORY 20 TO CORRECT A DIRECTORY DATA 21 TO DELETE A DIRECTORY DATA 22 METHOD OF INPUTTING THE CHARACTERS 23 4 CALL...

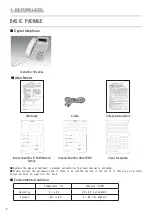
Page 8: ...er PBX Clear faceplate family Besides the above attachment a modular connector with screw terminal is attached Please contact the purchased shop if there is an insufficient one in the set or if there are an erratum and an omission of a word in this book Environmental condition Temperature Humidity RH Operating 0 40 20 80 not dewfall Storage 20 60 5 90 not dewfall ...

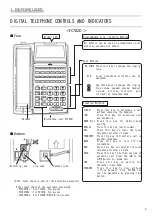
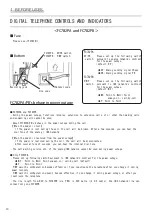
Page 9: ... Press this key for abbreviated dialing Press this key to redial number Press this key to clear the local telephone directory s data Press this key to transfer a call to another telephone Press this key to turn off the microphone Press this key to register the local telephone directory s data Press this key to hold an outside or extension call Press the ICM or the LINE button to resume call Press ...

Page 10: ...e during the call When the power is lost If the power is lost during the call the call will be broken After a few seconds you can hear the dial tone of the analog INS network When the power is restored from the power outage If the power is restored during the call the call will be disconnected After several tens of seconds you can hear the internal dial tone The call waiting service etc of the ana...

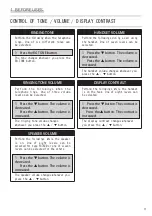
Page 11: ...the speaker is on One of eight levels can be selected for type FC782D or one of eleven levels can be selected for the others 1 Press the button The volume is decreased Press the button The volume is increased The speaker volume changes whenever you press the button Perform the followings during a call using the handset One of seven levels can be selected 1 Press the button The volume is decreased ...

Page 12: ...an set up a sheet in its place Removing the clear faceplate Mounting the clear faceplate The front side of the telephone refer First two fingernail refer the circle in the circle in figure can be easily figure is set up the ditch of the removed by raising the clear faceplate telephone and the clear faceplate is in the direction of the arrow installed in the telephone CAUTION Note that you don t in...

Page 13: ...BER REDIAL 1 Press the REDIAL button T h e last n u m b er y o u d i ale d is automatically redialed Listen to the ring back tone 2 Lift the HANDSET The conversation begins when the calling party answers Listen to the dial tone of the extension 2 Dial a desired number Listen to the ring back tone 3 Lift the HANDSET The conversation begins when the calling party answers 4 Replace the handset when t...

Page 14: ...incoming call sounds 1 Lift the HANDSET You are now connected to the calling party The ringing tone of the extension sounds 1 Lift the HANDSET You are now connected to the calling party 2 Replace the handset when the conversation ends 2 Replace the handset when the conversation ends 1 ...

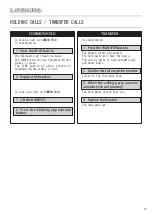
Page 15: ...y in red 2 Replace the handset To pick up a call on COMMON HOLD 1 Lift the HANDSET 2 Press the blinking appropriate button In conversation 1 Press the TRANSFER button The button lights up steadily The held party will hear the music The calling party is held automatically and hears music 2 Dial the desired extension number Listen to the ring back tone 3 When the calling party answers announce the c...

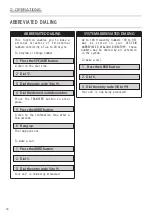
Page 16: ...ber Press the TRANSFER button to enter pause 5 Press the ABBD button Listen to the confirmation tone after a few seconds 6 Hang up The lamp goes out To make a call 1 Press the ABBD button 2 Dial 5 3 Dial the entry code 0 to 9 Your call is now being processed Up to 100 frequently numbers 00 to 99 m a y b e store d in y o ur S Y S T E M ABBREVIATED DIALING DIRECTORY these numbers may be shared by al...

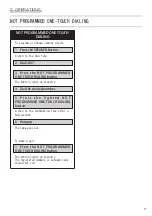
Page 17: ...ROGRAMMED ONE TOUCH DIALING button The button lights up steadily 4 Dial the desired number 5 P r e s s t h e l i g h t e d N O T PROGRAMMED ONE TOUCH DIALING button Listen to the confirmation tone after a few seconds 6 Hang up The lamp goes out To make a call 1 Press the NOT PROGRAMMED ONE TOUCH DIALING button The button lights up steadily The registered numbers is automatically dialed for you 1 ...

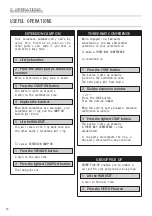
Page 18: ... Press the SPEAKER button Listen to the dial tone 2 Press the lighted CAMP ON button The lamp goes out While engaged in a two party conversation you may add another extension to your conversation To make a THREE WAY CONFERENCE In conversation 1 Press the CONF button The button lights up steadily Listen to the confirmation tone The held party will hear music 2 Dial the extension number or Press the...

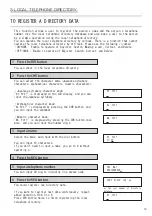
Page 19: ...habetical characters numeric characters Japanese syllabary character mode カナ ナマエ カナ ナマエ is displayed on the LCD display and you can input the Japanese syllabary Alphabetical character mode AL ナマエ AL ナマエ is displayed by pressing the CHR button and you can input the alphabet Numeric character mode ナマエ No ナマエ is displayed by pressing the CHR button once more and you can input the number digit 3 Input...

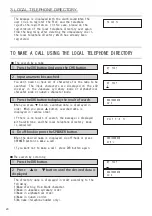
Page 20: ...c character mode 3 Press the DIR button to display the result of search When you press button searched data is displayed in order When you press button searched data is displayed in reverse order If there is no result of search the message is displayed with alarm tone and the local telephone directory mode is cancelled 4 Do off hook or press the SPEAKER button When the desired name is displayed do...

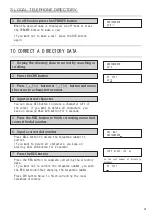
Page 21: ...aracter left of the cursor If you want to delete all characters you keep on pressing CALL LOG button for 2 seconds 5 Press the REG button to finish correcting name And correct the dial number 6 Input a correct dial number TEL 00312345678 Press DELL button to delete the telephone number to correct If you want to delete all characters you keep on pressing CALL LOG button for 2 seconds 7 Press the RE...

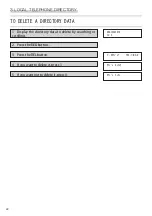
Page 22: ... DATA 1 Display the directory data to delete by searching or scrolling 2 Press the REG button 3 Press the DEL button 4 If you want to delete it press 1 5 If you want not to delete it press 0 00312345678 スズキ データサクジョ YES 1 NO 0 サクジョ カンリョウ サクジョ チュウシ ...

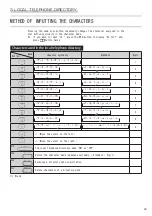
Page 23: ...ton Japanese syllabary Alphabet Digit ア イ ウ エ オ ァ ィ ゥ ェ ォ 1 カ キ ク ケ コ A B C a b c 2 サ シ ス セ ソ D E F d e f 3 タ チ ツ テ ト ッ G H I g h i 4 ナ ニ ヌ ネ ノ J K L j k l 5 ハ ヒ フ ヘ ホ M N O m n o 6 マ ミ ム メ モ P Q R S p q r s 7 ヤ ユ ヨ ャ ュ ョ T U V t u v 8 ラ リ ル レ ロ W X Y Z w x y z 9 ワ ヲ ン ー 0 Move the cursor to the left Move the cursor to the right DIR The local telephone directory mode ON or OFF CHR Select the chara...

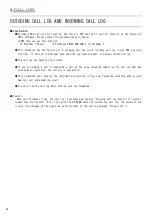
Page 24: ...ldest call log The call log can operate only on hook If you are making a call or answering a call at the same telephone number as the call log that has already been registered the call log is overwrited This telephone can t display the information registered in the local telephone directory when you are making a call and answering a call You can t see the call log while talking over the telephone ...

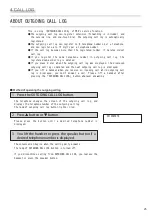
Page 25: ...outgoing call log is displayed If you lift a handset when you receive an incoming call while outgoing call log is displayed you can t answer a call Please lift a handset after pressing the OUTGOING CALL LOG button whenever answering Method of operating the outgoing call log 1 Press the OUTGOING CALL LOG button The telephone changes the screen of the outgoing call log and displays the telephone num...

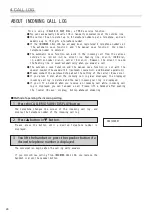
Page 26: ... example 130 1 automatic operation and 0 manual operation Please contact the purchased shop about the setting of the caller ID save dial If you press 0 dial when the incoming call log was displayed the displayed incoming call log is deleted and the next incoming call log is displayed If you lift a handset when you receive an incoming call while incoming call log is displayed you can t answer a cal...

Page 27: ... ...

Page 28: ...June 2010 T101 1947 01 ...

Reviews: