background image

fi-6800 C

ONSUMABLE

 R

EPLACEMENT


AND

 C

LEANING

 I

NSTRUCTIONS

8

R

EPLACING


THE

 B

RAKE

 R

OLLER

A worn or improperly installed Brake Roller will cause multiple feeds and
paper jams.  The Brake Roller has an approximate life of 600,000 pages.
If NCR or carbonless paper is used the life span of the Brake Roller may
be decreased by half.

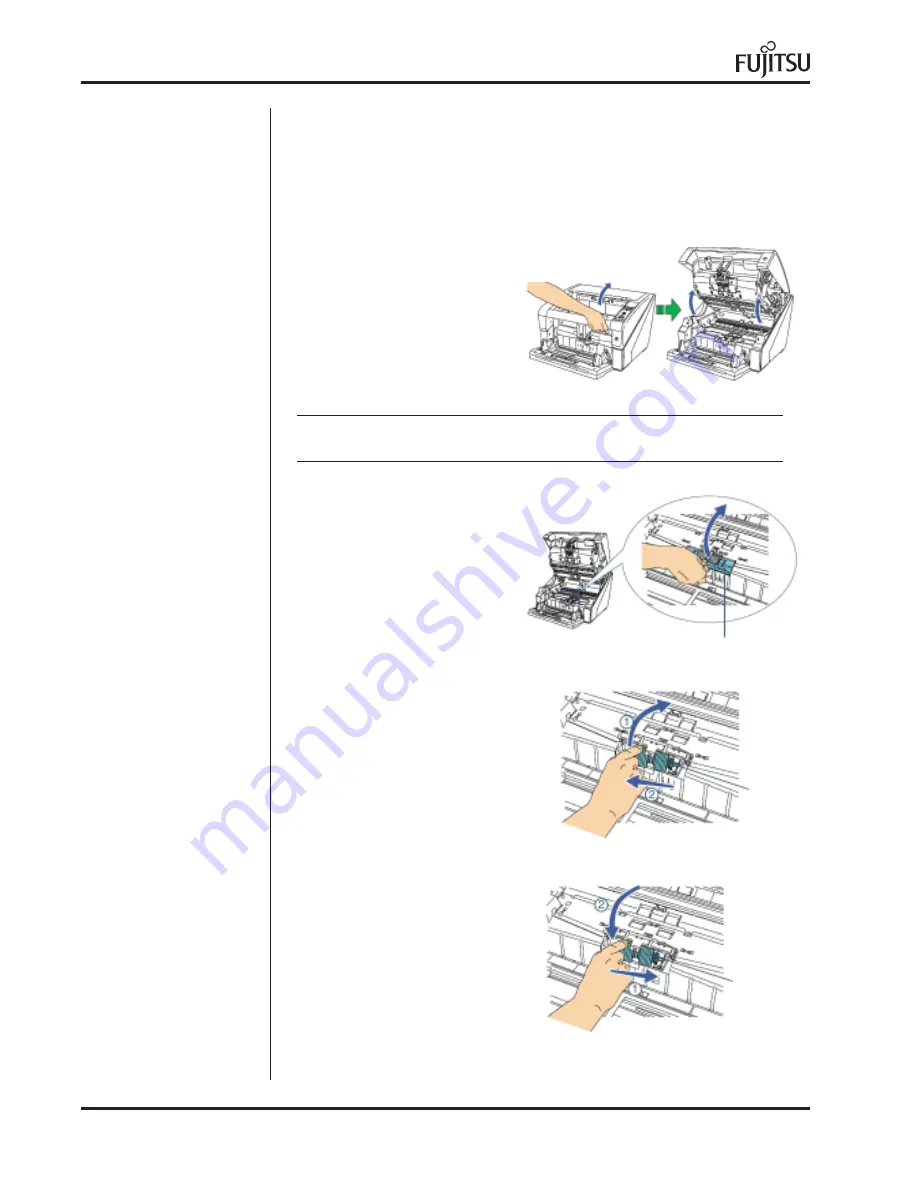
Make sure there is no paper
in the stacker.

Grab the ADF Release Tab
and lift it up to open the ADF.

Note:

When you stop pushing up on the ADF it stays at that location.

Grab the Roller Cover by the
lower middle and lift to open.

Lift the left side of the Brake
Roller and then pull the shaft
out from left to right.

Install the new Brake Roller
by inserting the right end of
the shaft into the mounting
hole, then place the left end
into the mounting bracket.

Close the Roller Cover.

Roller Cover

Brake

Roller

Brake

Roller

Summary of Contents for fi-6800

Page 1: ...1 fi 6800 CONSUMABLE REPLACEMENT AND CLEANING INSTRUCTIONS fi 6800 CONSUMABLE REPLACEMENT AND CLEANING INSTRUCTIONS CG00002 020901C ...

Page 2: ...mable life it is strongly recommended that all the consumables listed above be replaced at the same time Not replacing all the consumables at the same time will decrease the life of the consumables NCR or Carbonless paper has chemical composition which damages the consumables listed above Cleaning of these items will be needed more frequently to avoid feed problems Also their life will be reduced ...

Page 3: ...ab theADF Release Tab and lift it up to open the ADF Note When you stop pushing up on the ADF it stays at that location Open the Roller Cover by grabbing the tabs on the left and right sides with your fingers and pull down Pull out on the tab that locks the Pick Roller in place in the direction of the arrow and slide the Pick Roller off the shaft Repeat the procedure above to remove the second Pic...

Page 4: ... 4 REPLACING THE PICK ROLLERS CONT Install the new Pick Rollers by aligning the hole in the rollers with the roller shaft Close the Roller Cover Close theADF Cover Reset the Pick Roller Counter in the Software Operation Panel or on the Scanner Operator Panel ...

Page 5: ...y be decreased by half Tab Roller Cover Lever Separator Roller Lever Separator Roller Make sure there is no paper in the stacker Grab theADF Release Tab and lift it up to open the ADF Note When you stop pushing up on the ADF it stays at that location Open the Roller Cover by grabbing the tabs on the left and right sides with your fingers and pull down Pull down the lever which is located on the ri...

Page 6: ...ator Roller by inserting the right side of the shaft first then the left side so that the tab fits in the groove Push up the lever which is located on the left side of the Separator Roller Push up the lever which is located on the right side of the Separator Roller Tab Separator Roller Separator Roller Separator Roller Lever REPLACING THE SEPARATOR ROLLER CONT Separator Roller Lever ...

Page 7: ...ACING THE SEPARATOR ROLLER CONT Close the Roller Cover Note Make sure that both ends of the cover are locked firmly Close theADF Cover Reset the Separator Roller Counter in the Software Operation Panel or on the Scanner Operator Panel Roller Cover Separator Roller ...

Page 8: ... half Make sure there is no paper in the stacker Grab theADF Release Tab and lift it up to open the ADF Note When you stop pushing up on the ADF it stays at that location Grab the Roller Cover by the lower middle and lift to open Lift the left side of the Brake Roller and then pull the shaft out from left to right Install the new Brake Roller by inserting the right end of the shaft into the mounti...

Page 9: ...fi 6800 CONSUMABLE REPLACEMENT AND CLEANING INSTRUCTIONS REPLACING THE BRAKE ROLLER CONT Close theADF Cover Reset the Brake Roller Counter in the Software Operation Panel or on the Scanner Operator Panel ...

Page 10: ...umables have been replaced To insure accurate consumable life tracking it is very important to reset the consumable counters every time consumables are replaced CHECKING CONSUMABLE COUNTS Turn on the scanner and confirm it is communicating properly to your PC From the START MENU select ALL PROGRAMS SCANNER UTILITY FOR MICROSOFT WINDOWS SOFTWARE OPERATION PANEL The SOFTWARE OPERATION PANEL opens Fr...

Page 11: ... Separator Roller Number of pages scanned since the Separation Rollers were replaced Assist Roller Number of pages scanned since the Assist Roller was replaced This counter cannot be reset by the user The screen on the previous page displays the Life Count of the Scanner and the number of pages scanned by each consumable RESETTING THE CONSUMABLE COUNTERS USING THE SOFTWARE OPERATION PANEL Once con...

Page 12: ...able counters can also be reset from the scanner Operator Panel Make sure the scanner is on and Ready Press the MENU BUTTON Press the or and select 23 Show Clear Counters Press the FUNCTION ENTER BUTTON Press the or until the replaced consumable is displayed on the LCD Press the COUNTER RESET BUTTON Make sure that YES is highlighted and press the FUNCTION ENTER BUTTON to confirm ...

Page 13: ... in with Pencil Documents containing a large amount of calcium carbonate Documents with toner that is not fused properly Cleaning Cloths CG90000 120001 Cleaning Sheets CA99501 0016 Cleaner F1 PA03950 0352 CLEANING MATERIALS Cleaning Wipes PA03951 0419 Cleaning Swabs CG90000 120601 Location Cleaning Sheet Cloth Sprayed with every 10 000 pages Cleaner F1 Wipes every 10 000 pages Pick Rollers Brake R...

Page 14: ...eaning sheets does not take the place of the more com plete cleanings described later in this section Make sure the scanner is ON Press the MENU BUTTON Press the or and select 21 Show Clear Counters Press the FUNCTION ENTER BUTTON Set the Hopper Guides to their maximum width Adjust the Stacker Extension to the length of the Cleaning Sheet and pull up on the Paper Stopper Stacker Extension Paper St...

Page 15: ... Hopper Guide adhesive side up Press the SCAN BUTTON The cleaning sheet is fed through the scanner Repeat the previous steps with the adhesive side face down to clean the lower Transport Path Press the STOP BUTTON Reset the Cleaning Counter in the Software Operation Panel or on the Scanner Operator Panel CLEANING THE ROLLERS WITH THE CLEANING SHEETS CONT Right Hopper Guide Cleaning Sheet ...

Page 16: ...art forms Make sure there is no paper in the stacker Grab theADF Release Tab and lift it up to open the ADF Remove the Pick Rollers Refer to page 3 Using a cloth with F1 Cleaner or isopropyl alcohol gently wipe across the Pick Rollers along the grooves of the roller surface Reinstall the Pick Rollers Remove the Separator Roller Refer to page 5 Using a cloth with F1 Cleaner or isopropyl alcohol gen...

Page 17: ...MPONENTS CONT Remove the Brake Roller Refer to page 8 Using a cloth with F1 Cleaner or isopropyl alcohol gently wipe along the direction of the grooves of the roller surface Reinstall the Brake Roller Reset the Cleaning Counter in the Software Operation Panel or on the Scanner Operator Panel ...

Page 18: ...with a large amount of printing documents filled out in pencil or carbonless multipart forms Open the Top Cover by grabbing the Top Cover Release Tab and pushing up Clean the Feed Rollers in the upper area of the scanner with a lint free cloth moistened with F1 Cleaner or isopropyl alcohol Clean the whole surface of the rollers by rotating them manually Below is a location of the different types o...

Page 19: ...ropyl alcohol Clean the whole surface of the rollers by rotating them manually Clean the Pinch Rollers in the upper area of the scanner with a lint free cloth moistened with F1 Cleaner or isopropyl alcohol Clean the whole surface of the rollers by rotating them manually Clean the Pinch Rollers in the ADF of the scanner with a lint free cloth moistened with F1 Cleaner or isopropyl alcohol Clean the...

Page 20: ...ropyl alcohol Clean the metal sheet guides in the lower section of the ADF with a lint free cloth moistened with F1 Cleaner or isopropyl alcohol Note If the transport path contains a large amount of paper dust use a vacuum cleaner to clean Reset the Cleaning Counter in the Software Operation Panel or on the Scanner Operator Panel Keeping the transport path clean will avoid paper feeding issues and...

Page 21: ... large amount of paper dust in the scanner and the scanned images continue to have vertical streaks follow the directions below to clean behind the glass Loosen the screw on the Glass Assembly This is a captive screw so it will not come free Tilt the Glass to the angle shown on the right Remove the Glass as you slide it to the right Clean the backside of the glass you removed with a lint free clot...

Page 22: ...cal streaks follow the directions below to clean behind the glass Loosen the screw on the Glass Assembly This is a captive screw so it will not come free Tilt the Glass to the angle shown on the right Remove the Glass as you slide it to the left Clean the backside of the glass you removed with a lint free cloth Using a cotton swab clean the glass inside the area where the Glass was removed Reinsta...

Page 23: ...ADF Clean the Document Sensors in the upper section of the ADF area with the a lint free cloth moistened with F1 Cleaner or isopropyl alcohol Clean the Document Sensors in the lower section of the ADF area with the a lint free cloth moistened with F1 Cleaner or isopropyl alcohol Close the ADF Reset the Cleaning Counter in the Software Operation Panel or on the Scanner Operator Panel Document Senso...

Page 24: ...pper is open Clean the Friction Pads with a lint free cloth moistened with F1 Cleaner or isopropyl alcohol Reset the Cleaning Counter in the Software Operation Panel or on the Scanner Operator Panel Friction Pads Dirty Hopper Friction Pads can cause multifeeds when the Hopper only has a few sheets stacked on it ...

Page 25: ...25 fi 6800 CONSUMABLE REPLACEMENT AND CLEANING INSTRUCTIONS ...

Page 26: ... trademarks of Fujitsu Computer Products of America Inc All statements herein are valid only in the U S for U S residents are based on normal operating conditions are provided for informational purposes only and are not intended to create any implied warranty of merchantability or fitness for a particular purpose Fujitsu Computer Products of America Inc reserves the right to modify at any time wit...

Reviews: