background image

Getting started

Installing the cable cover (optional)

All necessary lines are connected to the device.

All necessary measures to protect property and data have been taken (see

"Property and data protection", Page 35

).

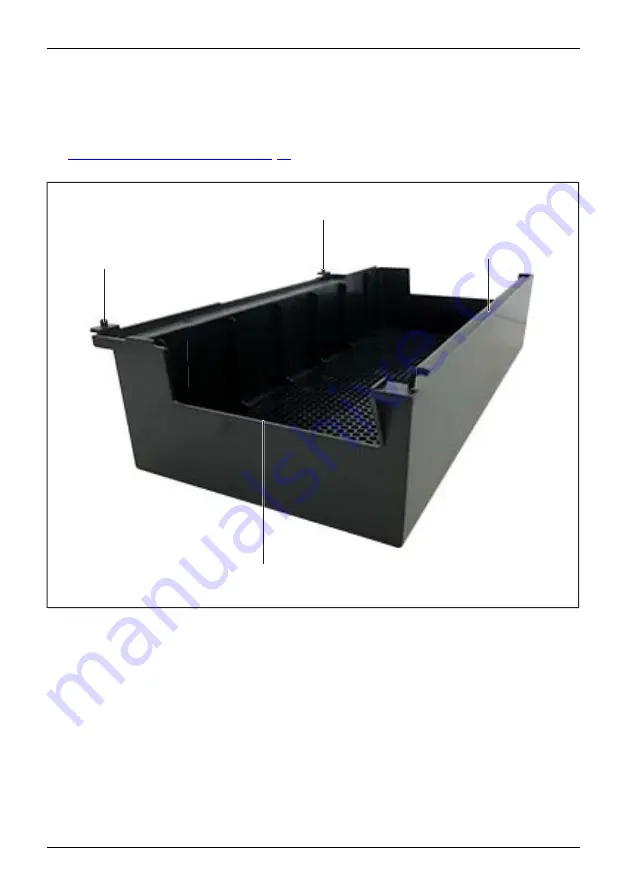
The cable cover is constructed as follows:

Platzhalter 1:
für Montage wichtige
Bauteile der Abdeckung

P

P

P

P

P

P

P

P

P

P

P

P

P

P

P

P

P

P

P

P

P

P

P

P

P

P

P

P

P

P

P

P

P

P

P

P

P

P

P

P

P

P

P

P

P

P

P

P

l

l

l

l

l

l

l

l

l

l

l

l

l

l

l

l

l

l

l

l

l

l

l

l

l

a

a

a

a

a

a

a

a

a

a

a

a

a

a

a

a

a

a

a

a

a

a

a

a

a

a

a

a

a

a

a

a

a

t

t

t

t

t

t

t

t

t

t

t

t

t

t

t

t

t

t

t

t

t

t

t

t

t

t

t

t

t

t

t

t

z

z

z

z

z

z

z

z

z

z

z

z

z

z

z

z

z

z

h

h

h

h

h

h

h

h

h

h

h

a

a

a

a

a

a

a

a

a

a

a

a

l

l

l

l

l

l

l

l

l

t

t

t

t

t

t

t

t

t

e

e

e

e

e

e

e

e

e

r

r

r

r

r

r

r


1

1

1

1

1

1

1

:

:

:

:

f

f

f

f

f

f

f

f

ü

ü

ü

ü

ü

ü

ü

ü

ü

r

r

r

r

r


M

M

M

M

M

M

M

o

o

o

o

o

o

o

o

o

n

n

n

n

n

n

n

t

tt

t

t

a

a

a

a

a

g

g

g

g

g

g

g

g

e

e

e


w

w

w

w

w

w

i

i

i

i

c

c

c

c

c

c

c

c

c

c

c

c

c

c

h

h

h

h

h

h

h

h

h

h

h

h

h

h

h

h

h

t

t

t

t

t

t

t

t

t

t

t

t

t

t

t

i

i

i

i

i

i

i

i

i

g

g

g

g

g

g

g

g

g

g

g

g

g

e

e

e

e

e

e

e

e

e

e

e

e

e

B

B

B

B

B

a

a

a

u

u

u

t

t

tte

e

e

e

e

e

i

i

i

l

l

l

l

l

l

e

e

e

e


d

d

d

d

d

d

e

e

e

e

e

e

e

e

e

e

e

e

e

e

e

e

e

e

e

e

e

r

r

r

r

r

r

r

r

r

r


A

A

A

A

A

A

A

A

A

A

A

A

A

A

A

A

A

A

A

A

b

b

b

b

b

b

b

b

b

b

b

b

b

b

b

b

d

d

d

d

d

d

d

d

d

d

d

d

d

d

e

e

e

e

e

e

e

e

e

e

e

e

e

e

e

e

c

c

c

c

c

c

c

c

c

c

c

c

c

c

c

c

c

c

k

k

k

k

k

k

k

k

k

k

k

k

k

k

k

k

k

k

k

k

k

k

k

k

k

k

k

k

k

k

k

k

k

k

k

k

k

u

u

u

u

u

u

u

u

u

u

u

u

u

u

u

u

u

u

u

u

u

u

u

u

u

u

u

u

u

u

u

u

u

u

u

u

u

u

u

u

u

u

u

u

u

u

u

u

u

u

u

u

u

n

n

n

n

n

n

n

n

n

n

n

n

n

n

n

n

n

n

n

n

n

n

n

n

n

n

n

n

n

n

n

n

n

g

g

g

g

g

g

g

g

g

g

g

g

g

g

g

g

g

g

g

g

g

g

g

g

g

g

g

g

g

g

g

g

g

g

g

g

g

g

g

g

g

g

g

g

g

g

g

g

g

g

a

a

b

c

a = Locking elements
b = Guide rail

c = Cable opening

On devices with a housing lock: Unlock the casing.

22

Fujitsu

Summary of Contents for ESPRIMO P5 Series

Page 1: ...System Operating Manual FUJITSU Desktop ESPRIMO P5xxx P7xxx P9xxx ...

Page 2: ...lable on our website http www fujitsu com fts You can find driver updates at http support ts fujitsu com download Should you have any technical questions please contact our Hotline Service Desk http support ts fujitsu com contact servicedesk Your sales partner Your sales office We hope you enjoy using your new Fujitsu system ...

Page 3: ......

Page 4: ...chnology Solutions GmbH Mies van der Rohe Straße 8 80807 Munich Germany http www fujitsu com fts Copyright Fujitsu Technology Solutions GmbH2020 All rights reserved Publication Date 09 2020 Order No A26361 K1700 Z325 1 7619 edition 1 ...

Page 5: ...MO P5xxx P7xxx P9xxx Operating Manual Your ESPRIMO 5 Ports and Operating Elements 7 Important notes 11 Getting started 13 Operation 31 Troubleshooting and tips 39 System expansions and repairs 43 Technical data 44 Index 46 ...

Page 6: ...iaries in the USA and other countries Kensington MicroSaver and K Slot are registered trademarks of ACCO Brands USB Type C and USB C are trademarks of the USB Implementers Forum in the USA and other countries Microsoft and Windows are trademarks or registered trademarks of Microsoft Corporation in the USA and or other countries All other trademarks specified here are the property of their respecti...

Page 7: ...al devices to the USB ports 21 Installing the cable cover optional 22 Switching on for the first time installing the software 29 Switch on the monitor and the machine 29 Installing the software 30 Operation 31 Switch the device on 31 Switching off the device 31 Indicators on the device 32 Keyboard 33 Important keys and keyboard shortcuts 33 Settings in BIOS Setup 34 Property and data protection 35...

Page 8: ... mouse pointer displayed on the screen 41 Time and or date is not correct 41 Error messages on the screen 41 Installing new software 41 Tips 42 System expansions and repairs 43 Technical data 44 Index 46 4 Fujitsu ...

Page 9: ...rating system is preinstalled on your hard disk e g Windows Further information on this device is provided in the Quick Start Guide poster in the Safety regulations manual in the Warranty manual in the BIOS manual for your device in the System expansions and repairs manual in the operating manual for the monitor in the manual for the mainboard in your operating system documentation Using the progr...

Page 10: ... or a command used to start a program start exe This font indicates information that is displayed on the screen by a program e g Installation is complete This font indicates terms and texts used in a software interface e g Click on Save names of programs or files e g Windows or setup exe This font indicates cross references to another section e g Safety information cross references to an external ...

Page 11: ...s This chapter presents the individual hardware components of your device This will provide you with an overview of the ports and operating elements on the device Please familiarise yourself with these components before you start to work with the device Fujitsu 7 ...

Page 12: ...tional 2 Module bay for a 51 4 inch drive 3 Module slot for optional components 4 ON OFF switch 5 Drive indicator 6 Connections depending on the configuration level see Ports on the device Page 17 7 Latch with optional housing lock left side not shown in image 8 Fujitsu ...

Page 13: ...FUJITSU Desktop ESPRIMO P501x P701x and P901x 4 full height slots FUJITSU Desktop ESPRIMO P991x The devices also have Flex I O with one of the following connection types exception FUJITSU Desktop ESPRIMO P501x USB Type C HDMI VGA DVI D The connections and slots on the device depend on the ordered variant and its configuration level and can therefore defer from the example below Fujitsu 9 ...

Page 14: ... socket AC IN 4 Screen socket AC OUT optional 5 Connections depending on the configuration level see Ports on the device Page 17 6 Full height slots 7 Flex I O in the example DVI D Ventilation openings on graphics cards can become hot during operation Therefore do not touch the graphics card during operation 10 Fujitsu ...

Page 15: ...ins voltage To completely disconnect from the mains voltage remove the power plug from the power socket Only operate the device with the casing closed Replace the lithium battery on the mainboard in accordance with the instructions in manual System Upgrades and Repairs Caution components in the system can get very hot The activities described in these instructions must always be performed with the...

Page 16: ... with water Water entering into the device could present a serious risk to users e g electric shock Ensure that no liquid enters the system The surface can be cleaned with a dry cloth If particularly dirty use a cloth that has been moistened in mild domestic detergent and then carefully wrung out Use disinfectant wipes to clean the keyboard and the mouse Energy saving disposal and recycling Dispos...

Page 17: ...use overview Preparingforuse Only a few steps are necessary to put your new device into operation for the first time Select a location for device and set up device Connect external devices such as mouse keyboard and monitor Check the voltage at the mains outlet and connect the device to an electrical outlet Switch the device on You will learn more about the individual steps in the following sectio...

Page 18: ... location disturbing vibrations and noises may occur In order to avoid this a minimum distance of 10 mm 0 39 inch to other devices or objects should be maintained on housing sides without ventilation surfaces In order to avoid overheating do not cover the ventilation areas of the monitor or the device For ventilation surfaces a minimum distance of 200 mm 7 87 inch from the device must be maintaine...

Page 19: ...wer cable to the device 1 Plug the power plug into a grounded mains outlet 2 Power connection Country USA Canada Mexico parts of South America Japan Korea the Philippines Taiwan Russia and the Commonwealth of Independent States CIS large parts of Europe parts of South America the Middle East parts of Africa Hong Kong India large parts of South Asia UK Ireland Malaysia Singapore parts of Africa Chi...

Page 20: ...s always remove all power plugs before connecting external devices Do not connect or disconnect cables during a thunderstorm Always take hold of the actual plug when disconnecting a cable Never pull the cable To ensure that your device works properly use only the supplied connection cable or only use a high quality connection cable 16 Fujitsu ...

Page 21: ...s require special drivers see the documentation for the connected device Combined headphone and microphone port black Line In Out Audio input Line In light blue Audioinput LineIn Audio output Line Out light green Audiooutput LineOut USB 2 0 Universal Serial Bus type A black USB 3 2 Gen1 Universal Serial Bus Type A blue Type C black UniversalSerialBus USB 3 2 Gen2 Universal Serial Bus type A blue t...

Page 22: ... or the monitor ports of an optional display adapter in one of the board slots 2 to connect a monitor to your device 2 1 3 1 1 Screen connections of the mainboard 2 Screen connections of the graphics card display adapter 3 Flex I O monitor connection Follow the instructions contained in the monitor manual to prepare the monitor for operation e g connecting cables 18 Fujitsu ...

Page 23: ... 1 0 A at 230 V or 2 0 A at 100 V The values for the monitor current consumption can be found in the technical data on the monitor or in the operating manual for the monitor 2 1 Depending on your device configuration level plug the monitor power cable into either the monitor socket of the device 1 or a grounded power outlet 2 When you connect the monitor to the monitor socket of the device it auto...

Page 24: ...supplied keyboard cable only USBport Connecting Plug the rectangular connector of the keyboard cable into the rectangular socket on the underside or on the rear of the keyboard Plug the flat rectangular USB connector of the keyboard cable into a USB port of the device USBport Connecting a PS 2 keyboard Use the supplied keyboard cable only ConnectingaPS 2keyboard Connecting Plug the rectangular con...

Page 25: ...stem already includes many drivers If the required drive is missing install it Current drivers are usually available on the Internet or will be supplied on a data carrier Connecting external devices to the USB ports USBdevices USBport Externaldevices Devices You can connect a wide range of external devices to the USB ports e g printer scanner mouse or keyboard USB devices are hot pluggable This me...

Page 26: ... o o o o o o o on n n n n n nt t t t ta a a a ag g g g g g g ge e e w w w w w wi i i ic c c c c c c c c c c c c ch h h h h h h h h h h h h h h h ht t t t t t t t t t t t t t ti i i i i i i i ig g g g g g g g g g g g ge e e e e e e e e e e e e B B B B Ba a au u ut t t te e e e e ei i il l l l l le e e e d d d d d de e e e e e e e e e e e e e e e e e e e er r r r r r r r r r A A A A A A A A A A A A ...

Page 27: ...Getting started 1 Pull the latch and lift the side panel off the housing 1 Fujitsu 23 ...

Page 28: ...tarted 2 Insert the guide rail b in the corresponding metal tab 2 to the left of the connections The cable opening c faces downwards Route the cables out through the cable opening c in the cable cover 24 Fujitsu ...

Page 29: ...Getting started 3 3 Press the locking elements a into the corresponding openings 3 on the outer right side of the housing The cable cover is positioned Fujitsu 25 ...

Page 30: ...Getting started 26 Fujitsu ...

Page 31: ...Getting started 4 Close the housing 4 On devices with a housing lock Lock the casing Fujitsu 27 ...

Page 32: ...Getting started The cable cover is secured Further secure the cable cover with the side panel to prevent unauthorised removal see Property and data protection Page 35 28 Fujitsu ...

Page 33: ...nd server details as well as the network protocol are required during the software installation Contact your network administrator if you have any questions about these settings When you switch on the device for the first time the supplied software is installed and configured Plan a reasonable amount of time for this as this process must not be interrupted Switch on the monitor and the machine In ...

Page 34: ...d to input read the online Help in your operating system You will find more information on the system as well as drivers utilities and updates on the optional Drivers Utilities DVD and on the Internet at http www fujitsu com fts support You can find information and help on the Windows operating system functions on the Internet at http windows microsoft com 30 Fujitsu ...

Page 35: ...perating system in the proper way Device Monitor If the operating system does not automatically switch the device into energy saving mode or switch it off press the ON OFF switch Warning this could lead to a loss of data The ON OFF switch does not disconnect the device from the mains voltage For complete disconnection from the mains voltage you must pull the mains plug out of the socket If necessa...

Page 36: ...Card reader is accessed 3 Power on indicator Warning In the energy saving mode the device must not be disconnected from the mains as this can result in a loss of data Indicator is illuminated The device is switched on The indicator flashes depending on device type The device is in energy saving mode After being switched on with the ON OFF switch the device powers up or returns to the state it was ...

Page 37: ...tails of other keys and keyboard shortcuts can be found in the documentation for the relevant application program Key key combination Description ON OFFswitch Button On off switch optional Depending on the setting in the BIOS Setup the device can be switched on or off with this switch Some operating systems allow you to configure additional functions of the ON OFF switch in the Control Panel With ...

Page 38: ...are active When the Num Lock indicator is not lit the cursor control functions on the Numeric keypad are active Ctrl Keys Keys Keys Keys Ctrl key performs a special operation when pressed in conjunction with another key The Ctrl key is also called the Control or Control key Alt Ctrl Del Ctrl Alt Del Ctrl Alt Del Keys keyboardshortcuts Windows Security Task Manager This key combination opens the Wi...

Page 39: ...hese functions Anti theft protection and lead sealing To avoid risk of injury please ensure that the device is kept out of the reach of small children Unauthorised opening of the housing can also greatly endanger third parties electric shock risk of fire etc Use the measures described below to keep unauthorised persons from accessing the interior of the housing Device Device Casing Lead sealing An...

Page 40: ...have connected to a fixed object beforehand with the Security Lock device 2 and a Kensington MicroSaver Please consult the manual for your Security Lock Lead sealing To prevent unauthorised persons from opening the casing the casing can be lead sealed To do this feed the sealing chain through the holes 1 and seal the chain with the lead seal 36 Fujitsu ...

Page 41: ...om opening it The keys can be found on the rear panel of your device In addition to the casing lock an open and a closed lock are also illustrated Key turned towards the closed lock The device is locked Key turned towards the open lock The device is unlocked Locking the casing Turn the key towards the closed lock Unlocking the casing Turn the key towards the open lock Fujitsu 37 ...

Page 42: ...s who have a corresponding SmartCard Operating the SmartCard reader optional Operation of a SmartCard reader with a RFID reader is not permitted in Taiwan Connect the external SmartCard reader to your system as described in the instructions for the SmartCard reader SmartCardreader After the device is switched on you will be prompted to insert your SmartCard Delete data data Erase Disk function for...

Page 43: ...ce The ID number is found on the type rating plate on the back the underside or the top of the casing Contact the Service Desk responsible for your country for clarification of the problem http support ts fujitsu com contact servicedesk When you do this please have ready the ID number and serial number of your system Troubleshooting Power on indicator remains unlit after you have switched on your ...

Page 44: ...t the brightness control For detailed information please refer to the operating manual supplied with your monitor Power cable not connected Switch off the monitor and the device Check that the monitor power cable is properly connected to the monitor and to a grounded mains outlet or to the monitor socket of the device Check that the device power cable is properly plugged into the device and a grou...

Page 45: ...orrect Cause Remedy Time and date are incorrect Set the correct time and date within the operating system you are using or Set the correct time and or date in the BIOS Setup The lithium battery is empty If the time and date are repeatedly wrong when you switch your device off and then on change the lithium battery see the System expansions and repairs manual Error messages on the screen Error mess...

Page 46: ...Troubleshooting and tips Tips Topic Tip Out of system resources Close unnecessary applications or Run the applications in a different order 42 Fujitsu ...

Page 47: ...n the Internet in the System Expansions and Repairs manual at http www fujitsu com fts support Operations that are distinguished in the manual as Only For Service such as repairs to the device may only however be performed by authorised service technicians Incorrect repairs may greatly endanger the user electric shock fire risk and will invalidate your warranty Fujitsu 43 ...

Page 48: ...height without cable cover 180 mm x 304 mm x 374 mm 7 09 inch x 11 97 inch x 14 72 inch Width depth height with cable cover optional 180 mm x 369 mm x 374 mm 7 09 inch x 14 53 inch x 14 72 inch Weight Depending on the device variant and configuration level c 8 kg 17 64 lbs Ambient conditions Environment class 3K2 Environment class 2K2 DIN IEC 721 part 3 3 DIN IEC 721 part 3 2 Temperature Operation...

Page 49: ...Technical data The data sheets of these devices contains further technical data The data sheets can be found on our website at http www fujitsu com fts Fujitsu 45 ...

Page 50: ...trl Alt Del 34 Cursor keys 33 D data delete 38 Data protection 35 Device setting up 14 Switching on 31 Device drivers Parallel port 21 Device drivers Serial port 21 Device Anti theft protection 35 Lead sealing 35 ports 17 switching off 31 transporting 11 12 upgrades 43 Devices connecting 21 Devices connecting 21 Displayport 17 Disposal 12 DVI I monitor port 17 E Erase Disk 38 Ergonomic Workstation...

Page 51: ...nt 11 Numeric keypad 33 O ON OFF switch 33 Overview Device 5 P Packaging 13 Packaging unpacking 13 Parallel port 17 21 Connecting devices 21 Settings 21 Ports 7 Preparing for first use overview 13 Preparing for use overview 13 Property protection 35 PS 2 mouse port 17 PS 2 mouse connecting 20 port 20 R Recycling 12 Retransportation 11 12 S Safety information 11 Saving energy 12 Security functions ...

Page 52: ...Transportation 11 12 U Universal Serial Bus 17 Upgrades device 43 USB devices connecting 21 USB port 20 USB port connecting devices 21 connecting keyboard 20 connecting the mouse 20 W Workstation 14 48 Fujitsu ...

Reviews: