background image

5.

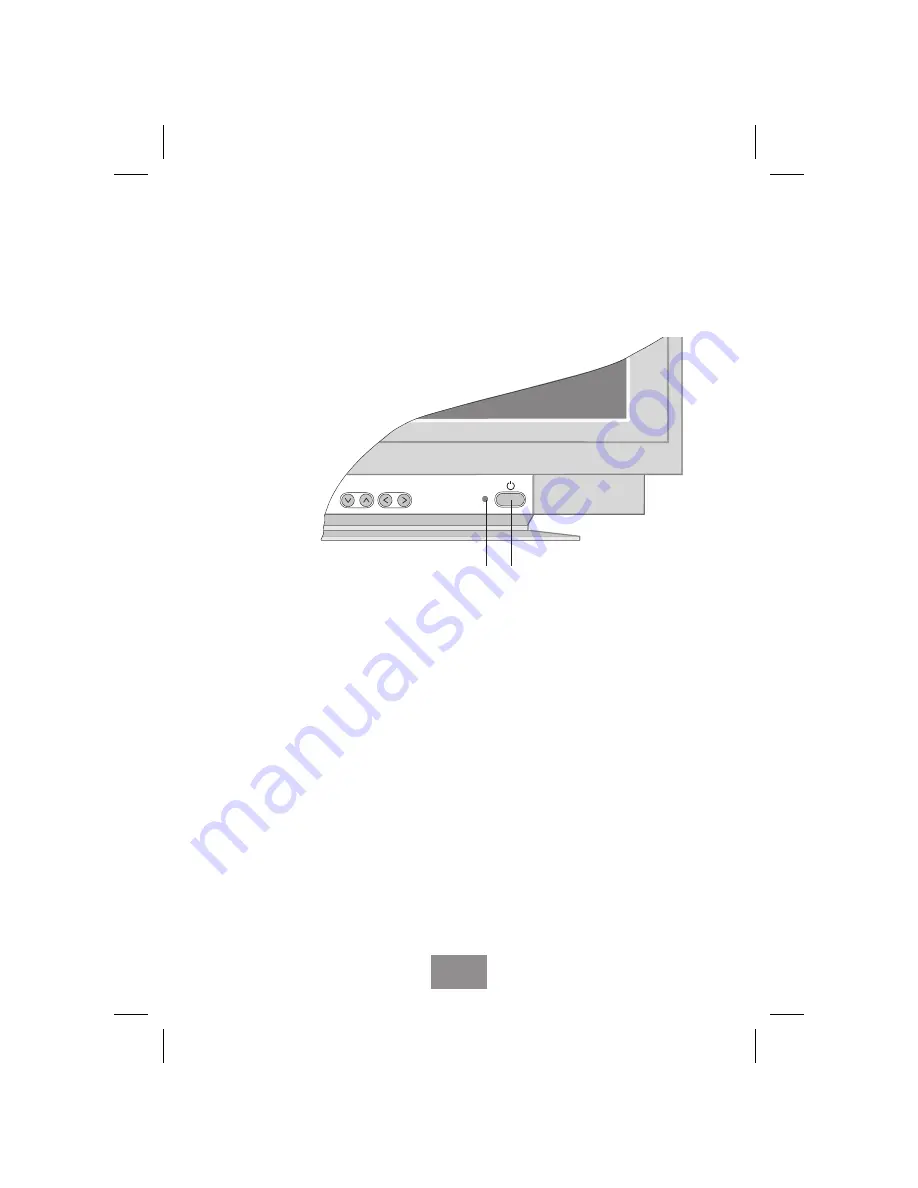
Turn on the display unit using the power switch (

1

) and check

to make sure that the power LED (

2

) is on, as shown in Fig. 2.

If not, repeat steps 3 and 4 or refer to the Troubleshooting
section of this guide.

6.

Turn on the power to the computer. The picture will appear
within about 20 seconds. Adjust the picture to obtain optimum
picture quality. See section Adjusting the picture in this guide
for more information.

SELECT

ADJUST

2

Fig. 2

1

English print original
July 1997
Fujitsu e213
MNä

English

7

main2.chp

Fri Aug 08 12:45:32 1997

Color profile: Disabled

Composite  Default screen

Summary of Contents for e213

Page 1: ...dning Käyttäjän käsikirja Manuel d utilisation Benutzerhandbuch Manual do utilizador Guía de usuario Användarhandbok English print original July 1997 Fujitsu e213 MNä titleall chp Fri Aug 08 12 40 25 1997 Color profile Disabled Composite Default screen ...

Page 2: ...es is continuous and published information may not be up to date Any particular issue of a product may contain part only of the facilities described in this document or may contain facilities not described herein It is important to check the current position with FUJITSU ICL Computers Specifications and statements as to performance in this document are FUJITSU ICL Computers estimates intended for ...

Page 3: ... display unit 6 Display power management 8 Adjusting the picture 9 Cleaning your display unit 17 Troubleshooting 18 Technical fact sheet 21 Regulatory notices 23 English Print original July 1997 Display unit e213 MNä contents chp Fri Aug 08 12 42 09 1997 Color profile Disabled Composite Default screen ...

Page 4: ...Print original July 1997 Display unit e213 MNä contents chp Fri Aug 08 12 42 09 1997 Color profile Disabled Composite Default screen ...

Page 5: ...ndations for low electromagnetic fields and environmental specifications n with power management features that allow the unit to enter a low power consumption state after a period of inactivity When you unpack the display unit check to make sure that you have the items below A power cable is included in your system unit package Display unit User s Guide English print original July 1997 Fujitsu e21...

Page 6: ... to the display unit and accessible in case you need to disconnect the display n Do not connect an extension cord n If you need to replace your cords contact your sales representative n Do not under any circumstances open the display unit cabinet n Slots in the cabinet are provided for ventilation Do not block the ventilation slots in the display unit cabinet English print original July 1997 Fujit...

Page 7: ...unit at a comfortable viewing height and distance most people prefer the top line of the text to be at or just below eye level and the display within arm s length a distance of 45 to 90 cm when you are comfortably seated You can tilt and swivel the display unit to get a good viewing angle n This display unit has an anti glare highly conductive antistatic screen The use of an additional anti glare ...

Page 8: ... shown in Fig 1 and secure it with the two screws The connector pins may be protected against damage by a plastic cover The cover needs to be removed first 3 Plug the display unit s power cable b first to the back of the display unit 4 Then plug the power cable b to a 100V 240V earthed electrical outlet or to the system unit if it has an outlet for the display power cable a b Fig 1 100 240V Englis...

Page 9: ...n of this guide 6 Turn on the power to the computer The picture will appear within about 20 seconds Adjust the picture to obtain optimum picture quality See section Adjusting the picture in this guide for more information SELECT ADJUST 2 Fig 2 1 English print original July 1997 Fujitsu e213 MNä English 7 main2 chp Fri Aug 08 12 45 32 1997 Color profile Disabled Composite Default screen ...

Page 10: ...er consumption Once you have set the timeout periods through the power management function in your computer the computer will enter power savings modes automatically after periods of inactivity The screen saver function where the screen image is replaced by a pattern does not affect power consumption The purpose of the screen saver is to extend the usable life of the display MODE LED POWER CONSUMP...

Page 11: ...ng the SELECT down or up button 2 Select the header which contains the adjustments you are looking for with SELECT or ADJUST SELECT PICTURE SHAPE Width Height Vertical Position Auto shape SHAPE continued COLOR PICTURE CLARITY MISCELLANEOUS Exit Horizontal Position 1600x1200 75Hz English print original July 1997 Fujitsu e213 MNä English 9 main2 chp Fri Aug 08 12 45 46 1997 Color profile Disabled Co...

Page 12: ...oss the bottom of the menus indicates the resolution and refresh rates currently in force 6 After adjustments are made the new settings are stored automatically All menu displays disappear automatically or you can push SELECT or choose Exit and push ADJUST or The illustration on the next page shows the menus for the adjustments that you can make to your display unit Explanations of the adjustment ...

Page 13: ...Connected English Horiz Convergence Horizontal Position Width Horizontal Position Height Vertical Position Auto shape COLOR PICTURE CLARITY MISCELLANEOUS Exit MISCELLANEOUS Selftest Degauss COLOR 1600x1200 75Hz PICTURE SHAPE PICTURE CLARITY Exit Language Green Blue Save to Custom1 MISCELLANEOUS 1600x1200 75Hz Exit COLOR Color Temp 9300 K Save to Custom2 PICTURE SHAPE PICTURE CLARITY Red 49 49 Dans...

Page 14: ...he correct height make it higher or lower using these adjustments Horizontal Position of the picture If the picture on your screen is not in the correct position horizontally move it left or right using these adjustments Vertical Position of the picture If the picture on your screen is not in the correct position vertically move it up or down using these adjustments Auto Shape When you choose Auto...

Page 15: ...n also known as east west correction Trapezoid Correction If the picture is wider at the top or at the bottom the distortion is called trapezoid distortion Orthogonality Correction If the vertical sides of the picture are tilted left or right the distortion is called orthogonal distortion Colour Menu Colour Temperature Colour temperature affects the tint of the image With lower colour temperatures...

Page 16: ...to Custom1 Custom2 You may create two image settings each containing individual colour temperature Red Green and Blue adjustments and store them using Save to Custom1 and Save to Custom2 In this way you may create suitable working environments for example for two software applications having different requirements for image properties You can recall the settings Custom1 and Custom2 by selecting Co...

Page 17: ... and Vertical Convergence A white line on the screen is made up of red green and blue lines If there are no convergence errors on the picture the lines will be exactly overlaid and the resulting colour is white If there is a convergence error separate red green and or blue lines will be seen instead of white With Horizontal Convergence you minimise the error in vertical lines With Vertical Converg...

Page 18: ... or discolouration in the picture Degaussing or demagnetization takes place automatically when the display unit is switched on and the unit normally maintains faultless colour purity during operation If you have tilted swivelled or moved the display unit you can perform degaussing by selecting Degauss and pushing the button During the degaussing process the picture is distorted for a few seconds A...

Page 19: ... with water or mild detergent If possible use a special screen cleaning tissue suitable for the antistatic coating n To clean the display unit cabinet use a cloth lightly dampened with a mild detergent n Wipe off stubborn stains from cabinet or screen with a cloth lightly dampened in alcohol methyl ethyl or isopropyl Do not use thinner or benzene abrasive cleaners or compressed air English print o...

Page 20: ...eys Check that the keyboard is properly connected to the computer Check that the power cable is correctly connected to the display unit and to the power outlet Use a desk lamp for example to check that current is connected to a power outlet Switch off the display unit and the computer Unplug the display unit from the power outlet for about one minute Restart Error message No signal Check that the ...

Page 21: ...ape and quality unsatisfactory Make sure that other electrical devices are at least 30 cm away Adjust the picture characteristics as described in section Adjusting the picture Objects on the screen either too small or too large Change resolution or font size see EasyGuide your computer s online help Screen flickers The screen may flicker when the refresh rate is less than 75 Hz See list of recomme...

Page 22: ...isplay unit is sent for service use the original package if possible Unplug the display unit from the power outlet and contact a service agent when n the display unit does not operate normally while following the operating instructions n the display unit exhibits a distinct change in performance n the display unit has been dropped or the cabinet has been damaged n the display unit has been exposed...

Page 23: ... Relative operating humidity 15 to 85 non condensing 5 to 95 packed Video n Analog positive 0 7 Vpp 75 ohm n Maximum dot frequency 230 MHz Power Supply 100 240 VAC 60 50 Hz auto select Management VESA DPMS 1 0 Consumption power on normal operation 160 W standby mode 160 W suspend mode 30 W power off mode 5 W manual OFF 1 W Plug and Play VESA DDC level 1 2AB version 1 0 Frequency range Horizontal 3...

Page 24: ...S X ray Act VCCI Japan C Tick Tilt and swivel 5o to 15o 75o Dimensions mm 518 h x 530 w x 555 d 32 kg unpacked 670 h x 670 w x 740 d 35 kg packed MTBF demonstrated 100 000 hours excluding CRT Geometric distortion Within 2 mm window on top left edges of image and 2 mm on right bottom edges of the picture area On Screen Display Brightness contrast height vertical centering width horizontal centering...

Page 25: ...ference to radio or television reception which can be determined by turning the equipment off and on the user is encouraged to try to correct the interference by one or more of these measures n Reoriented or relocate the receiving antenna n Relocate the equipment with respect to the receiver n Plug the equipment into a different outlet so that equipment and receiver are on different branch circuit...

Page 26: ...que n émet pas de bruits radioélectriques dépassant les limites applicables aux appareils numériques de Classe B prescrites dans le Règlement sur le brouillage radioélectrique édicté par le Ministère des Communications du Canada English print original July 1997 Fujitsu e213 MNä English 24 main2 chp Mon Aug 11 11 20 37 1997 Color profile Disabled Composite Default screen ...

Reviews: