background image

63

T r o u b l e s h o o t i n g

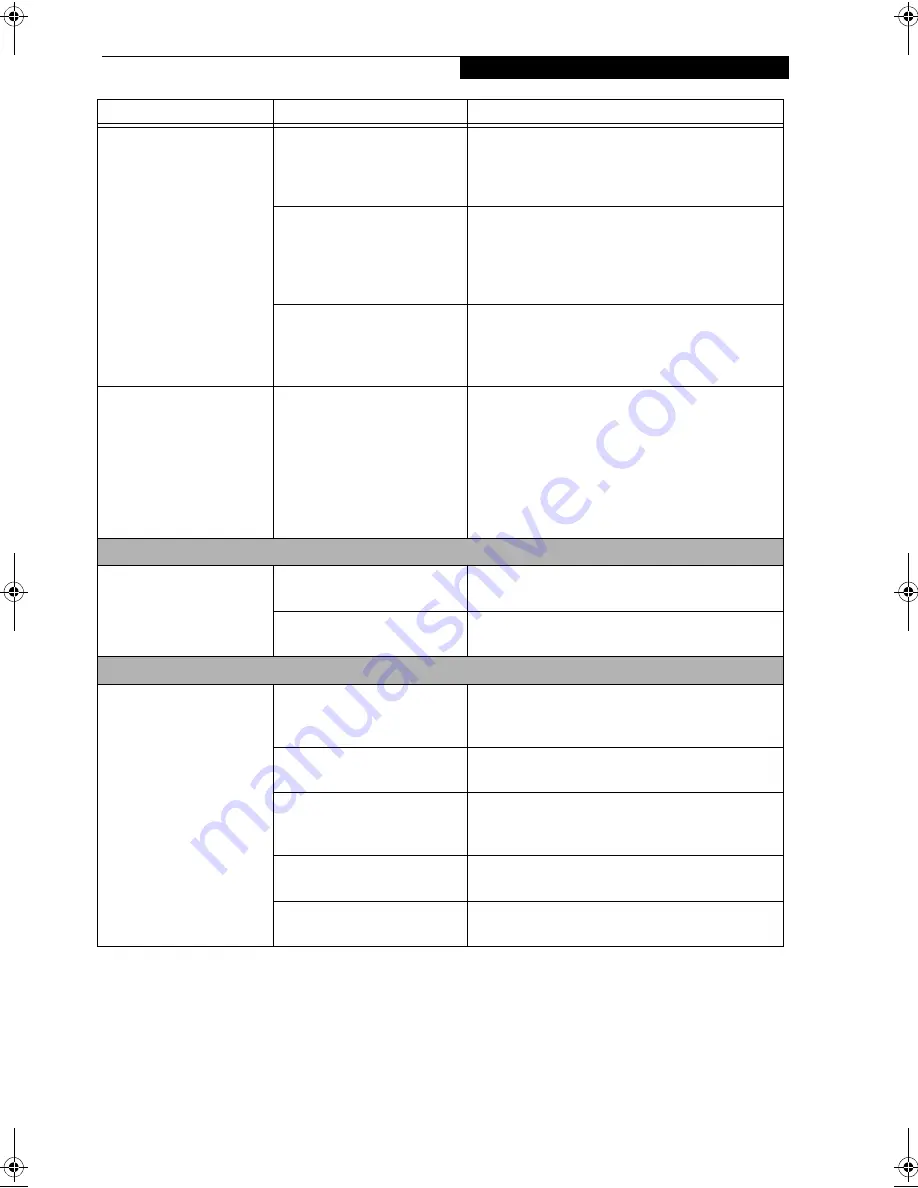
LifeBook notebook fails to 
recognize DVD/CD-RW/
CD-ROM’s. (continued)

Wrong drive designator was 
used for DVD/CD-RW/CD-
ROM in the application.

Verify the drive designator used by the application is 
the same as the one used by the operating system. 
When the operating system is booted from a DVD/
CD, drive designations are automatically adjusted.

Windows DVD/CD-RW/CD-
ROM auto insertion function 
is disabled.

Start the DVD/CD-RW/CD-ROM from the desktop 
or application software or re-enable the Windows 
DVD/CD-RW/CD-ROM auto insertion function. 
(See Auto Insert Notification Function on page 47 for 
more information)

DVD/CD-RW/CD-ROM is 
dirty or defective.

Wipe DVD/CD-RW/CD-ROM with a non-abrasive 
CD cleaning cloth and reinsert. It if still will not 
work try another DVD/CD-RW/CD-ROM in
the drive.

The DVD/CD-RW/CD-
ROM Access indicator on 
the Status Indicator Panel 
blinks at regular intervals 
when no DVD/CD-RW/
CD-ROM is in the tray or 
the DVD/CD-RW/CD-
ROM drive is not installed.

The Windows DVD/CD-RW/
CD-ROM auto insertion func-
tion is active and is checking to 
see if a DVD/CD-RW/CD-
ROM is ready to run. 

This is normal. However, you may disable this 
feature. (See Auto Insert Notification Function on 
page 47 for more information)

Port Replicator Problems

LifeBook notebook does 
not turn on when installed 
in Port Replicator

Port Replicator AC adapter is 
not plugged in.

 Provide power to the Port Replicator.

Notebook is not properly 
seated in the Port Replicator.

Remove and re-dock your LifeBook notebook.

Floppy Disk Drive Problems

You cannot access your 
floppy disk.

You tried to write to a write 
protected floppy disk.

Eject the floppy disk and set it to write enable. (See 
Preparing a Disk for Use on page 44 for more informa-
tion)

Floppy disk is not 
loaded correctly.

Eject floppy disk, check orientation and re-insert. 
(See Ejecting a Disk on page 44 for more information)

BIOS setup utility states 

Diskette Controller: 

Disabled.

Revise the setup utility Main menu settings to 
enable Diskette Controller. (See BIOS Setup Utility 
on page 33 for more information)

The floppy disk drive may not 
be properly installed.

Remove and re-install your floppy disk drive. 

Security is set to protect access 
to floppy disk data.

Verify your password and security settings.

Problem

Possible Cause

Possible Solutions

S Series.book  Page 63  Friday, April 20, 2001  5:16 PM

Summary of Contents for DVD Player

Page 1: ...protection technology that is protected by method claims of certain U S patents and other intellectual property rights owned by Macrovision Corporation and other rights users Use of this copyright protection technology must be authorized by Macrovision Corporation and is intended for home and other limited viewing uses only unless authorized by Macrovision Corporation Reverse engineering or disas ...

Page 2: ...st but not all areas the sum of the RENs of all of the devices should not exceed five 5 To be certain of the number of devices you may connect to your line as determined by the RENs contact your local telephone company If this equipment causes harm to the telephone network your telephone company may discontinue your service temporarily If possible they will notify you in advance If advance notice ...

Page 3: ... réseaux de télécommu nications Le département ne garantit pas le fonctionne ment de l équipement à la satisfaction de l utilisateur La série LifeBook notebook e possède un modem interne conforme aux normes de certification d Industrie Canada pour protéger les réseaux de télécommunica tions et satisfaire aux normes de sécurité Avant de connecter cet équipement à une ligne téléphonique l utilisateu...

Page 4: ...nly C A U T I O N To reduce the risk of fire use only 26AWG or larger telecommunications line cord C A U T I O N For continued protection against risk of fire replace only with the same type and rating fuse C A U T I O N Danger of explosion if Lithium clock battery is incor rectly replaced Replace only with the same or equiva lent type recommended by the manufacturer Dispose of used batteries acco...

Page 5: ...k Indicator 15 ScrLk Indicator 15 Security Indicator 15 Keyboard Using the Keyboard 16 Numeric Keypad 16 Windows Keys 17 Cursor Keys 17 Function Keys 17 Touchpad Pointing Device Clicking 19 Double Clicking 19 Dragging 20 Touchpad Control Adjustment 20 Scrolling 20 Volume Control Controlling the Volume 21 Flexible Bay Devices Removing and Installing Modular Devices 22 LifeBook Security Application ...

Page 6: ...ng DolbyTM Headphone 46 Using the Media Player on Battery Power 47 Auto Insert Notification Function 47 PC Cards Installing PC Cards 49 Removing PC Cards 49 Smart Card Reader 50 Memory Upgrade Module Installing a Memory Upgrade Module 51 To Remove a Memory Upgrade Module 51 Checking the Computer Recognition of New Memory Capacity 52 Port Replicator Back Panel Components 53 Front Panel Components 5...

Page 7: ... 83 Mass Storage Device Options 83 Features 84 Device Ports 84 Keyboard 84 Power 84 Dimensions and Weight 84 Environmental Requirements 85 Popular Accessories 85 Pre Installed Software 85 Learning About Your Application Software 85 LapLink Gold Windows 98 only 85 Microsoft Works 85 McAfee com ActiveShield 85 LifeBook Security Application Panel Software 86 Fujitsu Service Assistant 86 BatteryAid 86...

Page 8: ...L i f e B o o k S S e r i e s ...

Page 9: ...1 Preface ...

Page 10: ...L i f e B o o k S S e r i e s ...

Page 11: ...8fujitsu fujitsupc com Web site http www fujitsupc com Before you place the call you should have the following information ready so that the customer support representative can provide you with the fastest possible solution Product name Product configuration number Product serial number Purchase date Conditions under which the problem occurred Any error messages that have occurred Hardware configu...

Page 12: ...2 L i f e B o o k S S e r i e s S e c t i o n O n e ...

Page 13: ...3 2 Getting to Know Your LifeBook Notebook ...

Page 14: ...4 L i f e B o o k S S e r i e s S e c t i o n T w o ...

Page 15: ...lled Weight Saver Phone Modem RJ 11 telephone cable Driver and Application Restore CD Getting Started Guide User s Guide this document International Limited Warranty Brochure Certification of Authenticity with operating system manual First Cabin Registration card and envelope Fujitsu Service Assistant flier Depending on your configuration one of the following devices is installed in the Flexible B...

Page 16: ... a specific component of your LifeBook note book Figure 2 5 See Status Indicator Panel on page 13 for more information Suspend Resume Button The Suspend Resume button allows you to suspend notebook activity without powering off resume your LifeBook notebook from suspend mode and power on your notebook when it has been shut down from Windows Figure 2 5 See Suspend Resume Button on page 36 for more ...

Page 17: ...inting device is a mouse like cursor control with three buttons two mouse like buttons and a scroll button Figure 2 5 See Touchpad Pointing Device on page 19 for more information LifeBook Security Application Panel The LifeBook Security Application Panel provides hardware security and one touch application launch capability Figure 2 5 See LifeBook Security Application Panel on page 25 for more inf...

Page 18: ...dular CD ROM drive Modular DVD CD RW combo drive Modular SuperDisk 120 drive Modular Lithium ion battery Modular Digital Bay Camera Flexible Bay Eject Lever The Flexible Bay eject lever releases the Flexible Bay device Figure 2 6 Emergency CD Tray Release The Emergency CD Tray Release allows you to open the CD tray without powering on your LifeBook note book Figure 2 6 Anti theft Lock Slot The ant...

Page 19: ...information PC Card Slot The PC Card Slot allows you to install one Type II PC Card See PC Cards on page 49 for more information LAN RJ 45 Jack for LAN models The internal LAN RJ 45 jack is used for an internal Fast Ethernet 10 100 Base TX connection See Internal LAN RJ 45 Jack for LAN models only on page 55 for more information Modem RJ 11 Telephone Port The Modem RJ 11 telephone jack is for atta...

Page 20: ... Digital PBX systems Do not connect the internal modem to a Digital PBX as it may cause serious damage to the internal modem or your entire notebook Consult your PBX manufacturer s documentation for details Some hotels have Digital PBX systems Be sure to find out BEFORE you connect your modem C A U T I O N The internal multinational modem is designed to the ITU T V 90 standard Its maximum speed of...

Page 21: ...l monitor port allows you to connect an external monitor Figure 2 9 See External Monitor Port on page 57 for more information DC Power Jack The DC power jack allows you to plug in the AC adapter or the optional Auto Airline adapter to power your note book and charge the internal Lithium ion battery Figure 2 9 Power Switch This switch is the main power switch for your LifeBook notebook Figure 2 9 U...

Page 22: ...se button to release the internal battery Figure 2 10 Lithium ion Battery Bay The battery bay contains the internal Lithium ion battery It can be opened for the removal of the battery when stored over a long period of time or for swapping a discharged battery with a charged Lithium ion battery Figure 2 10 See Lithium ion Battery on page 41 for more information Main Unit and Configuration Label The...

Page 23: ...shut down from Windows but have not turned off the power switch AC ADAPTER INDICATOR The AC Adapter indicator states whether your notebook is operating from the AC adapter the Auto Airline adapter or the batteries This icon has two different states that can tell you what power source your LifeBook notebook is using On This means that either of the adapters are currently in use Off Power is only co...

Page 24: ...Drive on page 43 for more information PC CARD ACCESS INDICATORS The PC Card Access indicators state whether or not your notebook is accessing a PC Card The first icon repre sents the PC Card slot the second icon represents a PC Card slot located in the Flexible Bay The indicators will flash if your software tries to access a PC Card even if there is no card installed See PC Cards on page 49 for mo...

Page 25: ...Y INDICATOR The Security Indicator flashes if a password was set when the system resumes from Off or Suspend modes You must enter the password that was set in the Security Panel before your system will resume operation P O I N T If you are using the optional external numerical keypad pressing the NumLk key will activate the external keypad The indicator will come on however it will not change any ...

Page 26: ...actions that vary depending on what program is running Windows keys These keys work with your Windows operating system and function the same as the onscreen Start menu button or the right button on your pointing device NUMERIC KEYPAD Certain keys on the keyboard perform dual functions as both standard character keys and numeric keypad keys NumLk can be activated by pressing the NumLk keys Turning ...

Page 27: ...ws Explorer it moves the focus selects the next item up down left or right Figure 2 13 FUNCTION KEYS Your LifeBook notebook has 12 function keys F1 through F12 The functions assigned to these keys differ for each application You should refer to your software docu mentation to find out how these keys are used Figure 2 13 The FN key provides extended functions for the notebook and is always used in ...

Page 28: ...ume of your LifeBook note book FN F9 Pressing F9 repeatedly while holding FN will increase the volume of your LifeBook notebook FN F10 Pressing F10 while holding FN allows you to change your selection of where to send your display video Each time you press the combination of keys you will step to the next choice The choices in order are built in display panel only both built in display panel and e...

Page 29: ... the mouse cursor to the item you wish to select press the right button once and then immediately release it You also have the option to perform the clicking operation by tapping lightly on the Touchpad once Figure 2 15 Figure 2 15 Clicking DOUBLE CLICKING Double clicking means pushing and releasing the left button twice in rapid succession This procedure does not function with the right button To...

Page 30: ... your finger Figure 2 17 Figure 2 17 Dragging TOUCHPAD CONTROL ADJUSTMENT The Windows Control Panel allows you to customize your Touchpad with selections made from within the Mouse Properties dialog box SCROLLING Using the Scrolling button allows you to navigate through a document quickly without using the window s scroll bars This is particularly useful when you are navi gating through on line pa...

Page 31: ...individual applications Certain external audio devices you might connect to your system may have hardware volume controls Each source discussed above puts an upper limit on the volume level that must then be followed by the other sources We recommend that you experiment with the various volume controls to discover the optimal sound level P O I N T Any software that contains audio files will also c...

Page 32: ...e This is an optional 120MB floppy disk drive made by Imation for use with your notebook Modular Lithium ion battery This is a rechargeable battery that can be used to power your LifeBook note book when an adapter is not connected Weight Saver This is used to fill the bay when no device is needed Modular Digital Bay Camera This is a Digital Camera that can be used to take digital stills or video F...

Page 33: ...rt button to change a device in the Flexible Bay 4 A message appears telling you that it is safe to swap devices 5 Swap the modular devices 6 Click OK button 7 You can access and use the device when the System Device change message goes away Your notebook will automatically detect the new device and activate it within your system The drive letters associated with the device will be created and lis...

Page 34: ...icon for CD ROM or DVD drive If a LifeBook notebook with a USB FDD connected is put on Standby the drive letter for the FDD might change from A after the computer is brought out of the power saving state This phenomenon does not affect operations adversely If Windows is started on a LifeBook notebook with an external USB FDD connected an icon for the FDD might not appear in My Computer or Windows ...

Page 35: ...r the password into the LifeBook notebook Figure 2 22 PASSWORDS The user and supervisor password may be set on this notebook A supervisor password is typically the same for all LifeBook notebooks in a working group office or company to allow for system management Individual LifeBook notebooks in a group environment should not use a common password A password consists of one to five button strokes ...

Page 36: ...icator will go off To reactivate the LifeBook notebook after a password failure you must press the Suspend Resume button then enter a correct password PRECAUTIONS Opening and Closing the Cover Closing the cover automatically places the LifeBook notebook into suspend mode Opening the cover does not automatically place the notebook into normal oper ation Instead you must enter the proper security pa...

Page 37: ...to ship your LifeBook notebook LAUNCHING APPLICATIONS WITH THE SECURITY APPLICATION PANEL The security panel also enables you to launch applications with the touch of a button when your system is on Pressing any of the buttons will launch a user defined application Your LifeBook notebook is pre installed with software utilities that let you operate and configure your LifeBook Security Application ...

Page 38: ...Internet browser with this button you need only click on Default Internet Browser from the Internet browser box Be aware that you will erase the settings for the other application If you wish to go back to launching the other application from this button you will need to reconfigure it as described above When you have finished with Application Panel Setup click OK and the new settings will take ef...

Page 39: ...29 3 Getting Started ...

Page 40: ...30 L i f e B o o k S S e r i e s S e c t i o n T h r e e ...

Page 41: ...3 1 Connecting the Optional Auto Airline Adapter 1 Plug the DC output cable into the DC power jack on your notebook 2 Plug the Auto Airline adapter into the cigarette lighter of an automobile with the ignition key in the On or Accessories position OR 3 Plug the Auto Airline adapter into the DC power jack on an airplane seat Switching from AC Adapter Power or the Auto Airline Adapter to Battery Pow...

Page 42: ...ill increase the brightness of the display Using the Power Management Utility Adjusting the brightness using the Power Management changes the setting permanently 1 Double click the Battery icon in the lower right corner of your display This will open the BatteryAid Properties dialog box 2 Select the Power Control tab and adjust your LCD Backlighting to the desired level 3 Click OK or Apply to perm...

Page 43: ... for the BIOS Setup Utility the system displays the operating system s opening screen The boot sequence is executed when You turn on the power to your LifeBook notebook You restart your notebook from the Windows Shut Down dialog box The software initiates a system restart Example When you install a new application You reset the system by pressing the three keys CTRL ALT DEL BIOS SETUP UTILITY The ...

Page 44: ...t a later time you may click the Skip button and you will go directly to the condition of use page Once you have set up your notebook to dial out Windows 98 Second Edition will make a free telephone call which will test these settings If the call is unsuc cessful you will be returned to the phone settings page where you may try to fix them If you are unable to fix the settings please contact Fujit...

Page 45: ...Windows it is a part of the Windows Welcome process If you do not register during the Welcome process you can double click on the LifeBook Registra tion icon on your desktop and then follow the instruc tions The LifeBook Registration icon is the only way to register Windows 2000 Professional You may also complete the pre printed registration form and either Fax to 1 800 577 9989 Mail to Fujitsu PC...

Page 46: ...e SUSPEND MODE Suspend or Standby mode in Windows saves the contents of your LifeBook notebook s system memory during periods of inactivity by maintaining power to critical parts This mode will turn off the CPU the display the hard drive and all of the other internal components except those necessary to maintain system memory and allow for restarting Your notebook can be put in Suspend mode by Pre...

Page 47: ... of the Suspend Resume button and can be enabled and disabled in Windows and BIOS setup utility See BIOS Setup Utility on page 33 for more information WINDOWS POWER MANAGEMENT Power Management The Power Management icon located in the Windows Control Panel allows you to configure some of the power management settings For example you can use the Power Management to set the timeout values for turning...

Page 48: ... shut down from Windows allows your notebook to complete its operations and turn off power in the proper sequence to avoid errors The proper sequence is 1 Click the Start button and then click Shut Down 2 Select the Shut Down option from within the Windows Shut Down dialog box 3 Click OK to shut down your notebook 4 Move the power switch to the off position If you are going to store your notebook ...

Page 49: ...39 4 User Installable Features ...

Page 50: ...40 L i f e B o o k S S e r i e s S e c t i o n F o u r ...

Page 51: ...arge until they are too low to operate When this happens your notebook will go into Suspend mode There is no guarantee that your data will be saved once the notebook reaches this point Dead Battery Suspend mode shows on the Status indi cator just like the normal Suspend mode Once your notebook goes into Dead Battery Suspend mode you will be unable to resume operation until you provide C A U T I O ...

Page 52: ...here are two ways to swap batteries cold swapping and warm swapping Cold swapping Batteries To cold swap batteries in your battery bay follow these easy steps Figure 4 1 1 Have a charged battery ready to install 2 Shut down your notebook and disconnect the AC adapter 3 Unlock the battery bay using the lock button 4 Slide the battery bay release button to open the bay 5 Remove the battery from the ...

Page 53: ...lled formatting or initial izing a disk You will need to format new disks unless they are preformatted Please refer to your operating system manual for step by step instructions on formatting a disk To prevent accidental erasure of the data stored on a disk slide the write protect tab until a small hole is exposed This sets the disk into a protected state where nothing can be added or removed If y...

Page 54: ...eds to be prepared so your notebook knows where to store information This preparation is called formatting or initializing a disk You will need to format new disks unless they are preformatted Please refer to your operating system manual for step by step instructions on formatting a disk To prevent accidental erasure of the data stored on a disk slide the write protect tab until a small hole is ex...

Page 55: ... until a media disc can easily be placed in the tray 3 Place the media into the tray label side up with the hole in the center of the disc Snap the disc onto the raised circle in the center of the tray 4 Gently push the holder tray back in until you hear a click Figure 4 7 Media Holder Tray Media Eject Button P O I N T S Prior to using your Media Player you must install the Media Player software R...

Page 56: ...You have the option to pause rewind fast forward and stop the movie at any point 1 To Pause the movie click the button 2 To Rewind the movie click the button to rewind to a specific portion of the movie or the button to return to the opening screen 3 To Fast forward the movie click the button to forward to a specific portion of the movie or the button to jump to the ending credits 4 To Stop the mo...

Page 57: ...dia player locate and skip to the chapter of the movie you were last watching 7 Continue watching your DVD movie AUTO INSERT NOTIFICATION FUNCTION The Auto Insert Notification function allows your Life Book notebook to automatically start a DVD CD as soon as it is inserted in the media player drive and the tray is closed Your notebook will begin playing an audio DVD CD or will start an application...

Page 58: ...r drive manufacturer s name and model number dialog box 7 Select the Settings tab and then remove the check mark in the Auto Insert Notification box to turn it off 8 Click OK 9 Click Close in the System Properties dialog box then click Yes in the System Settings Change pop up window when it asks you to restart your machine and activate this change The Auto Insert Notification function can be re ac...

Page 59: ...book to lock the PC Card REMOVING PC CARDS To remove a PC Card follow these easy steps 1 See your PC Card manual for specific instructions on removing your card Some PC Cards may require your notebook to be in Suspend Mode or Off while removing them Eject Button PC Card Slot PC Card W A R N I N G Installing or removing a PC Card during your LifeBook notebook s shutdown or bootup process may damage...

Page 60: ...pe as credit cards but they contain an integrated microprocessor chip The chip can hold a variety of different information and provides the user with many possible options such as allowing them to make secure purchases pay for phone calls store security informa tion and provide personal identification and informa tion In order to use the embedded Smart Card Reader you must purchase an optional Sma...

Page 61: ...y upgrade module at a 45 angle Press the connector edge of the module firmly down and into the connector until it lodges under the retaining clip You will hear a click when it is prop erly in place Figure 4 10 Figure 4 10 Installing a Memory Upgrade Module 9 Replace the cover 10 Replace the screws TO REMOVE A MEMORY UPGRADE MODULE 1 Perform steps 1 through 5 of Installing a Memory Upgrade Module 2...

Page 62: ...Memory and the Extended Memory capacity as detected by your LifeBook notebook during the Power On Self Test POST are displayed at the bottom of the main menu screen The chart below shows you the possible displays that can be shown on the main menu screen P O I N T After installing your memory module you must com plete the Resetting the Save to Disk Parameters proce dure in order for the Save to Di...

Page 63: ...he LAN port on the Port Replicator cannot be used PS 2 Keyboard Port The PS 2 keyboard port allows you to connect an external PS 2 keyboard Figure 4 12 PS 2 Mouse Port The PS 2 mouse port allows you to connect an external PS 2 Mouse Figure 4 12 USB Port The USB port allows you to connect Universal Serial Bus devices Figure 4 12 External Monitor Port The external monitor port allows you to connect ...

Page 64: ... power is off To attach the Port Replicator follow these easy steps 1 Align the Port Replicator connector on the lower surface of your notebook with the connector on top of the Port Replicator 2 Push your notebook down to connect it to the Port Replicator securely Figure 4 14 Figure 4 14 Attaching the Port Replicator DETACHING THE PORT REPLICATOR The Port Replicator can be detached from your note ...

Page 65: ...cation 1 Align the connector with the port opening 2 Push the connector into the port until it is seated Some digital devices such as digital cameras use IEEE 1394 ports for fast transfer of digital files and data S VIDEO OUT PORT FOR NON LAN MODELS ONLY The S Video port allows you to connect and use directly any S Video device such as a VCR or television The S Video standard provides for a higher...

Page 66: ...y steps See figure 4 12 on page 53 for location 1 Align the connector with the port opening 2 Push the connector into the port until it is seated INFRARED PORT The Infrared IrDA 1 1 4Mbps port allows for wireless data transfer between your notebook and other IrDA compatible devices such as another computer or a printer without the use of a cable See figure 2 9 on page 11 for location It is importa...

Page 67: ...the connector into the port until it is seated EXTERNAL MONITOR PORT The external monitor port allows you to connect an external monitor In order to connect an external monitor follow these easy steps See figure 2 9 on page 11 for loca tion 1 Align the connector with the port opening 2 Push the connector into the port until it is seated 3 Tighten the two hold down screws located on each end of the...

Page 68: ...58 L i f e B o o k S S e r i e s S e c t i o n F o u r ...

Page 69: ...59 5 Troubleshooting ...

Page 70: ...60 L i f e B o o k S S e r i e s S e c t i o n F i v e ...

Page 71: ...hat follows for more detailed troubleshooting information 8 If you have tried the solutions suggested in the Trou bleshooting Table without success contact your support representative Toll free 1 800 8Fujitsu 1 800 838 5487 Fax 1 901 259 5700 E mail 8fujitsu fujitsupc com Web site http www fujitsupc com Before you place the call you should have the following information ready so that the customer ...

Page 72: ...system and applications Headphones are plugged into your notebook Plugging in headphones disables the built in speakers remove the headphones BIOS audio settings are incorrect Set the BIOS setup utility to the default values within the Multimedia Device Configuration menu See BIOS Setup Utility on page 33 for more information Software driver is not config ured correctly Refer to your application a...

Page 73: ...on is active and is checking to see if a DVD CD RW CD ROM is ready to run This is normal However you may disable this feature See Auto Insert Notification Function on page 47 for more information Port Replicator Problems LifeBook notebook does not turn on when installed in Port Replicator Port Replicator AC adapter is not plugged in Provide power to the Port Replicator Notebook is not properly sea...

Page 74: ...evice is not properly installed Re install your device See Device Ports on page 55 for more information Your operating system software is not setup with the correct software driver for that device Check your device and operating system docu mentation and activate the proper driver Your mouse or keyboard is connected to the wrong PS 2 port on the LANdock Plug the mouse into the PS 2 Mouse port and ...

Page 75: ...nformation Your device and another device are assigned the same I O address Check all I O addresses located within the BIOS setup utility and any other installed hardware or software to make sure there are no duplications Parallel port is set to output only Check parallel port setting in the BIOS and set to bi directional or ECP PC Card Problems A card inserted in the PC Card slot does not work or...

Page 76: ...tus Indicator Panel to determine the presence and condition of the batteries See Status Indicator Panel on page 13 for more information Use a Power adapter to operate until a battery is charged or install a charged battery The power adapter AC or auto airline is not plugged in properly Verify that your adapter is connected correctly See Power Sources on page 31 for more information The Power adapt...

Page 77: ...h a charged one or install a Power adapter No batteries are installed Install a charged battery The batteries are improperly installed Verify that the batteries are properly connected by re installing them Your installed batteries are faulty Verify the condition of the batteries using the Status Indicator panel and replace or remove any batteries that are shorted See Status Indicator Panel on page...

Page 78: ...ity settings and modify them as accordingly See BIOS Setup Utility on page 33 for more information Internal hard drive was not detected Use the BIOS setup utility or Primary Master submenu located within the Main menu to try to auto detect the internal hard drive An error message is displayed on the screen during the notebook boot sequence Power On Self Test POST has detected a problem See the Pow...

Page 79: ...your support representative The display goes blank by itself after you have been using it The notebook has gone into Video timeout Standby mode Suspend mode or Save to Disk mode because you have not used it for a period of time Press any button on the keyboard or move the mouse to restore operation If that fails push the Suspend Resume button Check your power management settings or close your appl...

Page 80: ...ery settings You have connected an external monitor and it does not display any information Your BIOS setup is not set to enable your external monitor Try toggling the video destination by pressing FN and F10 together or check your BIOS setup and enable your external monitor See the Video Features submenu located within the Advanced Menu of the BIOS See BIOS Setup Utility on page 33 for more infor...

Page 81: ...ystem there may be a serious fault which might cause you to lose data if you continue Contact your support representative Incorrect Drive A type run SETUP Type of floppy drive A not correctly identified in Setup This means that the floppy disk drive type identified in your setup utility does not agree with the type detected by the Power On Self Test Run the setup utility to correct the inconsisten...

Page 82: ...orrupted or modified incorrectly perhaps by an application program that changes data stored in BIOS memory Run Setup and reconfigure the system System RAM Failed at offset nnnn System memory failed at offset nnnn of in the 64k block at which the error was detected This means that there is a fault in your built in memory If you continue to operate you risk corrupting your data Contact your support ...

Page 83: ...e C partition must be a FAT FAT32 or NTFS partition and it must be directly before the backup partition on your hard disk 1 At the Drive Image Special Edition main screen click Options Create New Backup There is also a button on the main DISE screen that performs the same function 2 You will be prompted to type a password Type a password or leave the password fields blank then click OK DISE displa...

Page 84: ...74 L i f e B o o k S S e r i e s S e c t i o n F i v e ...

Page 85: ...75 6 Care and Maintenance ...

Page 86: ...76 L i f e B o o k S S e r i e s S e c t i o n S i x ...

Page 87: ...ver use glass cleaners Storing your LifeBook notebook If storing your notebook for a month or longer turn your LifeBook notebook off and remove all Lithium ion batteries Store your notebook and batteries separately If you store your LifeBook with a battery installed the bat tery will discharge and battery life will be reduced In addition a faulty battery might damage your Life Book Store your Fuji...

Page 88: ...ur Floppy Disks Avoid using the floppy disks in damp and dusty locations Never store a floppy disk near a magnet or magnetic field Do not use a pencil or an eraser on a disk or disk label Avoid storing the floppy disks in extremely hot or cold locations or in locations subject to severe temperature changes Store at temperatures between 50º F 10ºC and 125ºF 52ºC Do not touch the exposed part of the...

Page 89: ... your Media Player Drive Your media player drive is durable but you must treat it with care Please pay attention to the following points The drive rotates the compact disc at a very high speed Do not carry it around or subject it to shock or vibration with the power on Avoid using or storing the drive where it will be exposed to extreme temperatures Avoid using or storing the drive where it is dam...

Page 90: ...80 L i f e B o o k S S e r i e s S e c t i o n S i x ...

Page 91: ...81 7 Specifications ...

Page 92: ...82 L i f e B o o k S S e r i e s S e c t i o n S e v e n ...

Page 93: ...ideo Yes 1024 x 768 16M colors XGA SVGA and VGA compatible Video RAM ATI Rage Mobility M with 4MB embedded Video RAM AUDIO Yamaha AC97 codec YMF743 Sound Blaster Pro compatible 32 bit stereo PCM FM sound chip Spatializer 3D Stereo multiple speaker effect support Stereo headphone jack 1 Vrms or less minimum impedance 32 Ohms Stereo line in jack 880 mVrms or less minimum impedance 10K Ohms Mono micr...

Page 94: ... RS 232C serial input output devices One USB Universal Serial Bus connector for input output devices One 25 pin special connector for external floppy disk drive connection One LAN RJ 45 connector for LAN models only KEYBOARD Built in keyboard with all functions of 101 key PS 2 compatible keyboards Total number of keys 82 Function keys F1 through F12 Feature extension key Fn Two Windows keys one St...

Page 95: ...ook notebook comes with pre installed software for playing audio and video files of various formats In addition there is file transfer software virus protection software and Power Management software LEARNING ABOUT YOUR APPLICATION SOFTWARE Tutorials All operating systems and most application software have tutorials built into them upon installation We highly recommend that you step through the tu...

Page 96: ...the security features built into the Windows 2000 operating system only users with Administrator level access are able to run this particular test Please consult your network adminis trator for further assistance with this issue For further information about the Fujitsu Service Assis tant call 1 800 Fujitsu or visit the FPC support website at www fujitsupc com support BATTERYAID BatteryAid allows ...

Page 97: ...87 8 Glossary ...

Page 98: ...88 L i f e B o o k S S e r i e s S e c t i o n E i g h t ...

Page 99: ... A block of memory built into the micro processor which is much faster to access than your system RAM and used in specially structured ways to make your overall data handling time faster CardBus A faster 32 bit version of the PC Card interface which offers performance similar to the 32 bit PCI architecture CD ROM Compact disc read only memory This is a form of digital data storage which is read op...

Page 100: ... storage media which is highly flexible GB Gigabyte Hard drive A spinning platter of magnetic data storage media where the platter is very stiff Hexadecimal A decimal notation for the value of a 4 bit binary number 0 9 A B C D E F Example 2F in hexa decimal 00101111 in binary 47 in decimal I O Input Output Data entering and leaving your LifeBook notebook in electronic form I O Port The connector a...

Page 101: ...erating system accordingly PCMCIA PCMCIA is a trademark of the Personal Computer Memory Card International Association The Personal Computer Memory Card International Association is an organization that sets standards for add in cards for personal computers Peripheral Device A piece of equipment which performs a specific function associated with but not integral to a computer Examples a printer a ...

Page 102: ... not require periodic data refreshing Status Indicator A display which reports the condition of some portion of your hardware On your LifeBook notebook this is an LCD screen just above the keyboard Stereo audio A system using two channels to process sound from two different sources Stroke keyboard The amount of travel of a key when it is pressed from resting to fully depressed Suspend To make inop...

Page 103: ...93 G l o s s a r y ...

Page 104: ...94 L i f e B o o k S S e r i e s S e c t i o n E i g h t ...

Page 105: ...89 Boot Sequence 33 Built in Microphone 6 Built in Speakers 62 C Cache Memory 89 CapsLock 15 CD ROM problems 62 Clicking 19 Closed Cover Switch 6 Cold swap 23 Cold swapping 42 COMM Port 89 Configuration Label 12 Control 46 Cursor 19 Cursor Keys 17 D DC Output Cable 31 DC Power Jack 11 31 Device Ports 55 DIMM 51 DISE 73 Disk care 78 Display Panel 6 32 adjusting 32 brightness 32 closing 32 latch 6 o...

Page 106: ... indicator 14 problems 64 Hard Disk Timeout 37 Headphone Jack 9 57 Hibernation Feature 37 disable enabled 37 Hot swap 23 I Infrared Port 11 56 Internal LAN Jack 55 IrDA 56 K Keyboard 7 16 cursor keys 16 function keys 16 numeric keypad 16 problems 64 windows keys 16 L LAN RJ 45 jack 9 LifeBook Application Panel 7 LifeBook Security Application Panel buttons 27 configuring 27 deactivating 28 launchin...

Page 107: ... Management 36 37 Power On Self Test 33 71 Pre Installed Software 85 Adobe Acrobat Reader 86 Intel SpeedStep 86 LapLink 2000 85 LifeBook Application Panel 86 manuals 85 McAfee com ActiveShield 85 Microsoft Works 85 tutorials 85 PS 2 91 PS 2 Port 56 R Registration 34 35 Restarting 37 Restoring your hard disk 73 RJ 11 55 RJ 45 55 S ScrLk 15 SDRAM 12 51 Security Panel 25 Serial Port 56 92 problems 65...

Page 108: ...s 19 controls 20 Tray 72 Troubleshooting 61 U Universal Serial Bus Port 56 USB 56 65 port 11 problems 65 V volume control 21 W Warm swap 42 Windows Windows 2000 Professional 35 Windows 98 Second Edition 34 Windows keys 17 Application key 17 Start keys 17 ...

Reviews: