background image

En-32

6. CLEANING AND CARE

 CAUTION

Before cleaning the unit, be sure to stop the operation and 
disconnect the power supply.

Do  not  pour  water  or  cleaning  solvent  on  the  unit  directly, 
or wash the unit with them.

Do  not  expose  the  unit  body  to  liquid  insecticides  or  hair 
sprays.

Keep  the  surroundings  of  the  outdoor  unit  clean  and 
tidy,  and  do  not  place  anything  around  it.  If  it  is  covered 
with  fallen  leaves,  there  could  be  an  infiltration  of  small 
animals  or  insects  which  in  contact  with  internal  electrical 
components may lead to product malfunction.

Do not stand on unstable steps when operating or cleaning 
the air conditioner. It may overturn and can cause injuries.

Wipe the unit gently by using soft dry cloth.

Note

Do not use scouring cleanser, volatile solvents such as 
benzene or thinner.

7. ERROR CODE

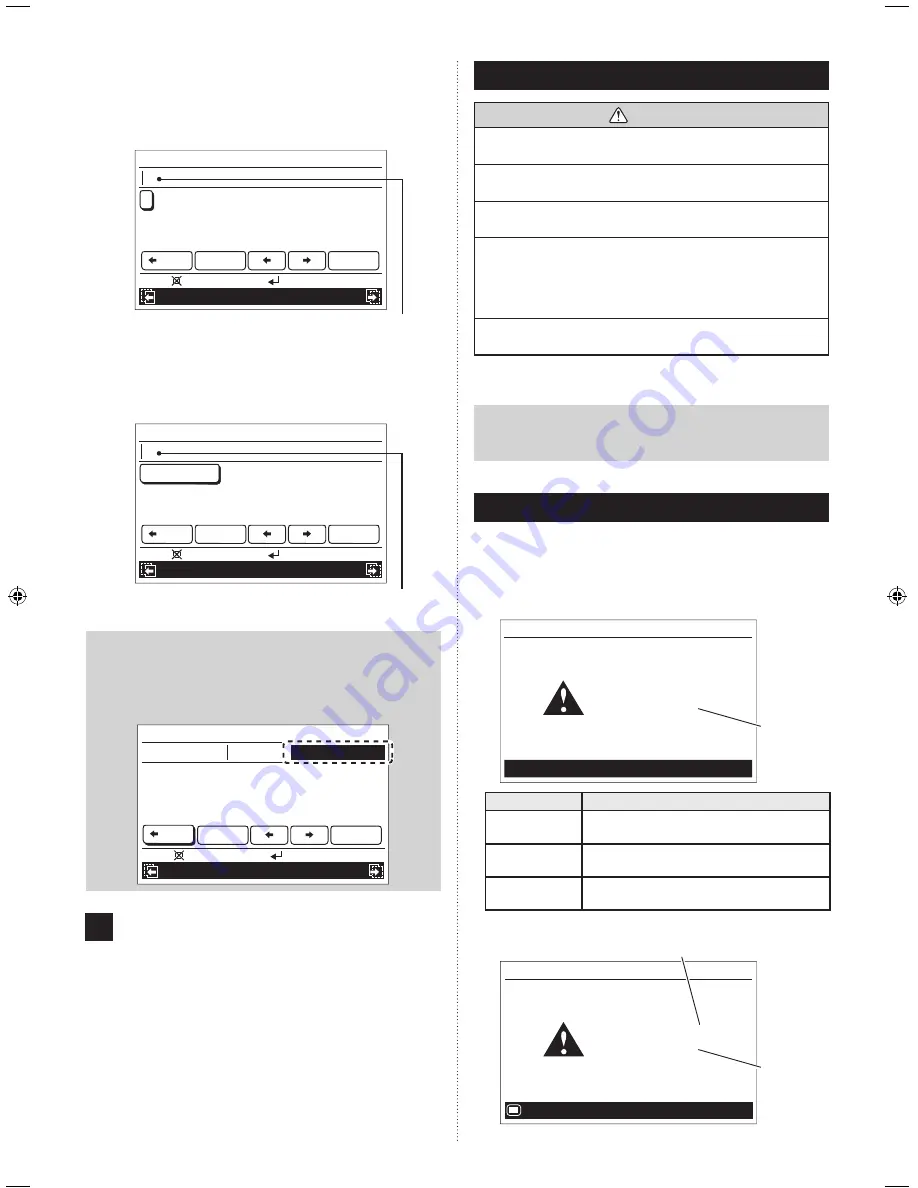
If  an  error  occurs,  the  power  indicator  (green)  blinks  and  the 
following screen will be shown.
If “Error” is displayed, immediately stop the air conditioner 
operation, and consult authorized service personnel.

When there is an error on this remote controller:


Code : XXXXXX

Remote  controller

Error

Mo 10:00

Error  
code

Error code

Contents

Er 12.1
EE 1c

Wired remote controller communication 
error

Er 15.4
EE 1d

Indoor unit data acquisition error

Er CC.1
EE CC.1

Remote controller sensor error

When there is an error on the indoor unit:


Code : XXXXXX

R.C. address : 00

Error

   Mo 10:00

Monitor

Address number of the relevant indoor unit

Error  
code

Lower case:
You can select and enter desired lower case

.

In “Lower case” screen, set the cursor to the target letter with 
the [Cursor button], and press the [Enter button]. 

Selected letter is displayed in the text field.

Name setting (Zone 1)

a b c d e f g h i j k l m n o p q r

s t u v w x y z & ( )

0 1 2 3 4 5 6 7 8 9 -

+ ; : . , / _

Back

Space

End

   Mo 10:00

Enter:

Cancel:

Capital

Preset names

Text field

Preset names:
You can select and enter desired preset name

.

In “Preset names” screen, set the cursor to the target name 
with the [Cursor button], and press the [Enter button]. 

Selected name is displayed in the text field.

Name setting (Zone 1)

Living

Back

Space

End

Dining

Study

Rumpus

Kitchen

Meals

Family

Bedroom

Lounge

   Mo 10:00

Enter:

Cancel:

Lower case

Capital

Text field

Note

Maximum  text  number  you  can  enter  is  12  characters 
including a space. If you try to enter the 13th character, 
message  indicating  that  the  entering  text  number  is 

exceeding is displayed in the text field as follows:

(The 13th character is not displayed.)

Name setting (Zone 1)

Over

Bedroom (Gue

a b c d e f g h i j k l m n o p q r
s t u v w x y z & ( )
0 1 2 3 4 5 6 7 8 9 -

+ ; : . , / _

Space

End

   Mo 10:00

Enter:

Cancel:

Capital

Preset names

Back

4

  Set  the  cursor  to  [End]  with  the  [Cursor  button], 

and  press  the  [Enter  button]  to  finalize  the  name 
registration.


Screen returns to the


“Name setting” screen, and regis-

tered name is displayed.

9374379866_OM_EN.indd   32

17/12/2014   13:19:33

Summary of Contents for ARTC72LATU

Page 1: ...ndoor Unit ARTG30LHTA ARTG36LHTA ARTG45LHTA ARTG60LHTA ARTG36LHTB ARTG45LHTB ARTG54LHTB ARTG60LHTB ARTG54LHTC ARTC72LATU ARTC90LATU OPERATING MANUAL KEEP THIS MANUAL FOR FUTURE REFERENCE FUJITSU GENERAL LIMITED PART No 9374379866 ...

Page 2: ... timer setting 21 5 SUBMENU SETTING 23 5 1 Switching to the Submenu screen 23 5 2 Date Time setting 23 5 2 1 Date setting 23 5 2 2 Time setting 23 5 2 3 Summer time Daylight saving time setting 24 5 2 4 Change display format setting 24 5 3 Screen setting 25 5 3 1 Automatic off time setting 25 5 3 2 Brightness setting 25 5 3 3 Contrast setting 25 5 4 Filter sign setting 25 5 4 1 Filter sign reset s...

Page 3: ... touch the fins of the heat exchanger built in this product to avoid personal injury when you install or maintain the unit Do not stand on unstable steps when operating or cleaning this product It may overturn and can cause the injury 1 1 INTRODUCTION 1 1 Safety precautions To prevent personal injury injury to others or property damage read this section carefully before you use this product and be...

Page 4: ... the unit automatically switches to a low power setting for eco nomic and comfortable operation ECONOMY OPERATION When Economy operation mode is operated the room temperature will be a little higher than the set temp under Cooling mode and lower than set temp under Heating mode Therefore the Economy operation mode is able to save more energy than other normal modes AUTO CHANGEOVER The operation mo...

Page 5: ...ops the operation 1 4 About Monitor screen Monitor screen shows several statuses such as the operat ing status of the air conditioner function setting or other cur rent operating conditions Mode Menu Cool Monitor Room 28 C Set temp Fan High C 26 Mo 10 00 Icon check 1 2 5 3 4 1 Screen status and current conditions Shows the current screen name room temperature day of the week and clock NOTES The cl...

Page 6: ...reen switch guidance display Any combination of Menu button mark with name of switchable screen by pressing the Menu button or Screen switch button Left Right mark or with name of switchable screen by pressing the Screen switch button Left Right is displayed 1 5 About zone control Zone control enables an efficient air conditioning by select ing only specific zone from some divided zones in the ind...

Page 7: ...nsor Indoor unit Zone group Mo 10 00 Monitor Off To cancel the air conditioning set the cursor to the zone marked with a check and press the Enter button to remove the check mark Unchecked zone is not air conditioned Note Depending on the initial setup in the installation there is a case that at least one zone need to be selected In that case following message is displayed on the screen and you ne...

Page 8: ...ditioned Zone group Day Night All Sensor Zone Zone 1 Zone 2 Zone 3 Zone 4 Indoor Monitor Mo 10 00 Zone single Note The check mark currently displayed on the screen can be unchecked only if you mark a check to the other group on this screen or when any setting change is done in Zone single screen 2 BASIC OPERATIONS 2 1 Starting the operation PREPARATION Check whether the current time is displayed c...

Page 9: ...ture is being out of the range configured in Set temp range setting message indicating that the temperature is restricted is displayed on the screen Menu Restricted by the set temperature range restriction 11 2 1 4 Fan speed setting In Monitor screen select Fan with the Cursor button Left Right and adjust the fan speed with the Cursor button Up Down Mode Menu Cool Monitor Set temp Fan High C 26 Mo...

Page 10: ... range can be limited through the operation mode 13 Timer On timer Use this timer function to start air conditioner operation The timer operates and air condition operation starts after the set time has passed The timer can be set up to 24 hours in advance Can be set up to 24 hours in units of 30 minutes 14 Off timer Use this timer function to stop air conditioner operation The timer operates and ...

Page 11: ...ontroller NOTE This setting can be set on either of one of the primary unit or the secondary unit 28 O Room temp temperature display Switches between displaying and non displaying the room temperature The displayed room temperature is the temperature around the remote control 28 O Key lock select Child lock Restricts all the button operation 28 O Part lock Restricts the Menu button operation 29 O ...

Page 12: ...emp setting Time Temp Cool Dry 26 C 30min 26 C 30min Heat Mo 10 00 Setting Back Air flow dire Set temp range Select the item with the Cursor button Up Down and press the Enter button 3 FUNCTION SETTING 3 1 Switching to the Function screen 1 In Menu screen select Function with the Cursor button Up Down and press the Enter button Menu Function Timer Submenu Mo 10 00 Setting Back 2 Function screen is...

Page 13: ...ter button to complete the setting Set temp auto return Enable Disable setting Enable Return time and temp setting Time Temp Cool Dry 26 C 30min 26 C 30min Heat Mo 10 00 OK Cancel Air flow dire Set temp range 4 For Return time and temp setting select operation mode with the Cursor button Up Down and press the Enter button Adjust the value with the Cursor but ton Up Down With the Cursor button Left...

Page 14: ...en you return to the Monitor screen the icon is displayed To check the function press the Enter button and select the icon with the Cursor button Left Right Menu Cool Monitor Mo 10 00 High C 26 Set temp range End 4 TIMER SETTING 4 1 Switching to the Timer screen 1 In Menu screen select Timer with the Cursor button Up Down and press the Enter button Menu Function Timer Submenu Mo 10 00 Setting Back...

Page 15: ...imer Off timer Weekly timer Auto off timer Disable Disable Disable Mo 10 00 Disable Setting Back 2 Off timer screen is displayed Off timer Enable Disable setting Time setting Disable 1 0 hour later Mo 10 00 On timer Weekly timer Setting Back To change the setting select the item with the Cursor button Up Down and press the Enter button 3 For Enable Disable setting select Enable or Disable with the...

Page 16: ...kly timer select Day off Su Mo Tu Th Fr Sa We Weekly 1 Mo 10 00 Auto off timer Off timer OK Cancel Day off setting In Day off setting select the inapplicable days of the week if there are any days that you want to skip the weekly timer op eration 1 Select Day off with the Cursor button Up Down and press the Enter button Weekly timer Weekly timer setting Weekly timer select Day off Su Mo Tu Th Fr S...

Page 17: ... We Weekly timer setting Time 5 8 Mo 10 00 Back Setting 2 Setting screen for the current day of the week opens 1 2 3 4 Weekly 1 Day Time End Su Mo Tu Fr Sa Th We Weekly timer setting Time 5 8 Mo 10 00 Cancel OK 3 Select applicable day of the week with the Cursor button Left Right and press the Cursor button Up Down Selected day of the week is highlighted 1 2 3 4 Weekly 1 Day Time End Su Mo Tu Fr S...

Page 18: ...Notes When you set On timer you need to set both of the operating mode and the temperature firmly Without these configurations the timer will not work Possible temperature setting ranges in the operation mode are as follows Cool Dry Auto 18 to 30 C 64 to 88 F Heat 16 to 30 C 60 to 88 F If the temperature out of the Set temp range limitation is set it will be reset at the nearest temperature within...

Page 19: ...10 00 Back Setting Weekly 1 Day Note Weekly timer setting screen consists maximum of 8 pages from Time 1 to Time 8 You can set one pat tern per page and maximum of 8 pattern per a day With pressing the Screen switch button Left Right during setting the screen switches to the previous page or the next page Example When the Screen switch button Right is pressed once on page Time 1 2 Weekly 1 Day Tim...

Page 20: ...1 Weekly 1 Day Time End Su Mo Weekly timer setting Time 8 Time 2 Mo 10 00 Delete Push for two seconds OK Note To delete the setting move the cursor to the pattern number and press the Cancel button for 2 seconds 3 Adjust time setting of On Off timer with the Cursor but ton Up Down 1 Weekly 1 Day Time End Su Mo 5 00 Weekly timer setting Time 8 Time 2 Mo 10 00 Cancel OK 4 Select On On timer or Off O...

Page 21: ...d 1 Weekly 1 Day Time End Su Mo 5 00 On Weekly timer setting Time 8 Time 2 Mo 10 00 Cancel OK Heat 20 C Zone single Sensor Secondary RC Zone 1 Zone 2 Zone 3 Zone 4 Zone 5 Zone 6 Zone 7 Zone 8 After you select all the applicable zones press the Enter button to complete the individual setting of zone control Notes When you set On timer you need to set all of operating mode temperature room temperatu...

Page 22: ...egistered will be sorted in time order Sorting function When you return to the Monitor screen the icon is displayed To check the function press the Enter button and select the icon with the Cursor button Left Right Cool Monitor High C 26 Menu Weekly timer Weekly 1 Mo 10 00 End Zone single 4 2 4 Auto off timer setting 1 In Timer screen select Auto off timer with the Cursor button Up Down and press ...

Page 23: ... valid hour during the counting down the function works If the air conditioning operation is On by Weekly timer after counting down of Auto off timer has started the Auto off timer will not work When you return to the Monitor screen and current time is within the valid hour the icon is displayed as follows To check the function press the Enter button and select the icon with the Cursor button Left...

Page 24: ...tes Display format of time depends on the setting Refer to 5 2 4 Change display format setting Even when summer time daylight saving time is applied set the standard time here Set On Off with 5 2 3 Summer time Daylight saving time setting 5 SUBMENU SETTING 5 1 Switching to the Submenu screen When Menu button is pressed twice while Monitor screen is displayed it switches to the Submenu screen If Me...

Page 25: ...M PM To complete the setting press the Enter button The screen returns to the Date and Time screen 5 2 3 Summer time Daylight saving time setting Note Set only for users in an area where summer time daylight saving time is applicable 1 In Date and time screen select Summer time daylight saving time with the Cursor button Up Down and press the Enter button Date and time Date Su 31 03 2013 10 00 Tim...

Page 26: ...nction can be used only if the setting is activated in the installation To activate this function consult authorized service personnel 5 3 Screen setting In Submenu screen select Screen with the Cursor button Up Down and press the Enter button Date and time Monitor Screen Filter sign R C sensor control Room temp display Off Off Mo 10 00 Setting Back Submenu 1 2 Screen screen is displayed Automatic...

Page 27: ... sign Mo 10 00 End In Submenu screen select Filter sign with the Cursor but ton Up Down and press the Enter button Date and time Monitor Screen Filter sign R C sensor control Room temp display Off Off Mo 10 00 Setting Back Submenu 1 2 Filter sign screen is displayed Screen Display Filter sign reset Filter sign Initial Off Mo 10 00 Setting Back 5 4 1 Filter sign reset setting If filter sign icon is...

Page 28: ...ck on the Monitor screen when operating To lock up When the Cancel button is pressed for about 3 seconds or more continuously on the Monitor screen To release the lock When the Cancel button is pressed for about 3 seconds or more continuously on the Monitor screen the lock is re leased and each applicable lock name on the screen turns off 5 5 R C sensor control setting Note This function can be us...

Page 29: ...button The screen returns to the Initial screen and displays the selected language Language Italiano Español English Ελληνικά Português Русский Deutsch Français Türkçe Temp unit Cancel OK Mo 10 00 Following key lock functions are available Child lock Restricts all the button operation Part lock Restricts the Menu button operation When Child lock is set Mode Child lock Auto Monitor Set temp Fan Hig...

Page 30: ... screen in following instruc tions Setting procedures are common to Day setting and Night setting Day setting Zone 1 Zone 3 Zone 5 Zone 7 Zone 4 Zone 2 Zone 6 Zone 8 Sensor Indoor unit Night setting Mo 10 00 Back Remove 5 8 2 Temperature unit setting 1 In Initial screen select Temp unit with the Cursor button Up Down and press the Enter button Initial Language English Temp unit Password setting Ma...

Page 31: ...be registered in the group with the Cur sor button When you press the Enter button a check mark is displayed Day setting Zone 2 Zone 3 Zone 5 Zone 7 Zone 4 Zone 1 Zone 6 Zone 8 Sensor Indoor unit Night setting Mo 10 00 Remove Back To remove the check mark adjust the cursor to the zone name to be unchecked and press the Enter but ton again Note Depending on the initial setup in the installation not...

Page 32: ...ld Name setting Zone 1 A B C D E F G H I J K L M N O P Q R S T U V W X Y Z 0 1 2 3 4 5 6 7 8 9 _ Back Space End Mo 10 00 Enter Cancel Preset names Lower case Text field Selecting zone to be named 1 In Zone user setting screen select Zone name setting with the Cursor button Up Down When you press the Enter button Name setting group screen is displayed As a setting example Zone 1 to 8 are supposed t...

Page 33: ...hen there is an error on the indoor unit Code XXXXXX R C address 00 Error Mo 10 00 Monitor Address number of the relevant indoor unit Error code Lower case You can select and enter desired lower case In Lower case screen set the cursor to the target letter with the Cursor button and press the Enter button Selected letter is displayed in the text field Name setting Zone 1 a b c d e f g h i j k l m ...

Page 34: ...peration is started fan speed is temporarily very low to allow internal parts to warm up During heating operation if the room temperature rises above the thermostat setting the outdoor unit will stop and the indoor unit will operate at very low fan speed If you wish to warm the room further set the thermostat to a higher setting During heating operation the unit will temporarily stop operation max...

Page 35: ...ction setting been set to Enable or On On timer or Off timer does not work Has there been a power outage Any power outage cancels the On or Off timer After the power supply is resumed set the Enable Disable setting to Enable again 15 16 Weekly timer does not work Have all the necessary settings been completed in Weekly timer set ting 17 to 23 Operation is automati cally stopped Has off timer been ...

Page 36: ...other wired remote controller when using 2 wired remote controllers Has Name setting been done on both wired remote controllers When using 2 wired remote controllers the name registration in Name setting need to be done on both wired remote controllers 32 NORMAL FUNCTION Volume of airflow changes Volume of the airflow is affected by configurations in the zone set ting If the airflow is too strong ...

Page 37: ...n using the heating mode under conditions of low out door temperature and high humidity frost may form on the outdoor unit resulting in reduced operating performance In order to prevent this kind of reduced performance this unit is equipped with a microcomputer controlled automatic defrosting function During the defrost cycle the indoor fan will shutdown and will be displayed on the remote control...

Page 38: ... operation first selected the fan will operate at low speed for about a few minute during which time the indoor unit detects the room conditions and selects the proper operation mode Room temperature is higher than the defined temperature in temperature setting Cooling mode or dry mode Room temperature is close to the defined temperature in temperature setting Determined by outdoor temperature Roo...

Page 39: ...ation if the user sets the indoor unit for heating again the defrosting mode will continue and the heating operation will begin after completion of defrosting with the result that some time may be required before warm air is emitted Permissible ranges of temperature and humidity are as follows 8 4 Temperature and humidity range Cooling Dry operation Outdoor temperature About 5 C to 46 C Indoor tem...

Page 40: ......

Reviews: