● FJT21 does not support backup by Google account. When a screen for backup appears, at
the first Google account setting, tap to end the setting.
Creating
Google account
starts. Follow
the onscreen
instructions to
complete the
setting.
Confirm Terms of Service→Tap
2-2
Set Family use
When you have set Set Family use, you can select Set style from "Standard mode" to use
FJT21 by yourself or "Family mode" to share FJT21 use with your family. Switching styles on
the lock screen is available when setting to "Family mode".
On the "ARROWS Getting started"
screen, tap "Set Family use"
Tap "Use in standard mode"/"Use in
Family mode"
Tap "Complete then go
next"→"Start right now"
E-mail Initial settings
● To use E-mail (@ezweb.ne.jp), subscription to LTE NET is required. If you did not subscribe
it when you purchased the product, contact an au shop or Customer Service Center.
● It takes from 30 seconds to 3 minutes for the initial setting depending on time zone. Wait
for a while on the "Eメールアドレスの設定中です。しばらくお待ちください。 (E-mail address
setting is in progress. Please wait for a while)" screen.
In the home screen, tap
(E-mail)
Tap "接続する (Connect)"
* Tap "閉じる (Close)"
to display the E-mail
top screen.
Initial settings are
complete, E-mail
address screen
appears.
Changing E-mail address
Although E-mail address is automatically decided by performing Initial settings, the
E-mail address can be changed.
1
. In the home screen, (E-mail)→
→Tap "E-mail settings"
2
. Tap "Other settings"→"接続する (Connect)"→"Eメールアドレスの変更 (Change E-mail
address)"
3
. Enter a security code and tap "送信 (Send)"→"承諾する (Accept)"
* Security code is a four digit number chosen by the customer and noted on the
application form.
4
. Enter in left section of "@" of E-mail address (changeable section) and tap "送信 (Send)"
→"OK"
PC-mail
Set up the mail account that you usually use on your PC etc. on FJT21 to send and
receive mails to/from the FJT21. Obtain information necessary for settings from your ISP
in advance to make a mail account settings. To activate PC-mail, in the home screen, tap
→"Email".
Wireless LAN (Wi-Fi
®
) setting
Use your home wireless LAN or public wireless LAN to connect internet service.
● Before setting wireless LAN (Wi-Fi
®
), check network name (SSID) and security key
(password) you want to use.
● Operate in a place where signal of connecting access point can be received.
In the home screen, tap
Tap "Wi-Fi"→If "Wi-Fi" is "OFF", tap to
turn "ON"
Tap an access point you connect
Tap and enter a password
(security key) set in the access
point
* If you select a network without
security setting, this screen
does not appear.
Example:
When Security is "WPA2 PSK"
When connected to access
point, "Connected" appears
on the selected network,
and icon ( ) appears on
the status bar.
If connecting access point is not
detected, register the access
point manually. To register
manually, tap "ADD NETWORK" and
enter network SSID and security
information.
Tap "Connect"
Easy Wi-Fi
®
network connection
You can connect using a wireless LAN (Wi-Fi
®
) access point supporting AOSS™ or WPS
with simple operation.
In the home screen,
→Tap "Wi-Fi Easy Settings"→"Easy Setting"/"AOSS system"/"WPS
system", and then operate on the access point.
Importing/Exporting contacts
Use NX! Contact to export contacts data to microSD card (backup) or import contacts
data saved in the microSD card (restore). You are recommended to export data regularly to
protect important data.
When an account selection
screen appears, select an
account to import.
When there are several files,
select a file to import.
In the home screen,
→Tap "NX!
Contact"
→Tap "Import/export"
To export, tap "Export to SD
card"→Select data to export
→Tap "OK"
To import, tap "Import from
SD card"
Backing up E-mails
You are recommended to save backup data of E-mails of Inbox, Outbox, Unsent box to
microSD card.
In the home screen, (E-mail)→
→Tap "E-mail settings"→"Backup/Restore"
Tap "Mail Backup"→"OK"→Mark a checkbox you want to back up →Tap "OK"
When microSD card is installed, data is saved to "/mnt/external̲sd/private/au/email/BU"
folder.
・
When microSD card is not installed, data is saved to "/storage/emulated/0/private/
au/email/BU" folder in internal storage.
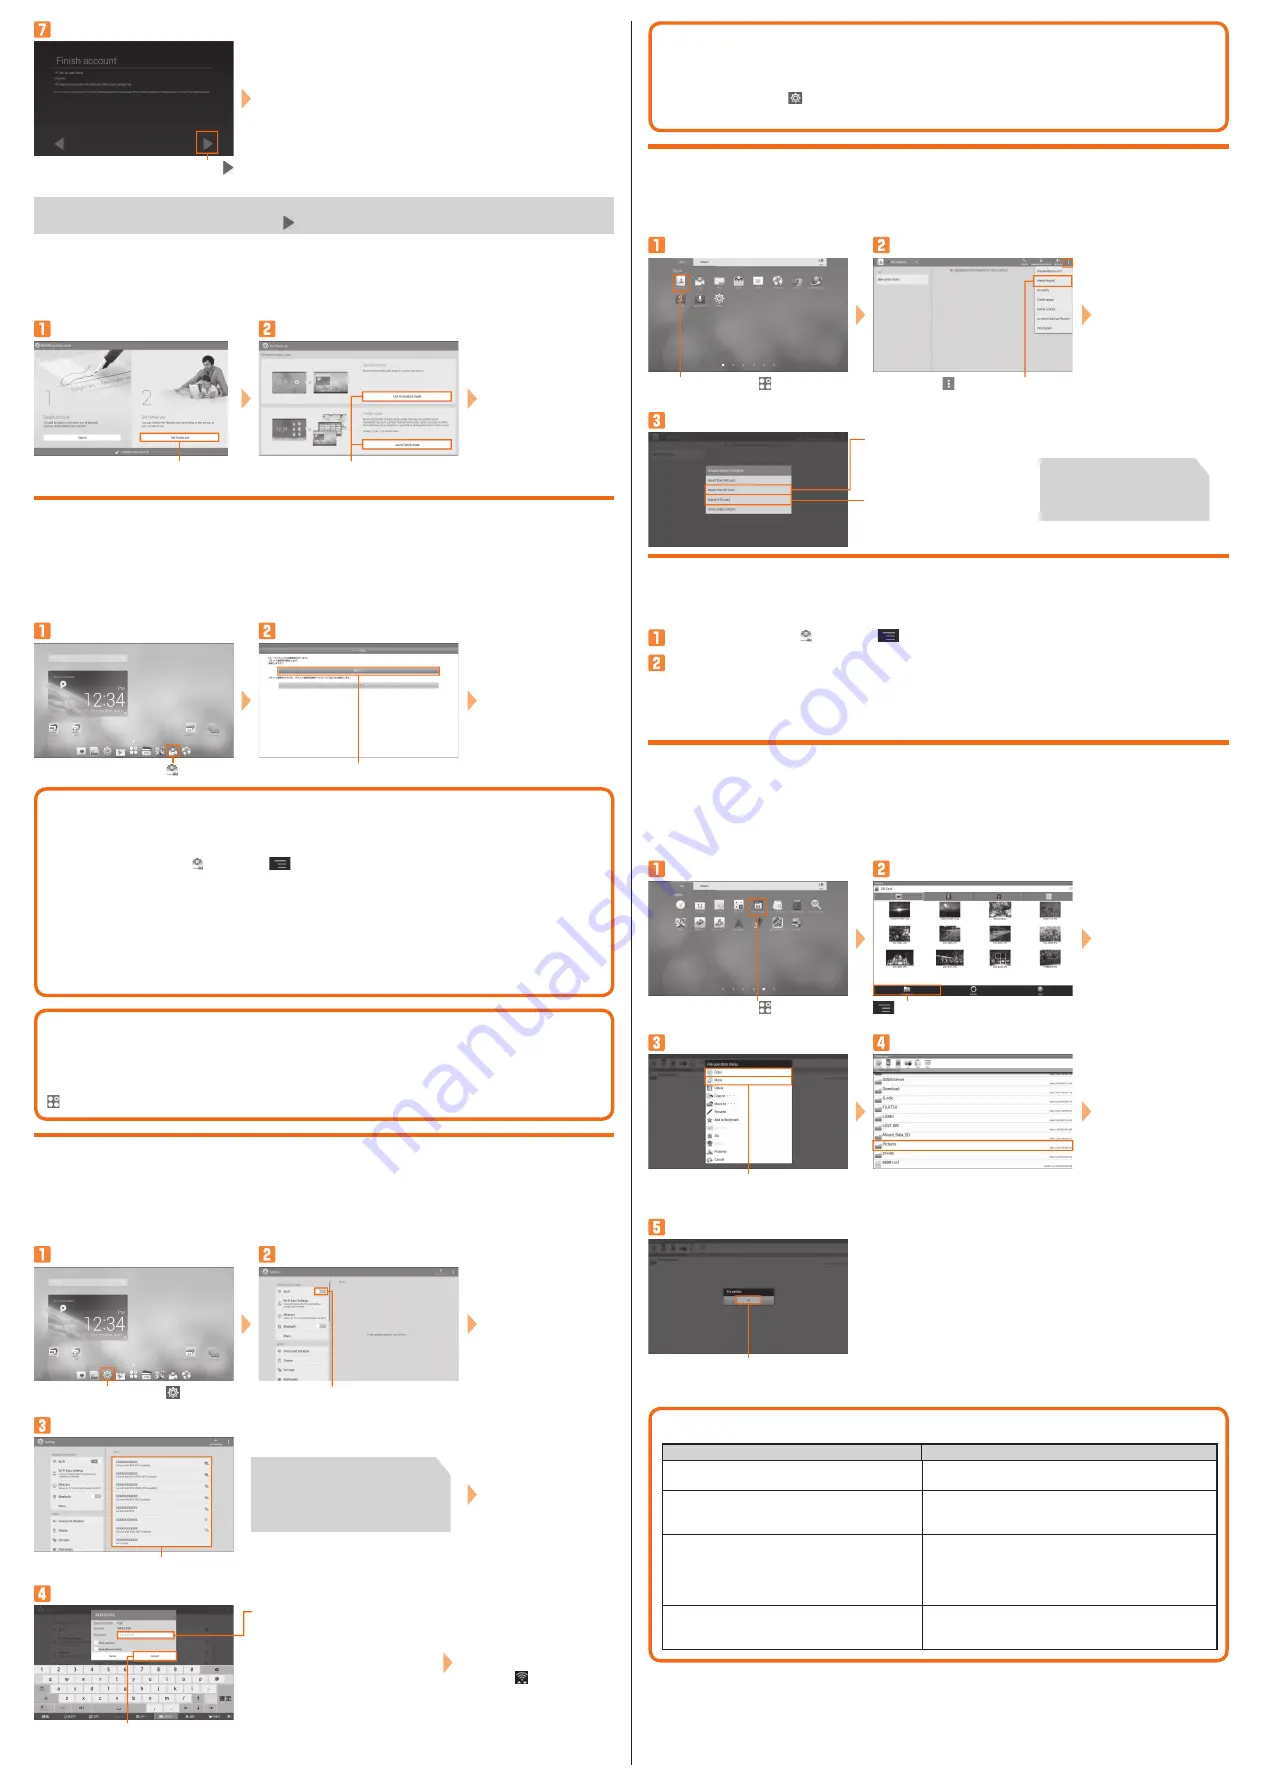
Data transfer to microSD card
Data saved in the internal storage of FJT21 can be transferred to microSD card.
● Still images and videos data can be also transferred to microSD card by "Gallery" application.
● Data moved to microSD card can be restored by setting back to the original folder in the
internal storage.
* microSD card is not included. Please prepare microSD card (commercially available) as required.
Tap "Paste"→"OK" when finished
In the home screen,
→Tap
"KSfilemanager"
→Tap "File Manager"
Tap "Home"→Long-touch a folder to
store the data→Tap "Copy"/"Move"
Tap "SD Card"→Tap a folder to copy/
move
Data saving folders
Data type
Folder location in internal storage
Still images and videos shot with Camera
/storage/emulated/0/DCIM/Camera
(When "Save" is set to "Terminal")
Attachment data in received E-mail (@ezweb.
ne.jp) or saved images inserted in the message
(including D-pictogram)
/storage/emulated/0/private/au/email/MyFolder
E-mail Inbox backup data
E-mail Outbox backup data
E-mail Unsent backup data
/storage/emulated/0/private/au/email/BU/RE
/storage/emulated/0/private/au/email/BU/SE
/storage/emulated/0/private/au/email/BU/DR
(When microSD card is installed, data is saved to
"/mnt/external̲sd/private/au/email/BU" automatically.)
Data saved by Browser
/storage/emulated/0/Download
(When "Download file save-to destination" is set to
"Built-in storage preferred")
November 2013, 1st Edition
Sold by: KDDI CORPORATION, OKINAWA CELLULAR TELEPHONE COMPANY
Manufactured by:
FUJITSU MOBILE COMMUNICATIONS LIMITED