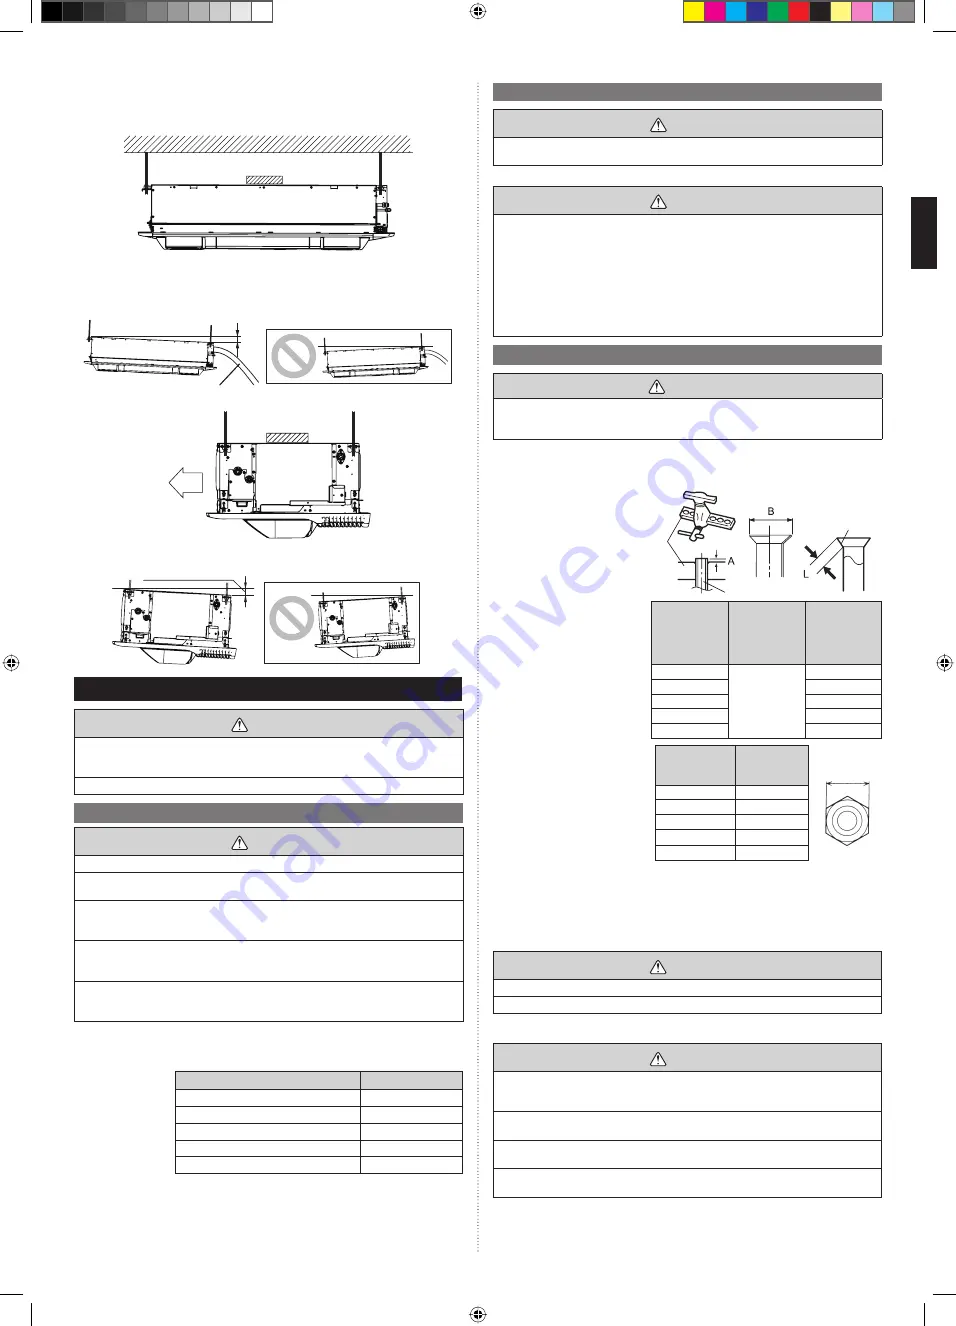
background image

En-4

3.3.4. Leveling

• Base horizontal direction leveling on top of the indoor unit.

Ceiling

Level

• Give a slight tilt to the side to which the drain hose is connected. The tilt should be in the 

range of 0 mm to 10 mm.

Drain hose

GOOD

PROHIBITED

10 mm or less

Level

Front

GOOD

PROHIBITED

5 mm or less

4. PIPE INSTALLATION

 CAUTION

Be more careful that foreign matter (oil, water, etc.) does not enter the piping than with 
refrigerant R410A models. Also, when storing the piping, securely seal the openings by 
pinching, taping, etc.

While welding the pipes, be sure to blow dry nitrogen gas through them.

4.1. Selecting the pipe material

 CAUTION

Do not use existing pipes from another refrigeration system or refrigerant.

Use pipes that have clean external and internal sides without any contamination which 
may cause trouble during use, such as sulfur, oxide, dust, cutting waste, oil, or water.

It is necessary to use seamless copper pipes.
Material : Phosphor deoxidized seamless copper pipes
It is desirable that the amount of residual oil is less than 40 mg/10 m.

Do not use copper pipes that have a collapsed, deformed, or discolored portion (es-
pecially on the interior surface). Otherwise, the expansion valve or capillary tube may 
become blocked with contaminants.

Improper pipe selection will degrade performance. As an air conditioner using R410A 
incurs pressure higher than when using conventional (R22) refrigerant, it is necessary to 
choose adequate materials.

• Thicknesses of copper pipes used with R410A are as shown in the table.
• Never use copper pipes thinner than those indicated in the table even if they are avail-

able on the market.

Thicknesses of 
Annealed Copper 
Pipes (R410A)

Pipe outside diameter [mm (in)]

Thickness [mm]

6.35 (1/4)

0.80

9.52 (3/8)

0.80

12.70 (1/2)

0.80

15.88 (5/8)

1.00

19.05 (3/4)

1.20

4.2. Pipe requirement

 CAUTION

Refer to the installation manual for the outdoor unit for description of allowable pipe 
length and height difference.

Use pipe with water-resistant heat insulation.

 CAUTION

Install heat insulation around both the gas and liquid pipes. Failure to do so may cause 
water leaks.
Use heat insulation with heat resistance above 120 °C. (Reverse cycle model only)
In addition, if the humidity level at the installation location of the refrigerant piping is 
expected to exceed 70 %, install heat insulation around the refrigerant piping. If the 
expected humidity level is 70 to 80 %, use heat insulation that is 15 mm or thicker and 
if the expected humidity exceeds 80 %, use heat insulation that is 20 mm or thicker. If 
heat insulation is used that is not as thick as specified, condensation may form on the 
surface of the insulation. In addition, use heat insulation with heat conductivity of 0.045 
W/(m·K) or less (at 20 °C).

4.3. Flare connection (pipe connection)

 WARNING

Tighten the flare nuts with a torque wrench using the specified tightening method. Other-
wise, the flare nuts could break after a prolonged period, causing refrigerant to leak and 
generate hazardous gas if the refrigerant comes into contact with a flame.

4.3.1. Flaring

Use special flare tool exclusive for R410A.
(1)  Cut the connection pipe to 

the necessary length with a 
pipe cutter.

(2)  Hold the pipe downward so 

that cuttings will not enter the 
pipe and remove any burrs.

(3)  Insert the flare nut (always 

use the flare nut attached to 
the indoor and outdoor units 
(or RB unit) respectively) 
onto the pipe and perform 
the flare processing with a 
flare tool. Use the special 
R410A flare tool. Leakage of 
refrigerant may result if other 
flare nuts are used.

(4)  Protect the pipes by pinching 

them or with tape to prevent 
dust, dirt, or water from 
entering the pipes.

Check if [L] is 
flared uniformly 
and is not cracked 
or scratched.

Pipe

Die

Pipe outside 

diameter 

[mm (in)]

Dimension A 

[mm]

(Flare tool for 

R410A, clutch 

type)

Dimension 

B

 0

-0.4

 [mm]

6.35 (1/4)

0 to 0.5

9.1

9.52 (3/8)

13.2

12.70 (1/2)

16.6

15.88 (5/8)

19.7

19.05 (3/4)

24.0

When using conventional (R22) 
flare tools to flare R410A pipes, the 
dimension A should be approxi-
mately 0.5 mm more than indicated 
in the table (for flaring with R410A 
flare tools) to achieve the speci-
fied flaring. Use a thickness gauge 
to measure the dimension A. It is 
recommended that a R410A flaring 
tool is used.

Pipe outside 

diameter 

[mm (in)]

Width across 

flats of Flare nut 

[mm]

6.35 (1/4)

17

9.52 (3/8)

22

12.70 (1/2)

26

15.88 (5/8)

29

19.05 (3/4)

36

Width across 

flats

4.3.2. Bending pipes

• If pipes are shaped by hand, be careful not to collapse them.
• Do not bend the pipes in an angle more than 90°.
• When pipes are repeatedly bend or stretched, the material will harden, making it difficult 

to bend or stretch them anymore. 

• Do not bend or stretch the pipes more than 3 times.

 CAUTION

To prevent breaking of the pipe, avoid sharp bends. 

If the pipe is bent repeatedly at the same place, it will break.

4.3.3. Pipe connection 

 CAUTION

Be sure to install the pipe against the port on the indoor unit and the outdoor unit cor-
rectly. If the centering is improper, the flare nut cannot tightened smoothly. If the flare 
nut is forced to turn, the threads will be damaged.

Do not remove the flare nut from the indoor unit pipe until immediately before connect-
ing the connection pipe.

Do not use mineral oil on flared part. Prevent mineral oil from getting into the system as 
this would reduce the lifetime of the units.

Hold the torque wrench at its grip, keeping it at a right angle with the pipe, in order to 
tighten the flare nut correctly.

9383489013_IM.indb   4

9383489013_IM.indb   4

08-Feb-19   17:11:22

08-Feb-19   17:11:22

Summary of Contents for AIRSTAGE AUXS018GLEH

Page 1: ...n flusso 3D A uso esclusivo del personale tecnico autorizzato Ελληνικά Português ΕΓΧΕΙΡΙΔΙΟ ΕΓΚΑΤΑΣΤΑΣΗΣ ΕΣΩΤΕΡΙΚΗ ΜΟΝΑΔΑ τύπος κασέτας με ροή 3D Μόνο για εξουσιοδοτημένο τεχνικό προσωπικό MANUAL DE INSTALAÇÃO UNIDADE INTERIOR tipo de cassete de fluxo 3D Apenas para técnicos autorizados Русский Türkçe РУКОВОДСТВО ПО УСТАНОВКЕ ВНУТРЕННИЙ МОДУЛЬ кассетный тип с 3D потоком Только для авторизованного ...

Page 2: ...rvice person nel to repairs When moving consult authorized service personnel for disconnection and installation of the unit 2 ABOUT THIS PRODUCT 2 1 Precautions for using the R410A refrigerant WARNING Do not introduce any substance other than the prescribed refrigerant into the refrigera tion cycle If air enters the refrigeration cycle the pressure in the refrigeration cycle will become abnormally...

Page 3: ...unit to leak water Area filled with mineral oil or containing a large amount of splashed oil or steam such as a kitchen It will deteriorate plastic parts causing the parts to fail or the unit to leak water Area that generates substances that adversely affect the equipment such as sulfuric gas chlorine gas acid or alkali It will cause the copper pipes and brazed joints to corrode which can cause re...

Page 4: ... pipe 50 150 227 204 250 85 120 Drain pipe Connect the attached drain hose 435 105 65 2 Hanging structure Select a strong structure for the hanging location If necessary reinforce the hanging bolt with quakeproof columnar support material to prevent shaking Use hanging bolts of M8 to M10 3 3 2 Hanging preparations Firmly fasten the hanging bolts as shown in the figure or by another method Install ...

Page 5: ...addition use heat insulation with heat conductivity of 0 045 W m K or less at 20 C 4 3 Flare connection pipe connection WARNING Tighten the flare nuts with a torque wrench using the specified tightening method Other wise the flare nuts could break after a prolonged period causing refrigerant to leak and generate hazardous gas if the refrigerant comes into contact with a flame 4 3 1 Flaring Use spe...

Page 6: ...by using the visible portion of transpar ent drain port and the drain piping final outlet on the indoor unit CAUTION Do not apply adhesive agent on the drain port of the indoor unit Use the attached drain hose and connect the drain piping Install the drain pipe with downward gradient 1 100 to 1 50 and so there are no rises or traps in the pipe Unsmooth draining caused by accumulated water flow in ...

Page 7: ...sufficient insulation or exceeding the allowable current can cause electric shock or fire Do not modify the power cables use extension cables or use any branches in the wir ing Improper connections insufficient insulation or exceeding the allowable current can cause electric shock or fire Match the terminal block numbers and connection cable colors with those of the outdoor unit or RB unit Erroneo...

Page 8: ...manual of the RB unit 2 Earth Ground the remote controller if it has an earth ground cable 3 The 3 wire type remote controller is not used Crossover wiring of power supply Indoor unit Pull box Pull box Power supply Power supply Power supply Indoor unit Indoor unit Breaker Power supply 6 3 Unit wiring Before attaching the cable to terminal block 6 3 1 Power supply cable Earth Ground cable 20 mm 30 ...

Page 9: ...d Then loosen one screw and remove the sheet metal Connector 3 After wiring is complete secure the cables with the cable clamps Cable clamp Earth ground Power supply cable 4 Connect the transmission and remote controller cables by passing the cables through the hole shown in the diagram below Once all cables are connected tie the power cable using a push mount cable tie and tie the transmission an...

Page 10: ...er supply unit Cable of the IR receiver unit Cable clamp Cable clamp Once all connectors required for connection are connected push up the circuit board that was pulled down and endure that the hooks are in place Fix the connected cables by passing them through the hole using the grille accessory cable tie as shown in the following figure Cable tie accessory of the grille 6 6 External input and ex...

Page 11: ...ergency stop ON OFF Normal Pulse CNA01 or CNA02 Ch1 OFF ON Emergency stop Ch2 OFF ON Normal All indoor units of same refrigerant system stops when Emergency stop operates When function setting is Forced stop mode Input signal type Connector Input signal Command Edge Ch1 of CNA01 or CNA02 OFF ON Forced stop ON OFF Normal Pulse CNA01 or CNA02 Ch1 OFF ON Forced stop Ch2 OFF ON Normal When the forced ...

Page 12: ...g for indoor unit Set the DIP switch SET3 SW1 2 referring to the figure and table below SET3 10 IU AD 1 10 REF AD 1 SET4 DIP switch SET3 SW 1 SW 2 SW 3 SW 4 ON OFF DIP switch SET3 DIP switch SET3 Custom code A Factory setting B C D SW1 OFF ON OFF ON SW2 OFF OFF ON ON 7 3 Function setting FUNCTION SETTING can be performed with the wired or wireless remote controller The remote controller is optiona...

Page 13: ...9 4 5 C Forbidden 71 00 Forbidden 72 00 Forbidden 73 00 Forbidden 74 00 Forbidden 75 00 8 GRILLE INSTALLATION Operate according to the installation manual of the grille Be sure to confirm there is no gap between the grille and indoor unit after installing the grille 9 TEST RUN 9 1 Test run using Outdoor unit PCB Refer to the Installation Manual for the outdoor unit if the PCB for the outdoor unit ...

Page 14: ...r error 3 10 Indoor unit communication circuit wired remote control ler error 4 1 Indoor unit room temp therm istor error 4 2 Indoor unit heat ex temp thermistor error 5 1 Indoor unit fan motor 1 error 5 2 Indoor unit coil expansion valve error 5 3 Indoor unit water drain abnormal 9 15 Outdoor unit miscellaneous error 10 8 Poor refrigerant circulation 13 1 RB unit error Display mode 0 5 s ON 0 5 s...

Reviews: