background image

21


IMPORTANT SAFETY INSTRUCTIONS


Dear customer, 


be sure to read the entire manual before you assemble or operate your machine.   

This manual contains important information regarding your safety.   

Important Safety Precautions 


Note the following safety precautions:   
1.  Keep children and pets away from the machine at all times. DO NOT leave children 

unattended in the same room with the machine.   

2.  Disabled persons should not use the machine without a qualified person or physician, 

who can provide qualified surveillance and assistance.   

3.  If the user experiences dizziness, nausea, chest pain, or any other abnormal symptoms, 

STOP the workout immediately. CONSULT A PHYSICIAN IMMEDIATELY.   

4.  Position the machine on a plain, leveled surface. DO NOT use the machine near liquids 

or outdoors. Use a floor or carpet protection.   

5.  Use the machine only for its intended use as described in this manual. DO NOT use 

attachments not recommended by the manufacturer.   

6.  Keep your hands away from all moving parts.   

7.  Before using the equipment, check if all nuts and bolts are securely tightened.   

8.  The safety of the equipment can only be maintained if it is regularly examined for 

damage and/or wear and tear. If you find any defective components while assembling or 

checking the equipment or if you hear any unusual noises coming from the equipment, 

stop immediately. Do not use the equipment until the problem has been rectified.   

9.  Never operate the device if it is not functioning properly.   

10. Only one person at a time should use the machine (max. capacity = 110 kg / 242 lb).   

11. Never use abrasives to clean the device. Remove drops of sweat immediately after 

finishing your workout.   

12. Always wear appropriate workout clothing when exercising. Running or aerobic shoes 

are also required when using the machine.   

13. 

Before using the device, always do stretching exercises to properly warm up. 


14. 

Do not place any sharp objects around the machine. 


WARNING 


BEFORE BEGINNING ANY EXERCISE PROGRAM, CONSULT YOUR PHYSICIAN 

FIRSTLY. THIS IS ESPECIALLY IMPORTANT FOR INDIVIDUALS OVER THE AGE OF 35 

OR PERSONS WITH PRE-EXISTING HEALTH PROBLEMS. READ ALL INSTRUCTIONS 

BEFORE USING ANY FITNESS EQUIPMENT. KEEP THESE INSTRUCTIONS.   
THE MANUFACTURER ASSUMES NO RESPONSIBILITY FOR PERSONAL INJURY OR 

PROPERTY DAMAGE OBTAINED BY OR THROUGH THE USE OF THIS PRODUCT.


Summary of Contents for HT 200

Page 1: ...Lesen Sie dieses Handbuch sorgf ltig durch bevor Sie das Ger t einsetzen und bewahren Sie das Handbuch f r die weitere Nutzung auf WARNING This device is only intended for home use in accordance with...

Page 2: ...NTSORGUNG 17 GARANTIE 18 ACHTUNG Dieses Ger t ist f r den privaten Gebrauch in Innenr umen vorgesehen Jedwede andersartige Benutzung f hrt zum Verlust der Garantie und kann dar ber hinaus ernsthafte V...

Page 3: ...gen Abst nden auf Sch den bzw Anzeichen von Abnutzung untersucht wird Sollten Sie defekte Teile beim Zusammenbau oder der Benutzung entdecken oder ungew hnliche Ger usche wahrnehmen stoppen Sie ein ev...

Page 4: ...e das beigef gte Werkzeug f r den Aufbau Pr fen Sie ob alle ben tigten Teile vorhanden sind 01 02 Hauptrahmen 03 Sattelst tze 04 Vorderer Handgriff 05 Vorderer Standfu 06 Hinterer Standfu 07 Sitz 08 C...

Page 5: ...80 Schraube M8x45L 4 81 Schraube M8x40L 2 84 Federscheibe 4 2 Aufbau SCHRITT 1 Ziehen Sie den Stift 11 aus dem Hauptrahmen 01 und klappen Sie den Hauptrahmen 01 aus Sichern sie ihn in der ausgeklappte...

Page 6: ...n dem Uhrzeigersinn befestigt Die Pedale sind zur besseren Zuordnung mit R f r rechts und L f r links markiert SCHRITT 3 L sen Sie die 3 Unterlegscheiben 16 und 3 Muttern 17 auf der R ckseite des Sitz...

Page 7: ...gscheiben 55 und 2 Schrauben 78 anziehen 2 Das R ckenpolster 77 wird mit 4 Federscheiben 84 und 4 Schrauben 80 an der R ckenpolsterhalterung 75 angebracht 3 Montieren Sie nun den hinteren Handgriff 76...

Page 8: ...des vorderen Handgriffs 4 wie abgebildet und verbinden Sie das Sensorkabel Oberteil 19 Verbinden Sie das Handpulskabel 18 mit dem Anschluss auf der R ckseite des Computers 08 SCHRITT 7 L sen Sie die...

Page 9: ...tarker Druck ausge bt werden treten Schmerzen auf h ren Sie auf 2 Die Trainingsphase In dieser Phase sollten Sie Leistung bringen Regelm iges Training wird Ihre Beinmuskulatur flexibler werden lassen...

Page 10: ...lativ hoch einstellen Dies beansprucht Ihre Beinmuskulatur in st rkerem Ma e das kann dazu f hren dass Sie nicht so lange trainieren k nnen wie gew nscht Wenn Sie jedoch auch Ihre Fitness trainieren m...

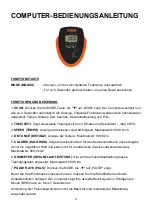
Page 11: ...igkeit Maximalwert 999 9 km h 4 DISTANCE DISTANZ Anzeige der Distanz Maximalwert 99 99 km 5 CALORIE KALORIEN Zeigt den aktuellen Wert f r den Kalorienverbrauch diese Angabe ist nur ein ungef hrer Wert...

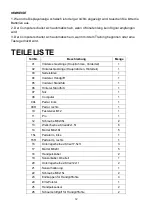
Page 12: ...s Gest nge Hauptrahmen Hinterteil 1 03 Sattelst tze 1 04 Vorderer Handgriff 1 05 Vorderer Standfu 1 06 Hinterer Standfu 1 07 Sitz 1 08 Computer 1 09L Pedal links 1 09R Pedal rechts 1 10 Feststeller M1...

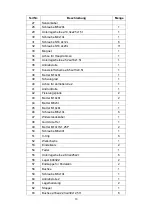
Page 13: ...10x8t 1 39 Schwungrad 1 40 Achse f r Antriebsrolle 2 1 41 Andruckrolle 1 42 Fixierungsplatte 2 43 Mutter M10x8t 2 44 Mutter M6x5t 1 45 Mutter M10x8t 1 46 Schraube M6x10L 6 47 Widerstandskabel 1 48 Gum...

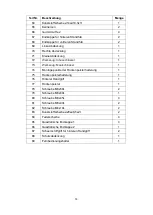
Page 14: ...sel 1 73 Werkzeug Maulschl ssel 1 74 Montagepunkte der R ckenpolsterhalterung 1 75 R ckenpolsterhalterung 1 76 Hinterer Handgriff 1 77 R ckenpolster 1 78 Schraube M8x50L 2 79 Schraube M8x80L 1 80 Schr...

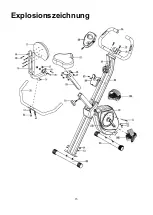
Page 15: ...15 Explosionszeichnung...

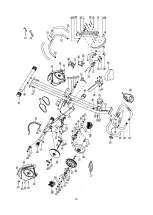
Page 16: ...16...

Page 17: ...n China ENTSORGUNG Dieses Ger t darf nicht zusammen mit dem Hausm ll entsorgt werden Jeder Verbraucher ist verpflichtet alle elektrischen oder elektronischen Ger te egal ob sie Schadstoffe enthalten o...

Page 18: ...ch zu machen einschlie lich jeglicher Teile die beim Versand ab Werk noch nicht Teil des Ger tes waren 4 Sch den an der Ger teoberfl che w hrend des Transports der Installation oder der Folgeinstallat...

Page 19: ...flichten von Cardiofitness aufgrund dieser Garantie sind begrenzt auf die Reparatur oder den Austausch des Produktes nach Wahl von Cardiofitness durch eines unserer autorisierten Servicecenter Alle Re...

Page 20: ...30 EXPLODED VIEW 33 TECHNICAL SPECIFICATIONS 35 DISPOSAL 35 ATTENTION This device is intended for use in private homes only Any other use leads to the loss of warranty and may cause serious hurts or...

Page 21: ...ly tightened 8 The safety of the equipment can only be maintained if it is regularly examined for damage and or wear and tear If you find any defective components while assembling or checking the equi...

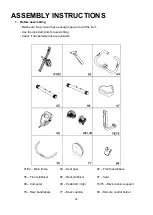
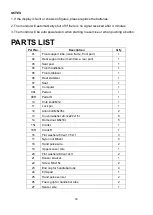
Page 22: ...item Use the included tools for assembling Check if all needed parts are available 01 02 Main frame 03 Seat post 04 Front handlebars 05 Front stabilizer 06 Rear stabilizer 07 Seat 08 Computer 09 Pedal...

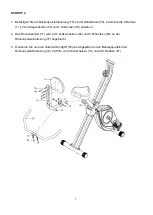
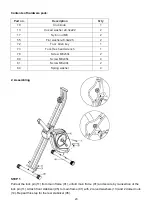
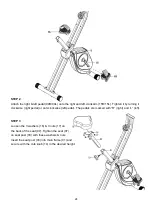
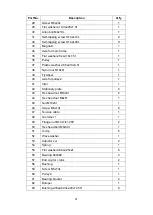
Page 23: ...Tool Hex head wrench 1 78 Screw M8x50L 2 80 Screw M8x45L 4 81 Screw M8x40L 2 84 Spring washer 4 2 Assembling STEP 1 Pull out the lock pin 11 from main frame 01 unfold main frame 01 and secure by re i...

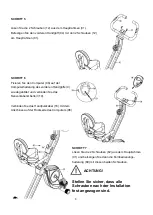
Page 24: ...wise right pedal or anti clockwise left pedal The pedals are marked with R right and L left STEP 3 Loosen the 3 washers 16 3 nuts 17 on the back of the seat 07 Tighten the seat 07 on seat post 03 with...

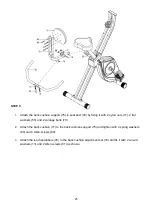
Page 25: ...2 flat washers 55 and 2 carriage bolts 78 2 Attach the back cushion 77 to the back cushion support 75 and tighten with 4 spring washers 84 and 4 Allen screws 80 3 Attach the rear handlebars 76 to the...

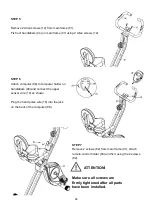
Page 26: ...omputer holder on handlebars 04 and connect the upper sensor wire 19 as shown Plug the hand pulse wire 18 into the jack on the back of the computer 08 STEP 7 Remove 2 screws 82 from main frame 01 atta...

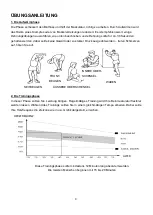
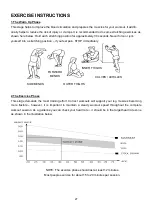
Page 27: ...tion if you feel pain STOP immediately 2 The Exercise Phase This stage demands the most training effort Correct workouts will support your leg muscles becoming more flexible however it is important to...

Page 28: ...o work harder during the exercise however this may cause you to break up your exercise earlier If you want to improve your fitness level as well you need to modify your exercise program in this way th...

Page 29: ...is 999 9 km h 4 DISTANCE Shows the distance from exercise start The maximum value is 99 99 km 5 CALORIE Shows the calories burned approximate value only not suitable for therapeutic use The maximum va...

Page 30: ...frame rear part 1 03 Seat post 1 04 Front handlebars 1 05 Front stabilizer 1 06 Rear stabilizer 1 07 Seat 1 08 Computer 1 09L Pedal L 1 09R Pedal R 1 10 Club knob M12 1 11 Lock pin 1 12 Allen bolt M8...

Page 31: ...ut M10x8t 1 39 Flywheel 1 40 Axle for pulley 2 1 41 Idler 1 42 Stationary plate 2 43 Hex head nut M10x8t 2 44 Hex head nut M6x5t 1 45 Nut M10x8t 1 46 Screw M6x10L 6 47 Tension cable 1 48 Grommet 1 1 4...

Page 32: ...1 72 Tool Allen Key 1 73 Tool Allen wrench 1 74 Back cushion adjustor set 1 75 Back cushion support tube 1 76 Rear handlebars 1 77 Back cushion 1 78 Screw M8x50L 2 79 Screw M8x80L 1 80 Screw M8x45L 4...

Page 33: ...33 EXPLODED VIEW...

Page 34: ...34...

Page 35: ...in China DISPOSAL This product must not be disposed of together with domestic waste All users are obliged to hand in all electrical or electronic devices regardless of whether or not they contain tox...

Page 36: ...36 Cardiofitness GmbH Co KG Friedrich Ebert Str 75 51429 Bergisch Gladbach info cardiofitness de F 57022 HT200 DE_GB 04 2020 V1 0...

Reviews: