FTE MAX S400 HD PLUS Quick Installation Manual Download Page 2

PAG. 2

rev 1.1

QUICK INSTALLATION GUIDE

Warning: 

-The apparatus shall not be exposed to dripping or splashing and that no objects fi lled with liquids, such as vases, 
shall be placed on the apparatus.
- Do not place naked fl ame sources, such as lighted candles on the apparatus; otherwise, there is the danger of 
fi re.
- The unit should be connected to a power supply only of the type described in the operating instructions or as 
marked on the unit. If you are not sure of the type of power supply (for example: 120 or 230V) to your home, consult 
your local dealer or local power company.
- Do not open the cabinet or touch any parts in the inner mechanism. Consult your local dealer for technical service 
if the opening is required.
- The mains plug is used as the disconnect device, the disconnect device shall remain readily operable.
- Take attention to the environmental aspects of battery disposal. The battery of remote control should not be 
exposed excessive heat such as sunshine, fi re or the like.
- Maintenance man must use the appointed screw in the rear plate.
- Ensure a minimum distance of 5 cm around the apparatus for suffi cient ventilation.
- Ensure that the ventilation is not impeded by covering the ventilation openings with items such as newspapers, 
table-cloths, curtains, etc.
- Use the apparatus only in moderate climates (not in tropical climates).
- Do not open the cabinet to avoid the unit direct exposure to radiation.

Unit Cleaning:

 After the unit power is turned off, you can clean the cabinet, panel and remote control with a soft 

cloth lightly moistened with a mild detergent solution.

Attachments: 

Never add any attachments and/or equipment without the manufacturer consent; as such additions 

may result in the risk of fi re, electric shock or other personal injury.

Locating:

 Slots and openings in the cabinet are provided for ventilation to protect it from overheating. Do not block 

these openings or allow them to be blocked by placing the STB on a bed, sofa or other similar surface, nor should it 
be placed over a radiator or heat register.

Power-Cord Protection:

 Place the power-supply cord out of the way, where it will not be walked on. Please take 

special attentions to cords at plugs, convenience receptacles and the point where they exit from the unit.

Object and Liquid Entry: 

Never put objects of any kind into this STB through openings, as they may touch 

dangerous voltage points or short-out parts that could result in a fi re or electric shock. Never spill any liquid on the 
STB.

Note:

 Moisture may be formed inside the unit in the following conditions:

When the unit is suddenly moved from a cold environment or an air-condition room to a warm place.
Immediately after a heater has been turned on. 
In a steamy or very humid room.
If the moisture forms inside the unit, it may not operate properly. To correct this problem, turn on the power and wait 
about two hours for the moisture to evaporate.

Parts Replacement:

 When the unit parts need to be replaced, user should make sure the service technician use the 

replacement parts specifi ed by the manufacturer or having the same characteristics as the original part. Unauthorized 
replacement may put the unit in the risk of fi re, electric shock or other hazards.

Safety Check:

 After all the maintenances and repairs are done, user is required to request the service technician to 

conduct the overall safety check to ensure the machine is in the proper condition.

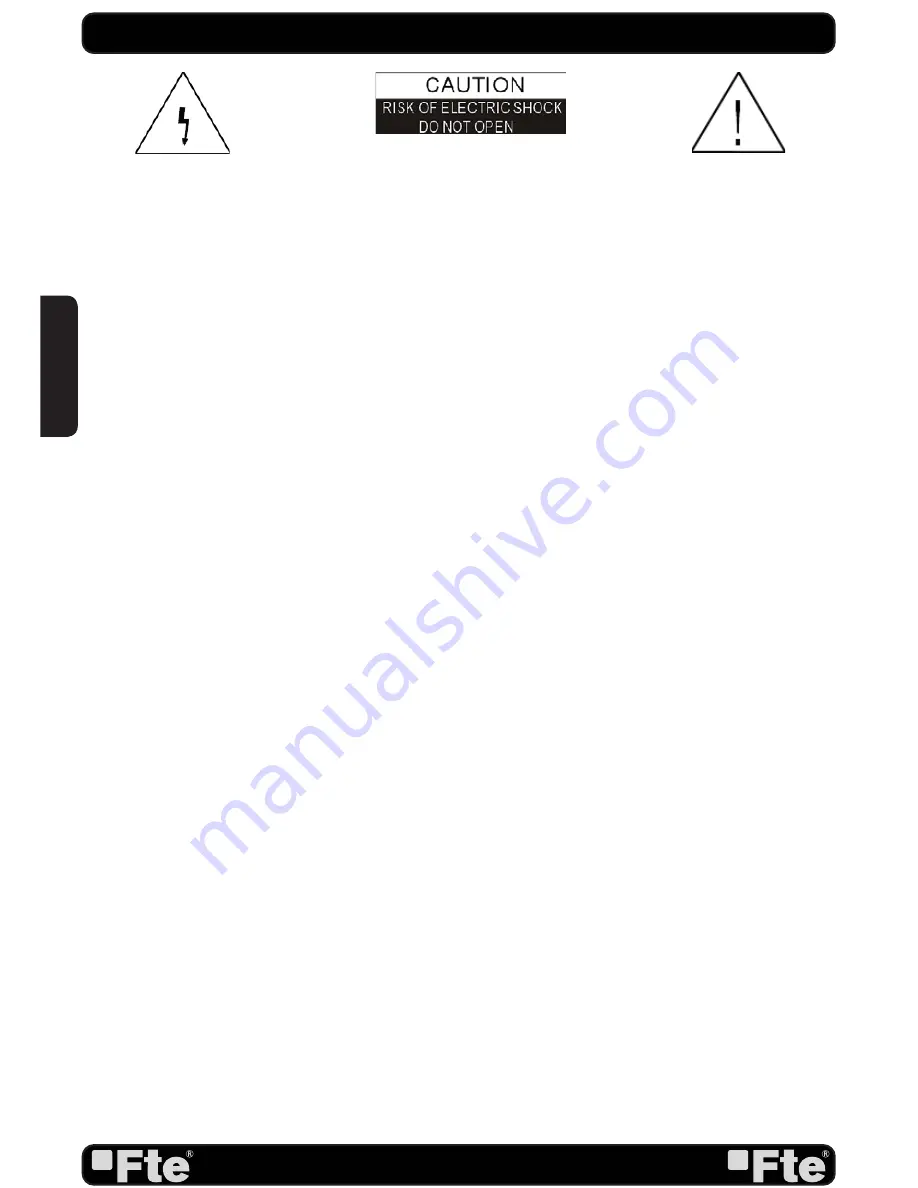
The lightning fl ash with arrowhead 
symbol, within an equilateral triangle, 
is intended to alert the user to 
“dangerous voltage” and to prevent 
from a risk of electric shock.

WARNING: 

To reduce the risk of 

electric shock, don’t open the cabinet. 
Refer servicing to qualifi ed personnel 
only.

The exclamation point within an 
equilateral triangle is intended 
to alert the user to important 
operating and maintenance 
(servicing).

Danger of explosion if battery is incorrectly replaced. Replace only with the same or equivalent type.

ENGLISH

Summary of Contents for MAX S400 HD PLUS

Page 1: ...MAX S400 HD PLUS...

Page 2: ...not block these openings or allow them to be blocked by placing the STB on a bed sofa or other similar surface nor should it be placed over a radiator or heat register Power Cord Protection Place the...

Page 3: ...o output By pressing the V FORMAT key you can configure the output format Options By source By Native TV 480i 480p 576i 576p 720p_50 720p_60 1080i_50 1080i_60 1080p_50 1080p_60 STEP 2 CONNECTIONS The...

Page 4: ...l If a Short circuit on the LNB message is shown on the TV please check the connections before continuing the installation Language press to select languages The selection of languages include English...

Page 5: ...be that you don t need to provide the power to the LNB But since this is depending on the kind of installed distribution system we recommend you to contact your installer or to refer to the user manua...

Page 6: ...n FTA Only item press to select scanning of all channels or just scanning of free channels If you select Yes it will scan free channels only 3 On Scan Channel item press to select the scanning range f...

Page 7: ...r if you wish to introduce the offset respect GMT manually GMT Usage On 3 GMT Offset If GMT Usage is On the offset respect GMT has to be configured depending on your region or country Use the keys to...

Page 8: ...s choosing the video Standard and other parameters of the screen Display setting Local Time Setting Time setting menu Timer Setting Timer setting menu Parental Lock In this option user can lock the ac...

Page 9: ...s all the stored TP This list can be modified Installation Information Shows all the technical information for the selected channel Factory Default This option resets the receiver and loads the factor...

Page 10: ...15 2 13 Mute 15 2 14 Back 15 2 15 Information 15 2 16 TTX 16 2 17 Favourites 16 2 18 Fast recordings 16 2 19 Timeshift 16 2 20 Find 17 2 21 Video Format 17 2 2 2 S l e e p 1 7 3 Edit Channel 3 1 T V...

Page 11: ...o f t w a r e u p g r a d e b y U S B 3 0 7 Game 7 1 Othello 32 7 2 Sudoku 32 8 Rec Media 8 1 Media Player 33 8 1 1 Adding a new file to the list 34 8 1 2 Sort file 34 8 1 3 Edit 34 8 1 3 1 Rename fi...

Page 12: ...vel at the ANT IN input 5 BUTTONS These buttons allow controlling some functions of the receiver 1 IF IN Satellite input 2 TV SCART Output SCART for the connection to a TV set 3 AC IN Mains input cabl...

Page 13: ...up and down 13 Vol Vol Adjusts audio volume up and down 14 OK LIST Confirms selections or opens channel list 15 Menu Opens the main menu 16 Exit Exit menus or stop operations 17 Record Quick start fo...

Page 14: ...to the desired channel 2 5 TV RADIO In TV mode press TV RADIO to switch to Radio mode In Radio mode press TV RADIO again to switch back to TV mode 2 6 CHANNEL LIST 1 In full screen press OK List key c...

Page 15: ...lecting a satellite the channel list will be reduced to the channels of this satellite OSD 5 2 10 SUBTITLES In TV mode press TXT button for activating deactivating the channel subtitles depending on t...

Page 16: ...T RECORDING To start the recording OSD 10 1 If you would like to record a programme immediately press the Key Record In order to stop a recording before the ending of the programmed length press the S...

Page 17: ...hannel according your input and list the matched channel 3 Press Blue key can close Find window 2 21 VIDEO FORMAT In Tv mode press RES key in order to configure the output format of your receiver 2 22...

Page 18: ...until you confirm with OK button 3 Press on the RCU to jump between the channels by pages 4 Press to switch the Program Group 5 The colour buttons offer further functions to manage the channel list 3...

Page 19: ...s Blue button to mark a channel for deleting Marked channels OSD 18 will be deleted after you confirm to save the changes when you leave this menu 3 1 3 3 EDIT In Channel Edit menu press Green button...

Page 20: ...first Select Yes to delete all channels or No to cancel and confirm with OK OSD 23 Pressing Exit will exit the function directly without saving FREQUENTLY ASKED QUESTION Q IF I incautiously delete all...

Page 21: ...window like the one beside OSD 26 1 Move through the satellite list using and mark unmark the satellites that you want pressing OK 2 Press Red button to enter edit satellite menu OSD 27 You can edit...

Page 22: ...kHz sig nal is used in KU Universal LNBs to change between low band and high band After choosing LNB type Universal you cannot modify 22K Toneburst 0 12V Press to switch this function On or Off Polar...

Page 23: ...d channels OSD 31 4 5 MULTI SEARCH Entering in this menu you can make a search in all the satellites of the list configured in the Satellites list option The configuration options are the same as in t...

Page 24: ...related channels will be deleted If you select No the operation will be cancelled 5 Press the key Blue to make a searching of the selected TP When selecting this option a new window will appear here y...

Page 25: ...ou to set the preferred audio language for those channels using If a channel offers the same audio language as the First Audio you set the system will play this audio language as default If the channe...

Page 26: ...rom TV System menu 5 3 DISPLAY SETTING When you enter to Display Setting menu you will see window like below OSD 32 This menu will allow you to set the features of the image Options 1 Brightness 0 100...

Page 27: ...l press OK key to enter channel list and select channel that you want to setting 5 Wake up Date use number keys to input your wakeup date 6 Wake up Time use number keys to input your wakeup time Once...

Page 28: ...tup menu the revising is complete 4 Press Exit key to draw back from the Parental Lock menu 5 7 OSD SETTING When you input to OSD Setting menu you will see a screen like below OSD 47 1 Subtitle displa...

Page 29: ...be able to choose which type of channels the receiver shown every time it starts Press in order to select among All Free or Scrambled 5 9 3 CHANNEL CHANGE From this option you will be able to select t...

Page 30: ...item 1 A warning message will be displayed like the one beside OSD 52 2 If you select Yes then all changes you made will be reset to default values Make sure you really want to do this 3 Press Exit in...

Page 31: ...ng of the file it is corrupt ed or it would be a not appropriated for this model of receiv er an alert messagewould appear Error reading the USB disk 5 After pressing OK the receiver will write into t...

Page 32: ...essman Exit Quit game and draw back to Game menu 7 2 SUDOKU 1 Moving highlight to Setup and press Left Right keys to select the game level degree of difficulty OSD 56 2 Moving highlight to Start and p...

Page 33: ...is menu option you can accede and manage the contents of the HDD previously copied from your computer You also can create playlists of music or pictures OSD 58 You can move through the different type...

Page 34: ...list press Yellow button 8 1 2 SORT FILE 1 Press the red key to open the Sort window OSD 60 Press to select and OK to confirm your choice 2 The ways of sorting are Default Sorting by scanning result...

Page 35: ...you want to play 2 A Player will be opened as it is shown in the picture 2 It changes among the different ways of replay random list or single 8 1 5 PICTURE VIEWER 1 Press OK over the file JPG that y...

Page 36: ...password If it has not been modified it is by default the code 0000 3 The blocked channel is marked with an icon OSD 69 4 In order that the blockade of channels work it is necessary that the blocking...

Page 37: ...channel information If the users makes a Pause the image will stop but when he wants to continue watching the program it will be running in the cur rent moment 2 With this option you can settle the j...

Page 38: ...ates DVB S DVB S2 recommendation Input Signal Frequency Input Level Band Width Input connector 950 2150MHz 65dBm 25dBm 36 MHz F Type connector LNB control LNB supply Polarized control DiSEqC control 1...

Page 39: ...1 1 WE FTE MAXIMAL DECLARE THAT THE PRODUCT MAX S400 HD PLUS IS IN CONFORMITY WITH FOLLOWING DIRECTIVES LOW VOLTAGE DIRECTIVE 2006 95 EC EMC DIRECTIVE 2004 108 EC PART OF THE DECLARATION OF CONFORMITY...

Page 40: ...Tel 00 39 05 22 90 97 01 Fax 00 39 05 22 90 97 48 fte fte it www ftemaximal com PORTUGAL Rua Jos Carlos Ary dos Santos A das Lebres Loures 2670 791 Santo Ant o do Tojal Tel 00 351 219 83 87 00 Fax 00...

Reviews: