SATS-MINI Orientation Calibration
In order to optimize the SATS-MINI detection algorithm for Multirotor only applications you need to tell the
system which way is up. The calibration procedure allows you to mount the SATS-MINI on your drone in any
imaginable orientation and it will work the same. Follow these steps:
1. Mount the SATS-MINI on your drone. Any orientation is Ok.
2. Turn on the SATS-MINI, The IMU is calibrated at the factory so it can quickly orient magnetic north. But
we do recommend moving your drone 90 degrees in all three axis to make sure the IMU is locked. You
may see a jump in the virtual drone position indicating the IMU is locked.
3. This next step is optional and is not required for proper SATS-MINI operation. In order to have the
SATS-MINI exactly track your drone movement so the Shooty Chute virtual drone matches the physical
drone movement you will want to orient your drone to face magnetic North. If you have a cell phone
compass, or a tool like GPS Essentials it can tell you which way to point your drone.
4. Next put your drone in a level position (optionally facing magnetic north) so calibration can capture the
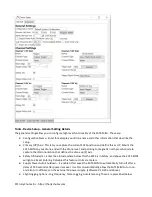
physical SATS-MINI orientation. In the UI go to Tools - Device Setup. Click Acquire in order to capture
the raw IMU orientation. You will see angle values populate the X / Y / Z fields. Clicking acquire again
should result in consistent values.
5. Upload that to the SATS-MINI and restart the SATS-MINI.
6. Reconnect the UI and the SATS-MINI and the UI drone should appear level and the drone arrow will
face away from you. You may need to rotate your drone 90 degrees around the Z axis to get the IMU to
lock. If you did step #3 your movement of the drone tilting will be exactly matched by the UI Drone.
Also it’s key that the IMU is internally calibrated (step 2). If the virtual drone does not seem to be in the
proper orientation then the IMU manetomers may not have been completely settled when you
acquired the position. Repeat the calibration process if needed. In any case the Z axis will be very close
to optimal for the detection algorithm to work properly after calibration in any case
Testing and Verification
After setting up your SATS-MINI be sure to test and verify all operations. Use the ShootyChute UI for some of
these tests.
Multirotor drones
NOTE: The SATS-MINI is not designed for Aerobatic or racing drone applications. It is optimized for delivery,
photography, or industrial drone applications.
1. Test for rotation detection - This may be easiest to do before the SATS-MINI is mounted to the drone.
After arming with the red light flashing flip the device end over end and the SATS-MINI should trigger
showing a blue flashing light. You can use a Servo to verify movement.
2. Test for Free Fall detection - After arming, toss the SATS-MINI into the air about 6 ft up being careful to
minimize rotation allowing the accelerometer sensor to detect free fall. After about ½ second the
SATS-MINI should trigger to a blue light.
3. Make sure the SATS-MINI IMU is calibrated. The ShootyChute UI top pane note the line Calibration
Status says “Calibrated”. All units are calibrated at the factory and should not need recalibration. If it
does not indicate calibration or you see the Error indicator show that there is a IMU error contact Fruity
Chutes for assistance.
© Fruity Chutes Inc - https://fruitychutes.com


