background image

23

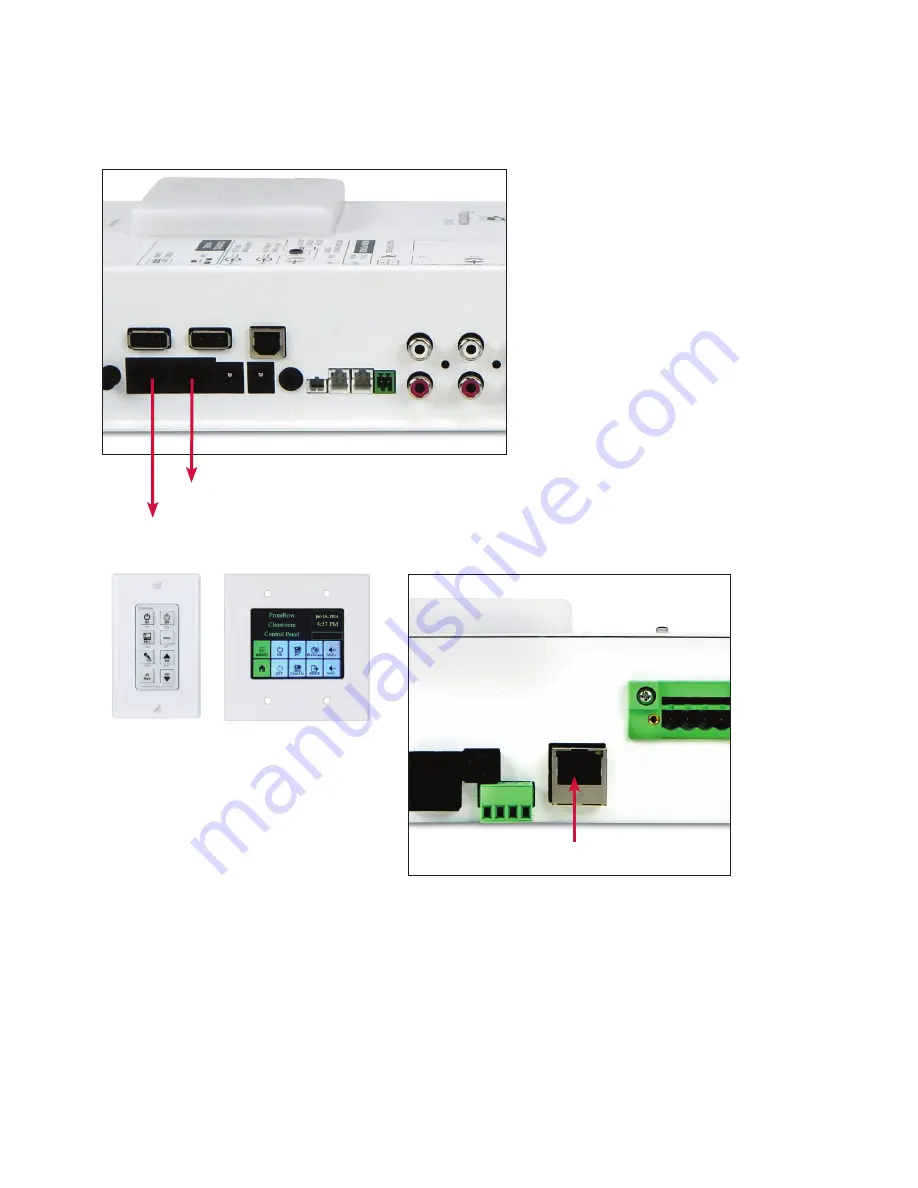
12.   If your classroom will be using a CB6000 or CB2000 wall controller, connect the CONTROL PANEL LAN port to a network switch 

that is also connected to the Smart Receiver’s LAN port OR connect the CONTROL PANEL LAN port directly to the Smart 
Receiver’s LAN port using a crossover network cable. Connect the CB2000 / CB6000 port to the NETWORK port on the  
CB2000 / CB2000.

To network switch or Smart Receiver LAN port

To CB2000 or CB6000 controller

CB2000

CB6000

Smart Receiver LAN port

Summary of Contents for ezRoom ICR-01

Page 1: ...ICR 01 Smart Receiver INSTALLER GUIDE ...

Page 2: ... proceed to Steps 2 through 5 If you follow the steps set out in this Installer Guide and organize everything you need beforehand you ll find setting up your FrontRow ICR 01 Smart Receiver to be quite simple Of course if you run into any obstacles you can always find contact information for our technical support representatives at www gofrontrow com contact us Thank you for choosing FrontRow You r...

Page 3: ... Line 12 Shortcuts 12 Action Creator 13 Event Creator 14 Step 3 Physical Installation Prep Recommended tools and materials 16 General safety precautions 16 Step 4 Plan Your Installation 17 Step 5 Install your Smart Receiver 18 Troubleshooting 24 Appendix A Control commands for the Smart Receiver 25 Appendix B Configuration File Settings 28 Appendix C Network Settings 29 Appendix D Connecting a CB ...

Page 4: ...iver is an amplification and control device that is used in ezRoom classroom AV manage ment systems and in Conductor paging bell and intercom systems This one device amplifies analog audio encodes decodes streaming audio auto switches between local classroom audio and IP audio and allows for direct or pass though control of serial devices such as a projector It resides on an IP network so it can b...

Page 5: ...m AV equipment such as computer or DVD player 13 External ALD Out Output with gain control for connecting to personal FM assistive listening devices 14 Ceiling or wall sensor ports 14 2 1 Intercom Input Connect the CB75 intercom panel microphone for communication with front office when push to talk is required can also be used with CB85 Connect a CB50 volume control with a TB8 cable for basic volu...

Page 6: ...intercom calls between the ezRoom classroom and the office with Conductor 4 Gathering Information You will save a lot of time by working with the school to gather information up front Make a list of all rooms to be outfitted and the equipment to be controlled in each one The IT department will provide you with IPv4 addresses for each ICR 01 Smart Receiver and other FrontRow IP address able compone...

Page 7: ...N port to the ICR 01 LAN port with a CAT 5 or network cable Change the IPv4 address on your laptop to static address 192 168 1 100 See Appendix B for instructions Open a web browser on your laptop and in the URL field type the IPv4 address 192 168 1 103 and press enter This is the default static IP address of the ICR 01 and will likely be changed when you configure it per the school s IP addressin...

Page 8: ...s and firmware version Password If the project requires it you can password protect the ICR 01 Smart Receiver configuration screens by setting a password If setting a password for the first time the old password is calypso Choose a new one based on the school s guidelines and record the information The username is always admin Audio Subsystem Information Displays information about the audio subsys...

Page 9: ...ophone will not be heard until and unless the user in the room is pushing the button Analog Page Override For use with 25V 70V and 100V analog paging systems The ICR 01 Smart Receiver will mute all audio in the room when an announcement is made over the facility s paging system Analog page override requires a connection to the facility s PA system For information about connecting the page override...

Page 10: ... Edition or Encore software via voice commands or via control devices such as the CB6000 or even the knob on a CB75 Microphone Volume Each microphone in the room can have a different volume setting For example student microphones can be set at a lower volume than the teacher s microphone Adjusting the master volume will keep the same relative difference between the microphones Aux Input Volume Adj...

Page 11: ...ny defined event or to control the system with voice commands If using to trigger an event choose Mic button press as the Trigger when defining an event For voice control choose the triggers in quotes e g Power Up Freeze screen etc when defining the events for more information on defining events see section 8 Event Creator Beacon Brightness The Beacon indicator light can be adjusted for how bright...

Page 12: ...powered on and an audio signal is present after 30 minutes of no activity the Beacon will turn off Backup PoE Power The primary power source for the device is no longer available and the unit has switched to Power over Ethernet usually due to a power outage Voice Command When holding down the mic button lets teachers know that the system is ready to receive the voice command Only available if the ...

Page 13: ... a control action in a trigger script The commands to use in the control actions are shown below For all FrontRow devices to receive the command at once set the control action to be sent to the broadcast IP address of the subnet Conductor is on e g 192 168 1 255 Testing Press the Test button to see a 5 second example of your alert settings note that the tone will not be played This test uses the v...

Page 14: ...h router switches determine connectivity across subnets Provided by the IT department Primary NameServer IP Address Optionally provided by the IT department Rarely used with this device only enter an IP address here if specifically requested by the IT department Secondary NameServer IP Optionally provided by the IT department Only enter an IP address here if specifically requested by the IT depart...

Page 15: ...yment of multiple FrontRow devices of the same type easier Use Shortcuts in defining actions that represent the IP addresses of the devices you ll control This means that your configuration file can be written as a template with IP addresses explicitly defined in only one place the Shortcut needing to be changed only once rather than repeatedly throughout your Actions This saves a tremendous amoun...

Page 16: ... a variety of ways including voice commands To create an Action 1 Click New 2 Name the Action 3 Enter the action string or Command Actions can be created using two methods 1 Using a wizard Select an Action Type using the drop down list Enter the syntax necessary to build the specific action 2 Using a Template Select an Template using the drop down list Edit the syntax necessary to build the specif...

Page 17: ... the same input trigger When that defined trigger is detected by the device all the matching Events will be executed in no particular order For each such Event the Actions for the Event will execute according to that Event s mode setting see below however Actions for different Events may be intermingled with each other If you care about the order in which Actions happen put them all in a single Ev...

Page 18: ... added and will be invoked according to the mode chosen in step 4 To add actions select them and click Add Selected Actions can be reordered by clicking and dragging the lines to the left of the action name in the Current Action List ...

Page 19: ...rill or hammer drill for concrete walls Drill bits masonry bits for concrete walls Slotted screwdriver Level or ruler tape measure Crimp pliers or scissors Ladder Staple gun Safety goggles General safety precautions Do not install or use the Smart Receiver near water or a heat source Clean only with a dry cloth Protect all cables from wear and damage from doors or other hazards Use only accessorie...

Page 20: ...ply and the classroom s network drop Typical maximum cable lengths are 330 for CAT 5 network cable runs 50 for RS232 and 50 for IR Typical maximum lengths for speaker cables are 50 though please refer to the applicable FrontRow product documentation for specific requirements For AV plates please refer to the specific AV plate documentation Step 4 Plan your installation Student desks Teacher s desk...

Page 21: ...llation 1 Plug the power supply jack into the main power 18VDC 3 5A power socket Step 5 Install your Smart Receiver 2 Connect audio cables to the auxiliary inputs If using the CMBT Bluetooth receiver connect the Bluetooth audio out here 3 Connect the network cable for the school LAN to the LAN port on the bottom of the Smart Receiver the other LAN port is a pass through connector for a FrontRow Wa...

Page 22: ...shown below Rs Ls Rs Ls 6 If the classroom will have an intercom through Conductor connect the network cable from the FrontRow CB75 or CB85 to the INTERCOM port on the ICR 01 or to the INTERCOM MIC port on the CMBT Bluetooth audio receiver CB75 CB85 19 5 If the classroom will play audio via Bluetooth connect the network cable from the CMBT Bluetooth audio receiver INTERCOM port to the ICR 01 INTER...

Page 23: ... securely in place IR emitter and adhesive tab are not provided with your Smart Receiver 3 5mm connector emitter end showing the emitter surface 20 7 If your classroom will be equipped with a wall knob controller for functions such as volume and mute either connect the CBVOL kit to the INTERCOM port or connect the CB55 blue and yellow network cables to the corresponding blue and yellow master audi...

Page 24: ...a 9 pin connector the standard is to use pins 2 and 3 for TX and RX but there is no standard as to which is which Most manufacturers use pin 2 for TX and pin 3 for RX but over 10 use the reverse TX1 RX1 GND 21 10 If you are using the CMBT Bluetooth receiver and want to control pairing via the CB6000 touch panel connect wires from either of the ICR 01 NO relay terminals to the CMBT See CMBT Install...

Page 25: ...for students and staff in the event of an emergency To integrate your Smart Receiver to the analog paging system for paging override use a FrontRow split core transformer and Phoenix connector not provided with your Smart Receiver to the PAGE OVERRIDE port Follow the con nection diagram below then adjust the settings on the interior PA audio page in the Smart Receiver s configuration menu see page...

Page 26: ... connected to the Smart Receiver s LAN port OR connect the CONTROL PANEL LAN port directly to the Smart Receiver s LAN port using a crossover network cable Connect the CB2000 CB6000 port to the NETWORK port on the CB2000 CB2000 To network switch or Smart Receiver LAN port To CB2000 or CB6000 controller CB2000 CB6000 Smart Receiver LAN port ...

Page 27: ...rom the Smart Receiver s System Settings web page I ve connected the serial cable from the Smart Receiver to the projector and I ve verified that baud rate and other settings are correct but I still can t control the projector Try switching the TX and RX wires In a 9 pin connector the standard is to use pins 2 and 3 for TX and RX but there is no standard as to which is which Most manufacturers use...

Page 28: ...integer from 1 to 100 or The or may be followed by a single digit 1 9 indicating the change in volume steps to be made If no digit is entered the volume will increment by one Sets the audio volume to the percentage of maximum volume corresponding to the integer used an increase in volume by n steps n or a decrease in volume by n steps n Examples Unmute and increase volume AUD1 M0 V Unmute and decr...

Page 29: ...ns the command Example increments the audio input channel of a Juno Connect by one over TCP IP protocol using an ASCII string NET F1 shortcutname AIN1 I1 L Intercom HTP Commands Syntax HTP http Server calypso conductor call Device Name Required Optional Data Type Format Description Server Required Variant If using Shortcuts recommended shortcutname For explicit device references IP address of the ...

Page 30: ...27 ...

Page 31: ...Channel No Speaker EQ Calibration No Equalizer No Microphone Button Mode Yes Beacon Brightness Smart Receiver only Yes Beacon LCD System On Yes Backup PoE Power Yes Voice Command Yes Recording Yes Recording Paused Yes Intercom Yes Paging Yes Alert Delivered Yes Alert Acknowledged Yes Campus Attention Yes Priority Alert mode 1 Yes Priority Alert mode 2 Yes Priority Alert mode 3 Yes Priority Alert m...

Page 32: ...re taken from a computer running Windows 7 and while other versions and other operating systems will look different the general procedure is identi cal The goal is to get to the screen where you can change your network adapter from Obtain an IP address automatically referred to as DHCP to Use the following IP address referred to as static 1 Click on the Windows Start button located on the lower le...

Page 33: ...3 Click on View network status and tasks Note that your computer may be set up differently and you may see an alternate view such as that shown below in which case select Network and Sharing Center 30 ...

Page 34: ...4 Click on Change adapter settings Note that your computer may display different wording such as Manage Network Connections 5 Double click on Local Area Connection 31 ...

Page 35: ...owing IP address In the IP address field enter 192 168 1 100 This is the static IP address to use when connecting to FrontRow networked devices Click into the Subnet mask field it may automatically fill in 255 255 255 0 but if not type it in Click the OK button and close each of the popups 32 ...

Page 36: ...o return your computer to its original condition where it uses DHCP follow the same steps described above but select Obtain an IP address automatically press the OK button and close each popup as before 33 ...

Page 37: ...ep 1 Connect the CB VOL to the RJ45 intercom jack on the Smart Receiver using a UTP cable 2 Give your Action a name 3 Click the Action Entry Method dropdown and choose Master Volume Setting Wizard 4 Choose Mute Toggle 5 Click Finish Wizard 6 Click Save Action 7 Repeat the above steps for creating Increase Volume and Decrease Volume Actions Step 2 Define the volume and mute Actions 1 On the Action ...

Page 38: ... new Event 2 Give your Event a name 3 Choose a Trigger 4 Click Save Event 5 Repeat the steps above for each of the three actions created in Step 2 Triggers For Mute Toggle choose Wall knob press For Increase Volume choose Wall knob turn right For Decrease Volume choose Wall knob turn left 35 ...

Page 39: ...tor Step 1 Connect the UTP cable with blue connector between the blue jacks on the CB55 and the CMBT Bluetooth receiver Connect the UTP cable with yellow connectors between the yellow jacks on the CM55 and CMBT 36 Step 2 Connect the CMBT Bluetooth audio receiver to the Intercom jack on the ICR 01 Smart Receiver using a UTP cable This connection provides power to the CMBT Alternatively you can powe...

Page 40: ...e and mute Actions 1 On the ICR 01 Action Creator Page see page 13 click New to define a new action Step 4 Define the volume and mute Events 1 On the Event Creator Page click New to define a new Event 2 Give your Event a name 3 Choose a Trigger 4 Click Save Event 5 Repeat the steps above for each of the three actions created in Step 2 Triggers For Mute Toggle choose Wall knob press For Increase Vo...

Page 41: ... Corporate Circle Petaluma CA 94954 6712 toll free 800 227 0735 tel 707 769 1110 fax 707 769 9624 web www gofrontrow com Canada FrontRow 6950 Creditview Road Unit 1 Mississauga ON L5N 0A6 toll free 800 340 9894 tel 905 461 5300 fax 905 677 7760 web www gofrontrow com Australia Phonic Ear 629 Nudgee Road Nundah QLD 4012 Australia freecall 1 800 PHONIC fax 1300 737 983 web www gofrontrow com au Scan...

Reviews: