background image

8

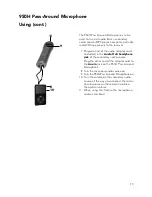
The 940TM Pendant Microphone can be 
used to transmit audio from a secondary 
audio source (MP3 player, computer, portable 
radio/CD/tape player) to the receiver.

  7.   Plug one end of the audio adaptor cord 

(included) in the 

Audio Out/headphone 

jack

 of the secondary audio source. Plug 

the other end of the adaptor cord to 
the 

Aux-In

 jack on the 940TM Pendant 

Microphone

  8.   Turn the secondary audio source on
  9.   Turn the 940TM Pendant Microphone on
10.   Turn the volume on the secondary audio 

source all the way up and adjust the micro-
phone volume on the receiver to obtain 
the optimal volume

11.   You can "talk over" the secondary audio 

by speaking into the microphone or mute 
the microphone to ensure the best audio 
sound quality

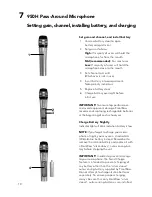
1.   Place microphone around neck and con-

nect clasp

2.   Adjust neck straps to position microphone 

approximately 5in (13cm) from mouth

3.   Set channel to A or B (whichever is not 

already in use)

4.   Turn microphone on. Indicator light 

should be green

5.   Press mute switch as needed for private  

conversations. Indicator light will blink green

6.   

Optional:

 if desired, plug in external 

boom microphone

5in/13cm

2

6

1

940TM (bottom)

5

4

5


940TM Pendant Microphone 


 Using 

6

3

Light Legend

Green  . . . . . . . . . . On
Blinking Green  . . . . Muted
Blinking Red . . . . . . Low Battery

When Charging with 950C charger

No light . . . . . . . . . . . Charging

When Charging with 2-unit wall charger only

No light  . . . . . . . . . . .Alkaline Battery is


 detected, or microphone 
power is still on

Red . . . . . . . . . . . . Charging

7

9

8

10

11

Summary of Contents for 5301R

Page 1: ...user guide 5301R Receiver 940TM Pendant Microphone 950H Pass Around Microphone 950C Microphone Charger lasso...

Page 2: ...detected the microphone will not let you charge the battery This prevents accidental damage You may use standard alkaline batteries in your microphones if you forget to charge them but do not attempt...

Page 3: ...d prong are provided for your safety If the provided plug does not fit into your outlet consult an electrician for replacement of the obsolete outlet 11 Protect the power cord from being walked on or...

Page 4: ...sive heat such as sunshine fire or the like 2 Proper Use of the Power Supply and Wiring An extension cord should not be used unless absolutely necessary Use of improper extension cord could result in...

Page 5: ...ging Blinking red Charge error Green Charging complete 3 Charge pocket for 940TM Pendant microphone will not charge 930TM pendant microphone 4 2 way indicator light for 940TM Pendant microphone No lig...

Page 6: ...ug onto the power supply 3 Plug power supply into power outlet and into the back of the charging base 4 Chargingmultiple microphones You can charge up to 3 microphones in any configuration by connecti...

Page 7: ...r cord to send audio from a secondary audio source such as an MP3 player portable radio CD tape player to the receiver 8 External microphone jack optional Connect a boom microphone 9 Charge jack When...

Page 8: ...you forget to charge your microphone at night you may use a standard AA LR6 alka line battery instead Remember to remove the alkaline battery and replace it with a FrontRow silver sleeve auto sensing...

Page 9: ...off 2 Place microphone face up into the charge pocket Ensure it is fully seated 3 The charger indicator light should be solid red when charging If it is blinking red you are attempting to charge an al...

Page 10: ...ry audio by speaking into the microphone or mute the microphone to ensure the best audio sound quality 1 Place microphone around neck and con nect clasp 2 Adjust neck straps to position microphone app...

Page 11: ...ging via 950C charger 3 On off switch 4 Battery compartment On back 5 Gain switch Inside battery compartment 6 Channel switch Inside battery compartment 7 Name plate 8 Charge input jack Use with 2 uni...

Page 12: ...g of each school year Charge Battery Nightly Indicator light will blink red when battery is low Note If you forget to charge your micro phone at night you may use a standard AA LR6 alkaline battery in...

Page 13: ...and receiver and 950H is OFF 950H Pass Around Microphone Charging with the 2 unit charge cord 3 1 Turn microphone off 2 Place microphone into the charge pocket Ensure it is fully seated 3 The charger...

Page 14: ...th when using as a hand held microphone 4 To allow hands free use for example when reading aloud and turning pages attach the lavaliere clip Adjust neck strap to position microphone approximately 4 5i...

Page 15: ...secondary audio source Plug the other end of the adaptor cord to the Aux In jack on the 950H Pass Around Microphone 8 Turn the secondary audio source on 9 Turn the 950H Pass Around Microphone on 10 T...

Page 16: ...hers or a teacher and an aide may each use a microphone Or one teacher can use a microphone and stu dents can use a pass around microphone Microphones must be on different channels or interference wil...

Page 17: ...lume control MP3 8 Audio Input jack 3 5mm MP3 9 Infrared ceiling or wall sensor inputs 10 EQ adjustment 11 Audio In jack stereo RCA CD DVD 12 Audio In jack stereo RCA TV VCR 13 Audio In jack stereo RC...

Page 18: ...d Red Microphone Off Muted 4 Speak in a normal conversational tone while walking the entire room Adjust the volume to a comfortable level 5 For daily use you do not need to turn the receiver on and of...

Page 19: ...system or standard audio cords from your local electronics store Example 1 Many classrooms use a computer as a multi media hub that is connected to the internet or school network to download stream an...

Page 20: ...media hub but it is connected to a TV instead of an LCD projector They also occasionally use the TV DVD VCR as a stand alone media For these classrooms you may need to use two auxiliary audio input co...

Page 21: ...it may be most convenient to connect these as needed through the MP3 jack on the front of the 5301R 5301R front 5301R back Computer LCD Projector Wireless Transmission Audio Out Example 4 Teachers can...

Page 22: ...port on back of Lasso receiver Depending on the device you are connecting match the type of the other end of the cord to the aux in on the transmitter typically 3 5mm 2 Adjust volume level setting fo...

Page 23: ...on the receiver Make sure that speakers are mounted as close as possible to the ceiling and to the listening area avoid mounting speakers in the teacher s primary lecture area Position the microphone...

Page 24: ...Any changes or modifications made to any government approved element of this instrument without the express approval of Phonic Ear Inc in writing could void the user s authority to operate those elem...

Page 25: ...toll free 1 800 PHONIC tel 617 3250 0385 fax 617 3250 0386 web www gofrontrow com Canada Phonic Ear 6950 Creditview Road Unit 1 Mississauga ON L5N 0A6 toll free 800 340 9894 tel 905 461 5300 fax 905...

Reviews: