


Color Screen Weather Station User Manual
and (+) (-) for the bottom battery.
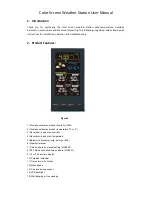
3.3 Display Console Set Up
Place the remote thermo-hygrometer about 5 to 10 meters away from the display console (if the
sensor is too close, it may not be received by the display console).
The console can be powered up by AC adapter or batteries. Choose one way of below two to
power up the console.
1.
Insert the power adapter into the power jack of the console, and plug in the adapter. The LCD
display will beep once and then light up. The brightness of console is HIGH level when plug in
the adapter. Press the
LIGHT/SNOOZE
key can adjust among HIGH/MIDDLE/OFF level
according to your preference.
2.
Remove the battery door on the back of the display. Insert three AAA (alkaline or lithium,
avoid rechargeable) batteries in the back of the display console. Looking at the back of the
unit (left to right), the polarity is (+) (-) for the top battery, (-) (+) for the middle battery and
(+) (-) for the bottom battery.
Note:
To avoid permanent damage, please take note of the battery polarity before inserting
the batteries.
The display will beep once and all of the LCD segments will light up for a few seconds to
verify all segments are operating properly.
Replace the battery door, and fold out the desk stand and place the console in the upright
position.
Note:
The backlight will be on for only 10 seconds if you use alkaline batteries as power supply.
Only when you use power adapter it will be continuous light on.
The console will instantly display indoor temperature, humidity, barometer, moon phase, date
and time.
The remote search icon will turn on
:
3.3.1
Radio controlled clock
The RCC is received by the wireless transmitter, and passed to the console. After the remote
sensor is powered up, the sensor will transmit weather data for 5 seconds, and then the sensor
will begin radio controlled clock (RCC) reception.
During the RCC time reception period (maximum 10 minutes), no weather data will be


