ENGLISH
– 7
NOTE: Refer to Owner’s Guide for operating and
cleaning instructions.
WHEN ALL HOOKUPS ARE COMPLETED
MAKE SURE ALL CONTROLS ARE LEFT IN THE
OFF POSITION.
MODEL AND SERIAL NUMBER LOCATION
The serial plate for your cooktop is located on the
underside of the burner box. In addition to the model
and serial numbers, it tells you the ratings of the burners
and type of fuel and pressure the cooktop was adjusted
for when it left the factory.
When ordering parts for or making inquiries about your
cooktop, always be sure to include the model and serial
numbers from the serial plate on your cooktop.
CARE, CLEANING AND MAINTENANCE
BEFORE YOU CALL FOR SERVICE
Check to make sure the house fuse or circuit breaker for
your cooktop are not blown or open.
MAKE SURE THE FLOW OF COMBUSTION
AND VENTILATION AIR TO THE COOKTOP IS
UNOBSTRUCTED.
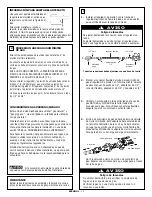
CHECK “LO” OR “SIMMER” SETTING
Push in and turn each control knob to the “LO”
(or “SIMMER”) setting. The “LO” setting of each burner
has been factory set to the lowest setting available to
provide reliable reignition of the burner. If it does not
stay lit on the “LO” setting, check “LO” setting as
follows:
a. Allow cooktop to cool down to room temperature.
b. Light up all burners by turning each control knob to
LITE until burners ignite and set them at HI.
c. Quickly turn down the burner involved from the HI to
the LOWEST POSITION.
d. If a burner goes out, readjust valve as follows:
Remove the burner control knob, insert a thin-bladed
screwdriver into the hollow valve stem and engage
the slotted screw inside. Flame size can be increased
or decreased with the turn of the screw. Adjust flame
until you can quickly turn the knob down from HI to
the LOWEST POSITION without extinguishing the
flame. Flame should be as small as possible and stable
without going out.
e. If you need to adjust another burner, repeat the steps
from a. to d. above until all burners operate properly.
7
HOLLOW
VALVE STEM

