background image

28

CARE & CLEANING

Control panel

Decorative trim

 (some models)

Surface type

Recommendation

Oven interior 

(see Self-Cleaning section)

Keep Warm Drawer porcelain surfaces

Porcelain enamel broil pan &
broil pan insert 

(if equipped)

Door liner & porcelain enamel parts

Control knobs

Painted body parts

Painted decorative trim

Aluminum (trim pieces) & vinyl

Easy Care™ Stainless Steel

(some models)

Oven racks

Oven door exterior surfaces

Oven racks must be removed from oven before starting a

self-clean cycle.

 Clean using a mild, abrasive cleaner following the

manufacturer's instructions. Rinse with clean water and let dry.

Use soap & water to thoroughly clean the top, sides and front of the

oven door. Rinse well. You may use a glass cleaner on the outside

glass of the oven door. 

Do not

 immerse the door in water. 

Do not

spray or allow water or the glass cleaner to enter the door

vents.

 Do not use oven cleaners, cleaning powders or any harsh

abrasive cleaning materials on the outside of the oven door. 

Do not

clean the oven door gasket. On self-cleaning models the oven door

gasket is made of glass woven material which is essential for a good

seal. Care should be taken not to rub, damage or remove this gasket.

See Cleaning the cooktop and surface burners instructions provided in

the following 

Care & Cleaning

 section.

Cooktop surface and contoured well

areas, surface burner heads, caps and

burner grates

Cleaning recommendation table

For general cleaning, use hot, soapy water and a cloth. For more

difficult soils and built-up grease, apply a liquid detergent directly

onto the soil. Leave on soil for 30 to 60 minutes. Rinse with a damp

cloth and dry. 

Do not 

use abrasive cleaners on any of these

materials; they can scratch. To remove control knobs, turn to the OFF

position; grasp firmly and pull straight off the shaft. To replace knobs

after cleaning, line up the flat sides of both the knob and the shaft;

then push the knob into place.

Before cleaning the control panel, turn all controls OFF and if needed

remove any knobs from the panel. Clean using hot, soapy water and

a dishcloth.  Be sure to 

squeeze excess water from the dishcloth

before wiping the control panel

; especially when wiping around

the controls area. Excess water in or around the controls may cause

damage to the appliance. When rinsing, use clean water and a

dishcloth and be sure to squeeze excess water from dishcloth before

wiping the control panel.

If your range finish is 

Easy Care™ Stainless Steel

 (some models),

clean the coated surface with warm soapy water using a clean sponge

or cloth. Rinse with clean water and dry with a soft clean cloth. 

DO

NOT

 use 

ANY

 store bought cleaners like Stainless Steel cleaners or

any other types of cleaners containing any abrasives, chlorides,

chlorine or ammonia. It is recommended to use mild dish soap and

water or a 50/50 solution of water and vinegar.

Gentle scouring with a soapy non-abrasive scouring pad will remove

most spots. Rinse with a 1:1 solution of clear water and ammonia. 

If

necessary, cover difficult spots with an ammonia-soaked paper towel

for 30 to 40 minutes. Rinse with clean water and a damp cloth, and

then scrub with a soap-filled non-abrasive scouring pad. Rinse and

wipe dry with a clean cloth. Remove all cleaners or the porcelain may

become damaged during future heating.

Summary of Contents for DGGF3054KF

Page 1: ...901217 Oct 2010 Important Safety Instructions 3 6 Features at a Glance 7 Before Setting Oven Controls 8 9 Before Setting Surface Controls 10 Setting Surface Controls 11 Oven Control Functions 540C 12 Setting Oven Controls 13 23 Keep Warm Drawer 24 25 Self Cleaning 26 27 Care Cleaning EC WD 28 32 Before You Call 33 35 Major Appliance Warranty back over ...

Page 2: ... a minute feature 14 Setting quick preheat 15 Setting bake 15 Setting bake time 15 Setting delayed timed bake 16 Setting convect bake 17 Setting convect roast 17 Setting convect convert 18 Setting broil 19 Setting pizza feature 20 Setting chicken nuggets feature 20 Setting keep warm 20 Adjusting oven temperature 21 Operating oven light 21 Setting the Sabbath mode feature 22 23 Keep Warm Drawer 24 ...

Page 3: ...installation instructions for proper anti tip bracket installation Remove all tape and packaging before using the range Destroy the carton and plastic bags after unpacking the range Never allow children to play with packaging material Proper Installation Be sure your appliance is properly installed and grounded by a qualified technician in accordance with the National Fuel Gas Code ANSI Z223 lates...

Page 4: ...osol cans on or near the range CAUTION Do not store items of interest to children in the cabinets above a range or on the backguard of the range Children climbing on the range to reach items could be seriously injured DO NOT TOUCH SURFACE BURNERS AREAS NEAR THESE BURNERS OVEN BURNERS OR INTERIOR SURFACES OF THE OVEN Both surface and oven burners may be hot even though flames are not visible Areas ...

Page 5: ...ir flow on to a range shall not be used in conjunction with gas ranges other than when the hood and range have been designed tested and listed by an independent test laboratory for use in combination with each other WARNING Use Proper Flame Size Adjust flame size so it does not extend beyond the edge of the utensil The use of undersized utensils will expose a portion of the burner flame to direct ...

Page 6: ...ppliance to satisfactorily meet the application needs must be made by a qualified technician Conversion to Liquefied Petroleum Gas WARNING See the Installation Instructions packaged with this range for complete installation and grounding instructions IMPORTANTINSTRUCTIONSFORCLEANING YOUR RANGE Clean the range regularly to keep all parts free of grease that could catch fire Pay particular attention...

Page 7: ...5 26 23 28 26 27 Broil pan some models 28 Broil pan insert some models 29 Roasting rack some models 30 Cast iron center griddle grate some models 31 Leveling legs and anti tip bracket included Be sure to visit us online at www frigidaire com for a complete line of accessories Note The features shown for your appliance may vary according to the model type color 3 4 20 13 Automatic oven door light s...

Page 8: ...ions To maximize oven cooking space place the bottom oven rack some models in the lowest rack position for baking or roasting large cuts of meat Removing replacing arranging racks half oven rack Fig 3 Fig 2 Air circulation in the oven For best baking results allow 2 4 5 10 cm around the cookware for proper air circulation and be sure pans and cookware do not touch each other the oven door sides or...

Page 9: ... rack connector bracket Fig 2 and as in Fig 3 The oven rack may need to be adjusted in or out in the rack position to match the length of the connector arm 5 While holding the connector arm in place twist the connector arm so the ends of the connector arm point upwards See Figs 4 5 The connector arm should now be locked into position 6 Repeat steps 4 and 5 for the other connector arm 7 Once both c...

Page 10: ...knob accordingly If the fat is too cool the food will absorb the fat and be greasy If the fat is too hot the food will brown so quickly that the center will be undercooked Do not attempt to deep fat fry too much food at once as the food will neither brown or cook properly Flame Size Type of Cooking High Flame Start most foods bring water to a boil pan broiling Medium Flame Maintain a slow boil thi...

Page 11: ...p uncovered After each use clean griddle grate with a stiff brush and hot water only Dry immediately and apply a light coating of vegetable oil to griddle before storing Do not clean griddle grate in the dishwasher When cool remove the center burner grate and carefully replace with the center griddle grate if equipped Preheat the griddle for 5 minutes using a medium to medium low center burner set...

Page 12: ...t convert Use to convert a standard bake recipe to a convection bake recipe self clean Use to set a 2 3 or 4 hour self clean cycle oven lockout Use to activate oven lockout setting set clock pad Use to set the time of day Minimum maximum control settings All of the features listed have minimum and maximum time or temperature settings that may be entered into the control An ENTRY acceptance beep wi...

Page 13: ...n is left on for more than 6 hours The control may be programmed to override this feature to continuously bake To turn off 6 Hour Energy saving mode Step Press 1 Press and hold timer on off for 6 seconds 2 Press self clean to toggle between 6 Hr OFF Fig 2 or StAY On Fig 3 Select StAY On to turn off 6 Hour Energy Saving mode 3 Press start to accept Fig 2 Fig 3 Setting 12 or 24 hour display modes Th...

Page 14: ...ROLS Add a minute feature Use the add 1 minute feature to set additional minutes to the timer Each press of the key pad will add 1 additional minute If add a minute key pad is pressed when the timer is not active the timer will begin counting down from 1 minute To add 2 additional minutes to the active timer Step Press Press add a minute twice Fig 1 Fig 2 Setting a silent control Silent mode allow...

Page 15: ...eature to cook most food items that require normal cooking temperatures A reminder tone will sound once the oven reaches the set temperature Bake can be set at any temperature from 170 F to 550 F To set bake using a default temperature of 350 F Step Press 1 Press quick preheat 2 Press start See Fig 1 When the set bake time runs out 1 END will appear in the display window and the oven will shut off...

Page 16: ...orrectly If the delay start needs to be set more than 12 hours in advance 12 24 hours the control must first be programmed for 24 hour display mode See Setting 12 or 24 hour display modes section NOTES FOOD POISONING HAZARD Do not let food sit for more than one hour before or after cooking Doing so can result in food poisoning or sickness WARNING Fig 1 Fig 2 1 Press bake time 2 Enter 50 mintues 3 ...

Page 17: ... OVEN CONTROLS 1 Press convect 2 Press start See Fig 2 To set convect convection bake with a default oven set temperature of 350 F Step Press Suggestion for convect roasting 1 Preheating is not necessary when roasting foods using convect roast 2 Since convect roast cooks food faster reduce the cook time by 25 from the recommended cook time of your recipe check the food at this time If necessary in...

Page 18: ... convect convert is used with a cook time or a delay start setting the convect convert feature will display a CF for check food when the bake time is 75 complete See Fig 1 At this time the oven control will sound 1 long beep at regular intervals until the set cook time has finished The convection fan will take 6 minutes to begin rotating once the convect convert feature has been activated When usi...

Page 19: ... 5th 450 F 10 8 Well Fish 5th 550 F as directed Well Shrimp 4th 550 F as directed Well Hamburger 1 thick 6th 550 F 12 10 Medium Hamburger 1 thick 5th 550 F 14 12 Well Insert Broil pan Fig 1 Fig 4 Fig 2 NOTES Use the off set rack if you choose to use rack position 6 4 5 6 The broiler pan and the insert some models allows grease to drain and be kept away from the high heat of the broiler DO NOT use ...

Page 20: ...e only 1 oven rack for best results when using the pizza feature The pizza setting is not timed Be sure to monitor the time needed to finish cooking the pizza Follow package directions for cook time Check pizza at the minimum recommended time The preset oven temperature for the frozen pizza setting is 425 F and the fresh pizza is 400 F NOTES Fig 1 Fig 2 To set the oven to keep warm Setting chicken...

Page 21: ...mes you can adjust the control so the oven cooks hotter or cooler than the temperature displayed The oven temperature my be increased 35 F 19 C or decreased 35 F 19 C from the factory settings Example increase the oven temperature by 30 F Adjusting oven temperature Oven temperature adjustments made will not affect the broil or self cleaning feature temperatures If the temperature shows an adjustme...

Page 22: ...p If not skip this step and continue to step 6 Refer to the bake time or delay start instructions Remember the oven will shut off after completing a timed bake or delay start and therefore may only be used once during the Sabbath Jewish Holidays The maximum delay start time is 11 hours 59 minutes 6 Press and hold both the bake time and delay start keypads at the together for at least 3 seconds The...

Page 23: ... same time press and hold both the keypads together for at least 3 seconds SF will disappear from the display and the oven may be used with all normal functions Fig 1 SETTING OVEN CONTROLS If a delay start time longer than 12 hours maximum of 24 hours in advance is desired set the display mode for the 24 hour setting For detailed instructions see the section Setting 12 or 24 hour display modes It ...

Page 24: ... is in use They should never be allowed to sit or stand on any part of the appliance including the warmer drawer FOOD POISONING HAZARD Do not let food sit for more than one hour before or after cooking Doing so can result in food poisoning or sickness Storage in or on appliance flammable materials should not be stored in an oven warmer drawer near surface units This includes paper plastic and clot...

Page 25: ...F lo and hi Please note that the approximate medium setting is shown on illustration See Fig 2 Keep Warm Drawer indicator light The indicator light is located above the Warmer Drawer thermostat control knob See Fig 2 The indicator turns on when the control is set and stays on until the heat setting is turned OFF 1 Open Keep Warm Drawer when cool and arrange Keep Warm Drawer rack as needed 2 For be...

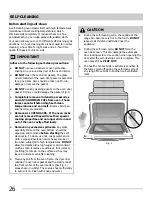
Page 26: ...o longer slide in and out of the oven cavity effortlessly Remove any excessive spillovers Any spills especially those on the oven bottom should be wiped up and removed before starting the self clean cycle To clean use hot soapy water and a cloth Large spillovers can cause heavy smoke or fire when subjected to high temperatures DO NOT allow food spills with a high sugar or acid content such as milk...

Page 27: ...until the range has cooled sufficiently You will need to allow about 1 additional hour to the time displayed before you can open the oven door When the oven is cool wipe away any residue or powdered ash with a damp cloth or paper towel SELF CLEANING Step Press 1 Be sure the control is set with the correct time of day ALL the oven racks are removed and the oven door is closed Go to step 5 if you wi...

Page 28: ...directly onto the soil Leave on soil for 30 to 60 minutes Rinse with a damp cloth and dry Do not use abrasive cleaners on any of these materials they can scratch To remove control knobs turn to the OFF position grasp firmly and pull straight off the shaft To replace knobs after cleaning line up the flat sides of both the knob and the shaft then push the knob into place Before cleaning the control ...

Page 29: ...on of harmful by products do not use the cooktop without all burner caps properly installed to insure proper ignition and gas flame size WARNING Burner cap lip Burner cap Burner head Fig 3 Fig 1 Fig 2 Fig 4 Cleaning the cooktop and surface burners Cleaning recessed and contoured areas of cooktop It is important to routinely clean the cooktop Keeping the cooktop surface clean after each use will he...

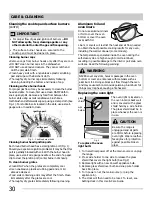
Page 30: ...ort slots orifice port Fig 1 Cooktop burner head WARNING Each round burner head has a small ignition port Fig 1 Should you experience ignition problems it may be that this port is partially blocked with soil With the burner head in place use a small wire gauge needle or the end of a paper clip to clear the ignition port center burner not shown NEVER cover any slots holes or passages in the oven bo...

Page 31: ...door care instructions Most oven doors contain glass that can break Please read the following recommendations 1 DO NOT close the oven door until all the oven racks are fully positioned inside the oven interior 2 Do not hit door glass with pots pans or any other object 3 Scratching hitting jarring or stressing the door glass may weaken its structure causing an increased risk of breakage at a later ...

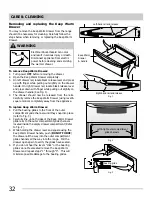
Page 32: ...e up both sides of the Keep Warm Drawer glide rails to the outer compartment glide channels located inside the empty drawer compartment Refer to Fig 2 3 While holding the drawer level and square using the Keep Warm Drawer handle push DO NOT FORCE the drawer all the way into the outer compartment glide channels all the way into the range Pull the drawer open again to verify the glides have seated 4...

Page 33: ...n Setting Oven Controls section Appliance is not level Poor installation To correct place oven rack in center of oven Place a level on the oven rack Adjust by turning leveling legs at base of appliance until the oven rack is level Be sure floor is level strong stable enough to adequately support the appliance If floor is sagging or sloping contact a carpenter to correct the situation Kitchen cabin...

Page 34: ... excessive smoke are present see Broiling in the Setting Oven Controls section for additional recommendations Problem Solution BEFORE YOU CALL Solutions to common problems Self cleaning cycle does not work Oven control not set properly Follow the instructions provided in the Self cleaning section of this manual Self clean cycle was interrupted Refer to the Self Cleaning section for more detailed i...

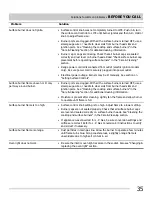
Page 35: ...Burners may be lit manually See section on Setting Surface Controls Surface burner flame uneven or lit only part way around burner Burner ports are clogged With all the surface burners turned OFF use a small gauge wire or needle to clear soils from burner head slots and ignition ports See Cleaning the cooktop and surface burners in the Care Cleaning section for additional cleaning information Mois...

Page 36: ...uthorized service companies use of parts other than genuine Electrolux parts or parts obtained from persons other than authorized service companies or external causes such as abuse misuse inadequate power supply accidents fires or acts of God CUSTOMER S SOLE AND EXCLUSIVE REMEDY UNDER THIS LIMITED WARRANTY SHALL BE PRODUCT REPAIR OR REPLACEMENT AS PROVIDED HEREIN CLAIMS BASED ON IMPLIED WARRANTIES...

Reviews: