background image


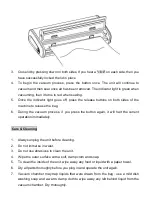
3.  Close lid by pressing down on both sides. If you hear a "click" on each side, then you 

have successfully locked the lid in place. 

4.  To  begin  the  vacuum  process,  press  the  button


once.  The  unit  will  continue  to 

vacuum and then seal once air has been removed. The indicator light is green when 

vacuuming, then it turns to red when sealing. 

5.  Once  the  indicator  light  goes  off,  press  the  release  buttons  on  both  sides  of  the 

machine to release the bag. 

6.  During  the  vacuum  process,  if  you  press  the  button  again,  it  will  halt  the  current 

operation immediately. 


Care & Cleaning 


1.  Always unplug the unit before cleaning. 

2.  Do not immerse in water. 

3.  Do not use abrasives to clean the unit. 

4.  Wipe the outer surface with a soft, damp cloth and soap. 

5.  To clean the inside of the unit, wipe away any food or liquid with a paper towel. 

6.  Dry all parts thoroughly before you plug in and operate the unit again. 

7.  Vacuum chamber may trap liquids that were drawn from the bag ; use a mild dish 

washing soap and a warm, damp cloth to wipe away any left behind liquid from the 

vacuum chamber. Dry thoroughly. 


Summary of Contents for VS90

Page 1: ...Vacuum Sealer VS90 175W USER S MANUAL...

Page 2: ...nce if it malfunctions or is any way damaged If the cord or the machine is damaged please return it to our after sales department for proper service replacement or repair 10 Close supervision is requi...

Page 3: ...e machine and your items are now vacuum fresh Your new vacuum sealer system includes the following l VS90 Vacuum Sealer l English User Manual Vacuum Sealing Guidelines Food Storage Safety IMPORTANT Va...

Page 4: ...se after each use If you make your bag just a little longer than needed you can re seal the bag after each use IMPORTANT Due to the risk of anaerobic bacteria soft cheeses should never be vacuum packa...

Page 5: ...liquid such as soup stock pre freeze in a casserole dish loaf pan or ice cube tray until solid Remove frozen liquid from pan and vacuum package in the vacuum bags You can then stack in the freezer Whe...

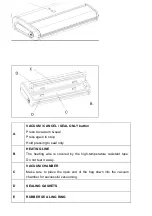
Page 6: ...again to stop Hold pressing to seal only B HEATING LINE The heating wire is covered by the high temperature resistant tape Do not tear it away C VACUUM CHAMBER Make sure to place the open end of the b...

Page 7: ...t illuminates during the seal process 5 Once completed the indicator light will turn off press the release buttons on both sides of the machine it is now safe to take out the newly created bag 6 The c...

Page 8: ...e bag 6 During the vacuum process if you press the button again it will halt the current operation immediately Care Cleaning 1 Always unplug the unit before cleaning 2 Do not immerse in water 3 Do not...

Page 9: ...ed bags l Check for loose worn or cracked Upper and Lower sealing gaskets l Foods with high liquid contents may prevent the bag from sealing properly Cut bag open and wipe top inside of bag and reseal...

Page 10: ...bag open and wipe top inside of bag and reseal Bag will not seal l Check that there aren t any gaps folds wrinkles or holes in pre sealed edges l Moisture of foods with high liquid content will preven...

Reviews: