background image


17 


(4) Check whether the equipment is stationary on the floor. All supporting feet of the equipment 
should firmly touch the floor, and the equipment should not shake or shake when used. If not, 
please adjust it again.       


4. Mobile equipment


The equipment is very heavy. If you plan to move your equipment to a new location, look for adult 
help and use the right lifting techniques. If there is a roller on one end of the device, you can use 
the wheel to relieve the load on you and your assistant.


It is recommended to use a four-wheeled trolley to move


5. long-term preservation when not in use


If you do not want anyone to use the equipment for a long time, perform the following tasks to save:


Place the equipment properly to avoid damage and not interfere with other people or other 
equipment.


Summary of Contents for FF-UB200

Page 1: ...FF UB200 FRENCH FITNESS UB200 COMMERCIAL UPRIGHT BIKE ASSEMBLY MANUAL...

Page 2: ...Sensors Console display Numerical Value Time Distance Calorie Speed Resistance Heart Rate Programs 8 preset programs 4 target programs FEATURES Weight 137 5lb 62 4kg Dimensions 43 3 L x 47 4 W x 66 1...

Page 3: ...1 SAFETY PRECAUTIONS 4 2 TECHNICAL STANDARD 6 3 MACHINE DIAGRAM 7 4 INSTALLATION PROCESS 8 5 INSTRUMENT OPERATION GUIDE 14 6 ROUTINE MAINTENANCE 16 7 EXPLOSION MAP 18 8 PARTS LIST 19 TABLE OF CONTENT...

Page 4: ...e at the same time The maximum weight of the machine is 170 kg 6 The heart rate sensor is not a medical device Due to various factors the sweat of the exerciser s palm etc the measurement result is bi...

Page 5: ...ion parts for fastening If it is loose please tighten or replace it in time 14 Upright bike during the maintenance and repair process the machine accessories should have obvious suspension of use of t...

Page 6: ...ange 0 00 99 59 Distance display range 0 00 99 99Km Heat display range 0 999 9 Kcal Heart rate display range 50 256 times minute Resistance display range 0 20 Speed display range 0 0 99 99 km h 2 TECH...

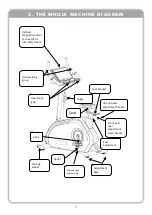
Page 7: ...ontrol car head 13 3 inch LED screen Hand welding group Heart rate grip crank Pedal Left and right outer casing Seat Adjustment base Moving wheel Up and down adjustment handle Front and rear adjustmen...

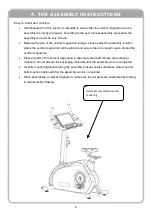
Page 8: ...placed and ensure there is enough space around the vertical magnetron Place all parts of the vertical magnetron in the empty area and remove all packaging materials Do not discard the packaging materi...

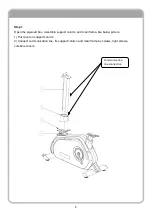
Page 9: ...d box assemble support column and main frame like below picture 1 Put cover on support column 2 Connect communication line fix support column and main frame by screws tight screws combine covers Commu...

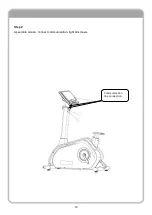
Page 10: ...10 Step 2 Assemble screen connect communication tight all screws Communication line connection...

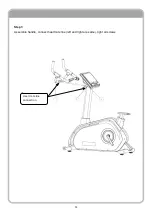
Page 11: ...11 Step 3 Assemble handle connect heart rate line left and right are same tight all screws Heart rate line connection...

Page 12: ...12 Step 4 Assemble bottle holder and handle protector tight all screws...

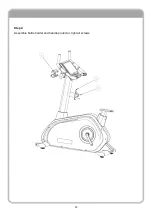
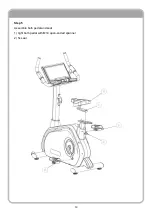
Page 13: ...13 Step 5 Assemble both pedal and seat 1 tight both pedal with M14 open ended spanner 2 fix seat...

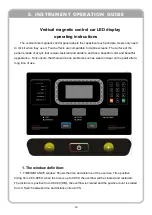
Page 14: ...a beautiful color and beautiful appearance Fully ensure that there will be no problems such as wear and tear on the paint after a long time of use 1 The window definition 1 TIME DISTANCE window Shows...

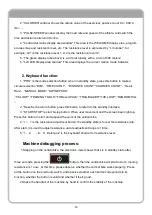
Page 15: ...Reset WALK TRAILBLAZER 10K LOOP RANDOM HILL 2 Reset is the return button press this button to return to the standby interface 3 START STOP is start stop button When user movement and the screen been l...

Page 16: ...ipment Wait until the equipment is completely dry before using it Frequent use of vacuum cleaner to clean the floor under the equipment can prevent dust accumulation from affecting the operation of th...

Page 17: ...ent to a new location look for adult help and use the right lifting techniques If there is a roller on one end of the device you can use the wheel to relieve the load on you and your assistant It is r...

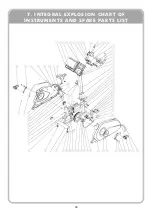
Page 18: ...18 7 INTEGRAL EXPLOSION CHART OF INSTRUMENTS AND SPARE PARTS LIST...

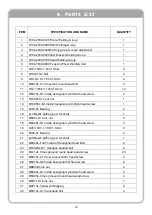
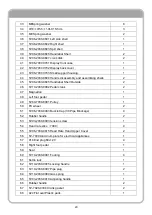
Page 19: ...L N1 Inside hexagonal cylindrical head screw 1 15 6203 Z1 Bearing 2 16 17Elastic baffle type A for shaft 1 17 M6X6t S1 Lock nut 4 18 M6X20L N1 Inside hexagonal cylindrical head screw 4 19 20 11 1 0t C...

Page 20: ...2 46 TZ10 2030 0002 Pedal crank 2 47 Magnetron 1 48 Left foot pedal 1 49 TZ80 7039 8001 Pulley 1 50 PU wheel 2 51 TZ06 7039 0003 Buckle Cap 30 Pipe Blockage 4 52 Rubber handle 2 53 TZ03 2030 0003 ten...

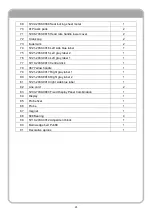
Page 21: ...21 2030 0014 Left gray label 1 1 77 TZ10 2030 0013 Central disk 1 78 067 Yellow handle 1 79 TZ21 2030 0017 Right gray label 1 1 80 TZ21 2030 0018 Right gray label 2 1 81 TZ21 2030 0019 right side blue...

Reviews: