background image

10

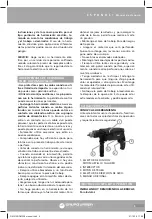
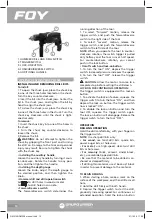
1. HAMMER DRILL AND DRILL SWITCH
2. TRIGGER SWITCH.
3. LOCK-ON BUTTON.
4. FORWARD/REVERSE SWITCH.
5. ADDITIONAL HANDLE.

OPERATION INSTRUCTIONS

INSTALLING AND REMOVING DRILL BITS

To install:
1. To open the chuck jaws, place the chuck key 
in one of the three holes located on the chuck. 
Turn the key counter-clockwise.
2. Insert the bit into the chuck jaws. Center the 
bit in the chuck jaws, and tighten the bit by 
hand to align the chuck jaws.
3. To close the chuck jaws, place the chuck key 
in one of the three holes in the chuck. Turn the 
chuck key clockwise until the chuck is tight-
ened securely.
To remove:
1. Insert the chuck key into one of the holes in 
the chuck.
2. Turn the chuck key counter-clockwise to 
loosen the chuck.
3. Remove the bit.

 WARNING: Do not attempt to tighten the 

chuck by gripping the front part and turning 
the drill on. Damage to the tool and personal 
injury may result. Be sure to tighten the chuck 
with the chuck key.
• Installing the auxiliary handle
Loosen the auxiliary handle by turning it coun-
ter-clockwise. Rotate the handle to any posi-
tion, and then tighten the handle.
• Installing the depth gauge
Loosen the knob, adjust the depth gauge to 
the desired position, and then tighten the 
knob.
• Hammer drill and drill operation switch
Set 

, to drill holes in wood or metal.

Set 

, to drill holes in concrete. 

• Forward/reverse switch
The forward/reverse switch determines the 

running direction of the tool.
1. To select “forward” motion, release the 
trigger switch, and push the forward/reverse 
switch to the right side of the tool.
2. To select “reverse” motion, release the 


trigger switch, and push the forward/reverse  
switch to the left side of the tool.
NOTE: When you operate the tool in counter-
clockwise rotation, the switch trigger is pulled 
only halfway and the tool runs at half speed. 
For counterclockwise rotation, you cannot 
push in the lock button.
• On/off switch and lock-on button
1. To turn the tool “ON”, depress the trigger 
switch. Increased pressure increases the speed.
2. To turn the tool “OFF”, release the trigger 
switch.

 CAUTION: Allow the motor to come to a 

complete stop before setting the drill down.
LOCK-ON FOR CONTINUOUS OPERATION:
The trigger switch is equipped with a lock-on 
button.
1. To activate the lock-on feature, squeeze the 
trigger switch to turn the tool “ON”, and then 
depress the lock-on button. The trigger switch 
now is locked “ON”.
2. To disable the lock-on button and turn the 
tool OFF, squeeze the trigger switch again. 
The lock-on button will disengage. Release the 
trigger switch to turn the tool “OFF”.

OPERATION
DRILLING OPERATION

Hold the drill comfortably, with your finger on 
the trigger switch. 
NOTE: Use sharp drill bits only.
• For wood, use twist-drill bits, spade bits, 
power-auger bits, or hole saws.
• For metal, use high-speed, steel-twist drill 
bits or hole saws.
• For masonry (brick, cement, cinder block, 
etc.), use carbide-tipped drill bits.
• Be sure that the material to be drilled is an-
chored or clamped firmly.
• If drilling thin material, use a “back-up” block 
in order to prevent damage to the material.

TO BEGIN DRILLING
1. When starting a hole, make a mark on the 
surface of the workpiece, and then drill a small 
hole.
2. Hold the drill firmly with both hands.
3. Depress the trigger switch to start the drill, 
gradually increasing speed. For continuous or 
extended operation, hold the lock-on button 

1

2

3

4

5

RM312B-RM338 manual.indd   10

01/12/16   17:09

Summary of Contents for RM312B

Page 1: ...ste manual antes de operar esta herramienta WARNING Read understand and follow the safety rules in this manual before operating this tool Rotomartillos Hammer Drills RM312B RM338 Manual de Usuario y Garantía User s Manual and Warranty RM312B RM338 manual indd 1 01 12 16 17 09 ...

Page 2: ...tric safety Personal safety Tool use and care Specific safety rules for hammer drills Features Operation instructions Maintenance Troubleshooting Technical data Warranty policy Normas generales de seguridad Seguridad eléctrica Seguridad personal Utilización y cuidados de las herramientas eléctricas Advertencias de seguridad para rotomartillos Características Instrucciones de operación Mantenimient...

Page 3: ...s Hay un riesgo aumentado de choque eléctrico si su cuerpo está puesto a tierra No exponga las herramientas eléctricas a la llu via o a condiciones de humedad El agua que entre en la herramienta aumentará el riesgo de choque eléctrico No abuse del cable No usar nunca el cable para llevar levantar o desenchufar la herramienta eléctrica Mantenga el cable lejos del calor aceite cantos vivos o piezas ...

Page 4: ... puede causar lesiones personales IMPORTANTE Este aparato no se destina para utilizarse por personas incluyendo niños cuyas capacidades físicas sensoriales o menta les sean diferentes o estén reducidas o carez can de experiencia o conocimiento a menos que dichas personas reciban una supervisión o capacitación para el funcionamiento del apa rato por una persona responsable de su segu ridad Los niño...

Page 5: ...e en vacío unos segundos antes de realizar la perforación Observe si hay una vibración o movimiento extraño esto podría indicar una deficiente instalación del accesorio Siempre utilice abrazaderas o un tornillo de banco para sostener la pieza de trabajo Siempre apague el rotomartillo antes de de jarlo o dejar de utilizarlo Asegúrese que tenga una luz adecuada para tener una buena observación de la...

Page 6: ...o y presione el selector de giro hacia la iz quierda de la herramienta NOTA Cuando opere la herramienta en sen tido contrario a las manecillas del reloj el in terruptor de encendido solo será presionado hasta la mitad y la herramienta funcionará a la mitad de su velocidad Para este sentido de giro la función de traba no podrá ser activada Interruptor de encendido y botón de traba 1 Para encender l...

Page 7: ...locidad baja para plásticos que tengan un punto bajo de fusión PERFORANDO EN METAL 1 Lubrique las brocas con aceite para cortar cuando perfore hierro o acero 2 No use lubricante cuando perfore metales NO FERROSOS como cobre latón o aluminio MANTENIMIENTO PRECAUCIÓN Antes de cada uso inspec cione el rotomartillo el interruptor y el cordón no deben estar dañados ausentes o con partes desgastadas Rev...

Page 8: ...an extension cord is necessary a cord with adequate size conductors should be used to prevent excessive voltage drop loss of pow er or overheating The table below shows the correct size to use depending on cord length and nameplate amperage rating of tools In case of doubt use the next heavier gauge Al ways use UL listed extension cords SIZE RECOMMEND EXTENSION CABLES PERSONAL SAFETY Stay alert wa...

Page 9: ...rential switch when you are using an electric equipment SERVICE Tool service must be performed only by quali fied repair personnel Service or maintenance performed by unqualified personnel could re sult in a risk of injury SPECIFIC SAFETY RULES FOR HAMMER DRILLS Hold the tool by its insulated gripping sur faces when performing any operation where the tool may contact hidden wiring or its own cord ...

Page 10: ...witch and push the forward reverse switch to the left side of the tool NOTE When you operate the tool in counter clockwise rotation the switch trigger is pulled only halfway and the tool runs at half speed For counterclockwise rotation you cannot push in the lock button On off switch and lock on button 1 To turn the tool ON depress the trigger switch Increased pressure increases the speed 2 To tur...

Page 11: ...ARNING Before each use inspect the hammer drill ON OFF trigger switch and cord for any damaged missing or worn parts Check for loose screws misalignment or bind ing of moving parts or any other condition that may affect the operation If abnormal vi bration or noise occurs turn the tool off imme diately and have the problem corrected before further use WARNING Before cleaning or perform ing any mai...

Page 12: ...tas Profesionales S A de C V garantiza este producto por el termino de 1 año en sus piezas componentes y mano de obra contra cualquier defecto de fabricación a partir de la fecha de entrega Fecha de venta ____ ____ ____ Producto ___________________ Marca ______________________ Modelo ____________________ ______________________________ Sello y firma de distribuidor Comercializado e Importado por Ur...

Reviews: