background image

Foxwell F1000B OBDII&Battery Tester User’s Guide_ English Version_V1.00

18

Manual Trigger---triggers recording whenever operators press the

ENTER

key.

DTC trigger--- automatically triggers recording when a code is detected by vehicle. DTC Trigger

is not available on all vehicles. Some vehicles need to be driven for a long period of time to store

a code after a drivability fault occurs. If

DTC trigger

is selected to make a recording, there might

not be drastic change in the data before and after trigger.

Do not operate the OBDII&Battery tester while driving; always have two persons in vehicle when

recording – one to drive and the other to operate the OBDII&Battery tester.

To record data:

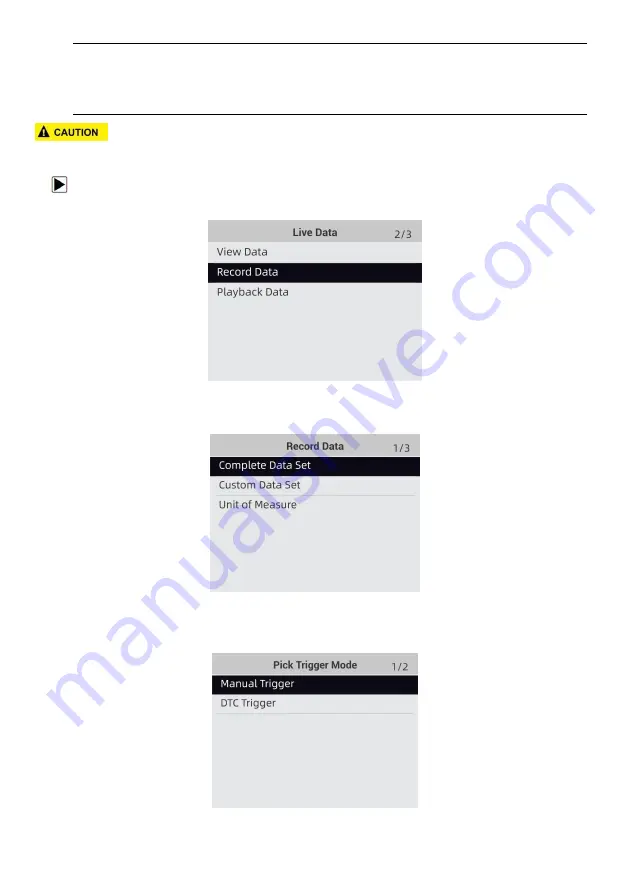
1. Select

Record data

from the menu and press the

ENTER

key.

Figure 4-17 Sample Live Data Menu Screen

2. Refer to

View Data

to set up

Complete Data Set

or

Customer Data Set

to record.

Figure 4-18 Sample Record Data Menu Screen

3. Scroll with the up and down arrow keys to pick a trigger mode and press the

ENTER

key to

confirm.

Figure 4-19 Sample Pick Trigger Mode Screen

4. Use the

UP/DOWN

key to select a memory location and press

ENTER

to confirm.

Summary of Contents for F1000B

Page 1: ...ctive holders Copyright Information 2020 Shenzhen Foxwell Technology Co Ltd All rights reserved Disclaimer The information specifications and illustrations in this manual are based on the latest information available at the time of printing Foxwell reserves the right to make changes at any time without notice Visit our website at www foxwelltech us For Technical Assistance send us email at support...

Page 2: ...mer after the completion of service under this limited warranty 4 FOXWELL does not warrant uninterrupted or error free operation of the product If a problem develops during the limited warranty period the consumer shall take the following step by step procedure a The customer shall return the product to the place of purchase for repair or replacement processing contact your local FOXWELL distribut...

Page 3: ... OR ANY OTHER LEGAL OR EQUITABLE THEORY EVEN IF FOXWELL KNEW OF THE LIKELIHOOD OF SUCH DAMAGES FOXWELL SHALL NOT BE LIABLE FOR DELAY IN RENDERING SERVICE UNDER THE LIMITED WARRANTY OR LOSS OF USE DURING THE PERIOD THAT THE PRODUCT IS BEING REPAIRED 6 Some states do not allow limitation of how long an implied warranty lasts so the one year warranty limitation may not apply to you the Consumer Some ...

Page 4: ...al and follow all safety messages Do not route the test cable in a manner that would interfere with driving controls Do not exceed voltage limits between inputs specified in this user s manual Always wear ANSI approved goggles to protect your eyes from propelled objects as well as hot or caustic liquids Fuel oil vapors hot steam hot toxic exhaust gases acid refrigerant and other debris produced by...

Page 5: ...CAL SPECIFICATIONS 9 3 GETTING STARTED 9 3 1 PROVIDING POWER TO OBDII BATTERY TESTER 9 3 1 1 Connecting to Vehicle Power 9 3 1 2 Connecting to Personal Computer with USB Cable 10 3 2 APPLICATION OVERVIEW 10 4 OBDII EOBD OPERATIONS 10 4 1 READ CODES 12 4 2 ERASE CODES 13 4 3 LIVE DATA 14 4 3 1 View Data 14 4 3 2 Record Data 17 4 3 3 Playback Data 20 4 4 FREEZE FRAME 21 4 5 READ I M READINESS STATUS...

Page 6: ...SER MANUAL 41 8 5 UPDATE TOOL SETTINGS 41 9 SYSTEM SETUP 42 9 1 SELECT LANGUAGE 42 9 2 CONFIGURE MONITORS 43 9 2 1 Spark IGN Required Monitors 44 9 2 2 Compression IGN Required Monitors 45 9 2 3 Allowed INC Monitors 46 9 2 4 Reset Factory Default 47 9 3 UNIT OF MEASURE 47 9 4 KEY BEEP SET 48 9 5 DIAG BEEP SET 49 9 6 TOOL SELF TEST 49 9 6 1 Display Test 50 9 6 2 Keypad Test 50 9 6 3 LED Test 51 9 7...

Page 7: ...tions displays Menu options include Languages Configure monitors Unit of measure Key Beep Set Diag Beep Set Tool self test About 1 2 2 Arrow Icon An arrow icon indicates a procedure Example To change menu language 1 Use the UP DOWN key to highlight Language on the menu 2 Press the ENTER button to select 1 2 3 Note and Important Message Note A NOTE provides helpful information such as additional ex...

Page 8: ...eir diagnostic testing and no DTCs are found D Yellow LED Display shows the tool finds a possible problem Pending DTCs exist or and some of the vehicle s emission monitors have not run their diagnostic testing E Red LED Display indicates there are some problems in one or more of the vehicle s systems In this case the MIL lamp on the instrument panel is on F UP Key quick access to the Read Codes fu...

Page 9: ...es connection between the OBDII Battery tester and a computer to upgrade the tool 4 Quick Start Guide includes the user s manual NT Wonder update software and update files 2 3 Technical Specifications Display 2 8 TFT color display Working Temperature 0 to 60 32 to 140 Storage Temperature 20 to 70 4 to 158 Power Supply 8 18V vehicle power Supported Protocols J1850PWM J1850 VPW ISO9141 KWP2000 ISO 1...

Page 10: ...ester OBDII EOBD leads to OBDII screens for all 9 generic OBD system tests Battery leads to battery testing functions DTC Lookup leads to screens for diagnostic trouble code lookup Review leads to screens for access to tested data files Print Data leads to screens for access to printing function Setup leads to screens for adjusting default settings to meet your own preference when using the OBDII ...

Page 11: ...sent Unit of measure NOTE Not all function options listed above are applicable to all vehicles Available options may vary by the year model and make of the test vehicle A The selected mode is not supported message displays if the option is not applicable to the vehicle under test When the OBDII Battery tester links to vehicle it checks the status of I M Monitors automatically and gives a summary r...

Page 12: ...e fault does not occur within a certain number of drive cycles depending on vehicle the code clears from memory If a fault occurs a specific number of times the code matures into a DTC and the MIL illuminates or blinks Permanent Codes are DTCs that are confirmed and are retained in the non volatile memory of the computer until the appropriate monitor for each DTC has determined that the malfunctio...

Page 13: ...porary ECU information including freeze frame So make sure that the selected system are completely checked and serviced by technicians and no vital information will be lost before clearing codes There are two ways to erase codes Press the Erase hot key to erase codes from home screen Traditional way select Erase Codes from the diagnostic menu NOTE To clear codes make sure that the ignition key is ...

Page 14: ...ets you view record and playback real time PID data from the electronic control module Menu options typically include View Data Record Data Playback Data 4 3 1 View Data The View Data function allows real time viewing of the vehicle s electronic control unit s PID data including sensor data operation of switches solenoids and relays Menu options typically include Complete Data Custom Data Unit of ...

Page 15: ...Select View Data from the list and press ENTER key to confirm Figure 4 9 Sample Live Data Menu Screen 3 Select Complete Data Set from the menu and press the ENTER key to display the data stream screen Figure 4 10 Sample View Data Menu Screen 4 Scroll with the up and down arrow keys to scroll through data to select lines and left and right arrow keys to scroll back and forth through different scree...

Page 16: ...ID Graph Screen 6 Use the BACK key to return to diagnostic menu 4 3 1 2 Custom Data List Custom Data List menu lets you to minimize the number of PIDs on the data list and focus on any suspicious or symptom specific data parameters To create a custom data list 1 Select Custom List from the menu and press the ENTER key Figure 4 13 Sample Live Data Menu Screen 2 The custom data stream selection scre...

Page 17: ...cel Figure 4 15 Sample Custom Data stream Screen 4 When finished selection press the ENTER key to display selected items Figure 4 16 Sample Data stream Screen 4 3 2 Record Data The Record Data function is used to record PIDs to help diagnose intermittent drivability problems that can t be determined by any other method Menu options typically include Complete Data Custom Data Unit of measure Please...

Page 18: ... in the data before and after trigger Do not operate the OBDII Battery tester while driving always have two persons in vehicle when recording one to drive and the other to operate the OBDII Battery tester To record data 1 Select Record data from the menu and press the ENTER key Figure 4 17 Sample Live Data Menu Screen 2 Refer to View Data to set up Complete Data Set or Customer Data Set to record ...

Page 19: ...a with an asterisk was picked a message prompting to erase data displays Figure 4 21 Sample Erase Recording Screen 5 If the recording is to be overwrited selected Yes if data is not to be overwrited pick No to return to Select Memory screen and choose another one 6 If Manual Trigger is selected following screen displays Figure 4 22 Sample Manual Trigger Recording Screen 7 If DTC Trigger is picked ...

Page 20: ...e maximum number of frames that can be recorded varies The OBDII Battery tester keeps recording data until the memory is full the operator presses the BACK key 9 After recording the OBDII Battery tester displays a prompt to Playback Figure 4 25 Sample Record Data Screen 10 Select YES to view recorded data pick NO or press the BACK key to return to Record Data 4 3 3 Playback Data The Playback Data ...

Page 21: ...WN key to view recorded PIDs of each frame Press the BACK key to exit Figure 4 27 Sample Record Data Screen 4 4 View Freeze Frame Freeze Frame menu displays freeze frame data a snapshot of critical vehicle operating conditions automatically recorded by the on board computer at the time of the DTC set It is a good function to help determine what caused the fault To view freeze frame data 1 Select V...

Page 22: ...sion system during normal driving conditions After a specific amount of drive time each monitor has specific driving conditions and time required the computer s monitors decide if the vehicles emission system is working correctly When the monitor s status is OK vehicle was driven enough to complete the monitor INC Incomplete vehicle was not driven enough to complete the monitor N A Not Applicable ...

Page 23: ... the LED is Green Indicates that engine systems are OK and working properly the number of Monitors equipped with the vehicle which have run and performed their self diagnostic testing is in the allowed range MIL is off No stored and pending DTCs exist The vehicle is ready for an Emissions Test Yellow The tool finds a possible problem It indicates the following two conditions 1 Pending DTCs exist P...

Page 24: ...o highlight I M Readiness from Diagnostic Menu and press the ENTER key If vehicle supports both types of monitors a screen for monitor type selection displays Select a monitor type and press the ENTER key Figure 4 31 Sample Diagnostic Menu Screen 2 If the vehicle being tested supports both types of monitors following screen displays Figure 4 29 Sample I M Readiness Screen 3 Depending on readiness ...

Page 25: ...the menu but tested when engine operating conditions are within specified limits If the vehicle uses a controller area network CAN protocol to communicate this function is not supported by vehicle Refer to On Board Monitor Tests on page 38 39 for O2 monitor data of CAN equipped vehicles To retrieve O2 monitor data 1 Use the UP DOWN key to highlight O2 Monitor Test from Diagnostic Menu and press th...

Page 26: ...ure 4 37 Sample data of 81 screen 5 Press the BACK key to exit and return 4 7 On Board Monitor Test The On Board Monitor Test function is useful after servicing or after clearing a vehicle ECU s memory It receives test results for emission related power train components and systems that are not continuously monitored for Non CAN vehicles And for CAN vehicles it receives test data for emission rela...

Page 27: ...creen 2 Depending on the protocol the vehicle used one of these 2 screens shows Figure 4 39 Sample Non CAN Vehicle Test Screen Or Figure 4 40 Sample CAN vehicle test screen 3 Use the UP DOWN key to highlight a test group and press the ENTER key to confirm A screen with details of the selected sensor displays Use the up and down arrow keys to scroll through data to select lines and left and right a...

Page 28: ...ser s Guide_ English Version_V1 00 28 Figure 4 41 Sample Non CAN vehicle test screen For CAN vehicles test screen is illustrated as below Figure 4 42 Sample Can vehicle test screen 4 Press the BACK key to exit and return 4 8 Component Test ...

Page 29: ...ey to start test and the OBDII Battery tester displays the message Command Sent Figure 4 44 Sample Component test screen 3 Press the BACK key to exit and return 4 9 Request Vehicle Information Vehicle Information allows to request the vehicle s VIN number calibration ID s which identifies software version in vehicle control module s calibration verification numbers CVN s and in use performance tra...

Page 30: ...ormation A screen with a list of available options displays Figure 4 46 Sample Vehicle Info Screen 3 Use the UP DOWN key to highlight an available option and press the ENTER key A screen with details of the selected option displays Figure 4 47 Sample Calibration ID Screen 4 Press the BACK key to exit and return 4 10 Modules Present The OBDII Battery tester identifies module IDs and communication p...

Page 31: ... and charging systems The menu driven display will guide you step by step through the test process 5 1 Connecting The OBDII Battery Tester The OBDII Battery tester powers on automatically when it is correctly connected to the battery The preferred test position is at the battery terminals If the battery is not accessible you may test at the jumper post however the power measurement may be lower th...

Page 32: ...are cut off the key is not in the ON position and the doors are closed 5 2 Battery Testing F1000B 12 Volt Automotive Battery Analyzer allows you to analyze the battery healthy status and view battery charging status To start a battery test 1 Press the ENTER button to start the test BAT LOCATION Menu will display Figure 6 2 Sample BAT LOCATION Screen 2 Scroll with the UP or DOWN button to highlight...

Page 33: ...ER to confirm Figure 6 4 Sample Battery Type Screen 4 Scroll with the UP or DOWN button to select the battery standard from BATTERY STANDARD menu and press ENTER to confirm Not all rating systems are available for each application Figure 6 5 Sample Battery Standard Screen 5 You may find the battery type and battery rating label on every battery Global Rating Systems No Standard Description F1000B ...

Page 34: ...s a combination of numbers and letters 26A17 245H52 5 DIN Deutsche Industrie Norm 100 1100 6 IEC International Electro technical Commission 100 1100 7 EN Europa Norm 100 1100 8 SAE Society of Automotive Engineers 100 1100 5 Use UP or DOWN button to change measure range till you enter the correct range of your battery Press ENTER to start the test Figure 6 6 Sample Battery Rating Screen If the batt...

Page 35: ...er you fully charge the battery replace it 4 REPLACE BATTERY The battery is almost dead or the connection between the battery and battery cable is poor Replace the battery and retest or disconnect the battery cables and retest the battery using the out of vehicle test before replacing it 5 BAD CELL REPLACE The battery may be damaged such as broken cell or short circuit Replace the battery and rete...

Page 36: ...e digit you want to enter a valid code number Press the ENTER key to confirm Figure 5 2 Sample DTC Lookup Screen 3 A screen with code number and its definition displays If definition could not be found SAE or Manufacturer Specific the OBDII Battery tester displays DTC definition not found Please refer to vehicle service manual If a P1xxx C1xxx B1xxx or U1xxx code is entered select a vehicle make t...

Page 37: ...e the UP DOWN key to highlight an optional record and press the ENTER key Details of the test record displays View and analysis the recorded information then press BACK to exit 8 Printing and Update NT Wonder is an extremely easy to use that is used to update F1000B OBDII Battery tester Also it allows you to upload recorded test results to your PC or laptop for analysis and printing Still it enabl...

Page 38: ...nstall the tool and driver 3 Double click the desktop icon to launch the application 4 Click Setting and select the language you want to update 5 Connect F1000B to computer with the USB cable provided Please press and hold the HELP key while connecting the USD cable 6 When F1000B enters the Update Mode the application would detect it automatically Figure 9 1 Sample Update Mode Screen NOTE After en...

Page 39: ...r It is not available to perform this function when the device is in Update Mode To print test results 1 Download and launch NT Wonder as instructed on page 38 of 9 1 Updating the OBDII Battery tester 2 Activate the application by clicking the Print Button from the menu Figure 9 4 Sample Printing Activation Function 3 Connect F1000B to computer with the USB cable supplied to power it on 4 Use the ...

Page 40: ...clipboard on the computer It also allows the users to edit the text by moving the cursor to the edit box Figure 9 7 Sample Printing Data Screen 7 With the printer correctly connected use the Print key to print the testing data Press the BACK key to return to home screen 8 3 Searching DTC Searching DTC option opens a screen that allows you to look up the DTC To search DTC 1 Download and launch NT W...

Page 41: ...nual you want to check Figure 9 9 Sample User Manual Screen 8 5 Update Tool Settings Settings option opens a screen that allows you to set the language and style of the tool Still it offers the option for you to automatically check the update files from the server To set up the update tool 4 Download and launch NT Wonder as instructed on page 43 of 9 1 Updating the OBDII Battery tester 1 Activate ...

Page 42: ...elected a menu with available service options displays Menu options typically include Language Configure monitors Unit of measure Key Beep Set Diag Beep Set Tool self test 9 1 Select Language Selecting Language opens a screen that allows you to choose system language To configure system language 1 Use the LEFT RIGHT key to highlight Setup from home screen and press the ENTER key Figure 8 1 Sample ...

Page 43: ...ompression IGN Required Monitors Allowed INC Monitors Reset Factory Default There are two different types of monitors continuous and non continuous Continuous monitors are different in design from the non continuous monitors Continuous monitors are being constantly tested and evaluated by the car s computer while the car is running Conversely the non continuous monitors require certain conditions ...

Page 44: ...s 1 Use the UP DOWN key to highlight Configure Monitors from Setup menu and press the ENTER key to confirm Figure 8 4 Sample Setup Screen 2 A screen with the optional monitors to be configured displays Figure 8 5 Sample Configure Monitors Display 9 2 1 Spark IGN Required Monitors In this menu the operators can configure monitors for spark ignition cars gasoline engines To configure spark IGN requi...

Page 45: ...d Monitors Selection Screen NOTE The number to the upper right corner of display indicates the total number of optional monitors and sequence of currently selected monitor 9 2 2 Compression IGN Required Monitors In this menu the operators can configure monitors for compression ignition cars diesel engines To configure spark compression required monitors 1 Use the UP DOWN key to highlight Compressi...

Page 46: ... on the geographic or regional area in which the vehicle is registered F1000B provides a more flexible way to meet different standards which allows the user to select 0 1 2 3 INC monitors in test To configure allowed INC monitors 1 Use the UP DOWN key to highlight Allowed INC Monitors from the menu and press the ENTER key to confirm Figure8 9 Sample Configure Monitors Selection Screen 2 The custom...

Page 47: ...e set to 1 To reset factory default 1 Use the UP DOWN key to highlight Reset Factory Default from the menu and press the ENTER key to confirm Figure8 11 Sample Configure Monitors Selection Screen 2 A message prompting to reset factory default displays Answer Yes to confirm the request or answer No to abort and return Figure8 12 Sample Reset Factory Default Screen 9 3 Unit of measure Unit of measur...

Page 48: ...turn Figure 8 14 Sample Unit Selection Screen 9 4 Key Beep Set Key beep set opens a dialog box that allows you to turn on off the built in speaker for key pressing To set the key beep 1 Use the UP DOWN key to highlight Key beep set from Setup menu and press the ENTER key Figure 8 15 Sample Setup Screen 2 Press the UP DOWN arrow key select an item and press the ENTER key to save and return ...

Page 49: ...et the diag beep 1 Use the UP DOWN key to highlight Key Beep Set from Setup menu and press the ENTER key Figure 8 17 Sample Setup Screen 2 Press the UP DOWN key to select an item and press the ENTER key to save and return Figure 8 18 Sample Diag Beep Selection Screen 9 6 Tool Self test Key beep set opens a dialog box that allows you to check if the LCD display and the operation of keypad and LED a...

Page 50: ...hlight Display Test from Setup menu and press the ENTER key to start test Figure 8 19 Sample Tool Self test Screen 2 Check if there are any missing spots in the LCD screen Figure 8 20 Sample LCD Test Screen 3 To quit the test press the BACK key 9 6 2 Keypad Test Selecting Key Test option opens a screen that allows you to check the functionality of the keypad To test the keypad 1 Use the UP DOWN ke...

Page 51: ... BACK to return Figure 8 22 Sample Key Test Screen 9 6 3 LED Test Selecting LED Test option opens a screen that allows you to check the functionality of the LED To test the LED 1 Use the UP DOWN key to highlight LCD Test from Setup menu and press the ENTER key to start test Figure 8 23 Sample Tool Self test Screen 2 The Green Yellow Red indicators will flashing randomly the indicators shall turn o...

Page 52: ... about your OBDII Battery tester such as serial number and software version To view information of your OBDII Battery tester 1 Use the LEFT RIGHT key to highlight Setup from home menu and Highlight About press Enter key Figure 8 25 Sample Home Screen 2 A screen with detailed information of the OBDII Battery tester displays Figure 8 26 Sample Tool Information Screen 3 Press the BACK key to exit and...

Reviews: