background image

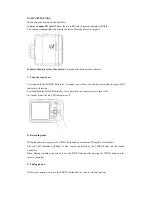
Time lapse 

OFF/2/3/5/20/30/60 sec 


If  choosing  a  Timelapse  interval,  when  you  press  the  PHOTO  button  once,  it  will  take  photos 

continuously. 

The red indicator will flash once each time a photo is taken. 

Press the


PHOTO button again to stop. 


Video   

*Press the MENU (M) button; you will see the video icon. 

*Press the OK button to go into the video settings menu. 

*Press the M or VIDEO button to go back. 

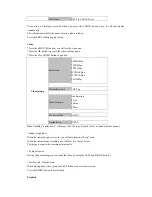
Video setting


Resolution   

1080P/30fps 

720P/60fps 

720P/30fps 

WVGA/60fps   

WVGA/30fps 

VGA/30fps 


Motion detection 

  OFF/on 


Video duration 

Any duration   

30sec 

180sec 

300sec 


Loop recording 

Off/ON 


Upside down 

Off/ON 

Note

: Enabling “upside down” will cause the LCD to go black for a few seconds, which is normal. 


*Sound recognition: 

When the camera begins to record, you will only hear one *beep* noise. 

When the camera stops recording, you will hear two *beep* noises. 

This helps recognize the recording status easily. 


*4x digital zoom: 

During 720p recording, you can zoom the video by using the LEFT and RIGHT buttons. 


*Fast forward, Slow-motion: 

When playing back video, press the LEFT button to choose slow motion.   

Press the RIGHT button to fast forward. 


Playback 

Summary of Contents for AC1080

Page 1: ...AC1080 Professional Sports Action Camera User Manual...

Page 2: ...oid dropping or damaging the camera in any way Don t keep the camera in moist circumstances for long periods of time Don t keep the camera in high temperatures as it may cause damage of external and i...

Page 3: ...ill build up in the seal which can cause failure Please do not to remove or reset the seal Doing so may cause leaks and damage your camera About adhesive mounts Please mount on clean and smooth surfac...

Page 4: ...case 60M 196 FT shockproof 2M and dustproof Waterproof remote controller remote distance 15 20M Fast forward Slow motion Digital Image Stabilizer DIS Contrast ISO Metering adjustment One button back...

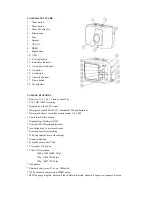
Page 5: ...ill only flash once Using this information you can check the camera status by following the indicator usually when you cannot see the camera easily OVERVIEW Main Buttons Power playback button Menu del...

Page 6: ...nd the green LED indicator will turn on Press and hold the POWER button for 3 seconds when your camera is on to turn it off In standby mode the red LED indicator is off D Recording video When the came...

Page 7: ...or photo you would like to view by using the 4 directional buttons When viewing videos or photos press the M button to delete the file H Pausing and seamless recording During recording pressing the U...

Page 8: ...VGA 30fps VGA 30fps Motion detection OFF on Video duration Any duration 30sec 180sec 300sec Loop recording Off ON Upside down Off ON Note Enabling upside down will cause the LCD to go black for a few...

Page 9: ...ttings Using the SETUP feature you can customize the camera s functions based on your personal preferences Press the MENU button navigate to the Settings icon third from the left Press the OK button t...

Page 10: ...screen Note Before inserting the USB cable please turn on the camera When the camera is off the cable is for charging only FIRMWARE UPDATE Usually the software can be updated by using a micro SD card...

Page 11: ...k SYNC THE REMOTE CONTROL Open the remote controller RC and take off the battery Press and hold the PHOTO button of the remote controller then install the RC s battery Next turn on the camera when tur...

Page 12: ...GA 60fps WVGA 30fps QVGA 60fps Video format MOV H 264 advanced compression LCD size 1 5 Remote distance 15 20M Waterproof IP68 60M 196 FT Storage Micro SD MMC Max 32GB SDHC Storage capacity 32GBmicro...

Page 13: ...ized cloth to remove away blots fingerprints and dust before recording The micro SD card is not compatible with the camera Try formatting your micro SD Card using a computer Formatting the card will d...

Reviews: