background image

8. Register Your Product

If you did not register your product using the FortiExplorer wizard, please register 
your product now. 

Register

Register your Fortinet product in order to receive:
• Technical Support • New product features • Protection from new threats

Enregistrer

Vous devez enregistrer le produit pour recevoir:
• Support technique • Nouvelles fonctionnalitées du produit • Protection contre de 
nouvelles menaces

Registra

La reistrazione ti permette di usufruire di:
• Supporto Tecnico • Nuove funzionalita • Proteezione dalle ultime minaccce

Registrar

Debe registrar el producto para recibir:
• Apoyo técnico • Nuevas funcionalidades del producto • Protección contra 
ataques

登録のお願い

本日、フォーティネット製品の登録をしてください。

登録すると次のメリットがあります。 

テクニカルサポート • 新機能の追加 • 新しい脅威への防御

请马上注册

您的飞塔产品
您在注册以后才能得到技术支持、新产品特点信息、最新威胁防护

Web: http://www.fortinet.com/register

Toll free: 1-866-648-4638

Phone: 1-408-486-7899

Fax: 1-408-235-7737

Email: [email protected]

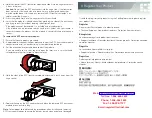
4. 

Hold the sides of the SFP transceiver module and slide it into the cage socket until 
it clicks into place.

Caution:

 Do not force the SFP transceivers into the cage slots. If the transceiver 

does not easily slide in and click into place, it may not be aligned correctly or 
may be upside down. If this happens, remove the SFP transceiver, realign it or 
rotate it and slide it in again.

5. 

Press the module firmly into the cage socket with your thumb.

6. 

Verify that the module is latched correctly by grasping the sides of the transceiver 
and trying to pull it out without lowering the extraction lever.
If the module cannot be removed, it is installed and latched correctly.
If the module can be removed, reinsert it and press harder with your thumb. If 
necessary, repeat this process until the module is securely latched into the cage 
socket.

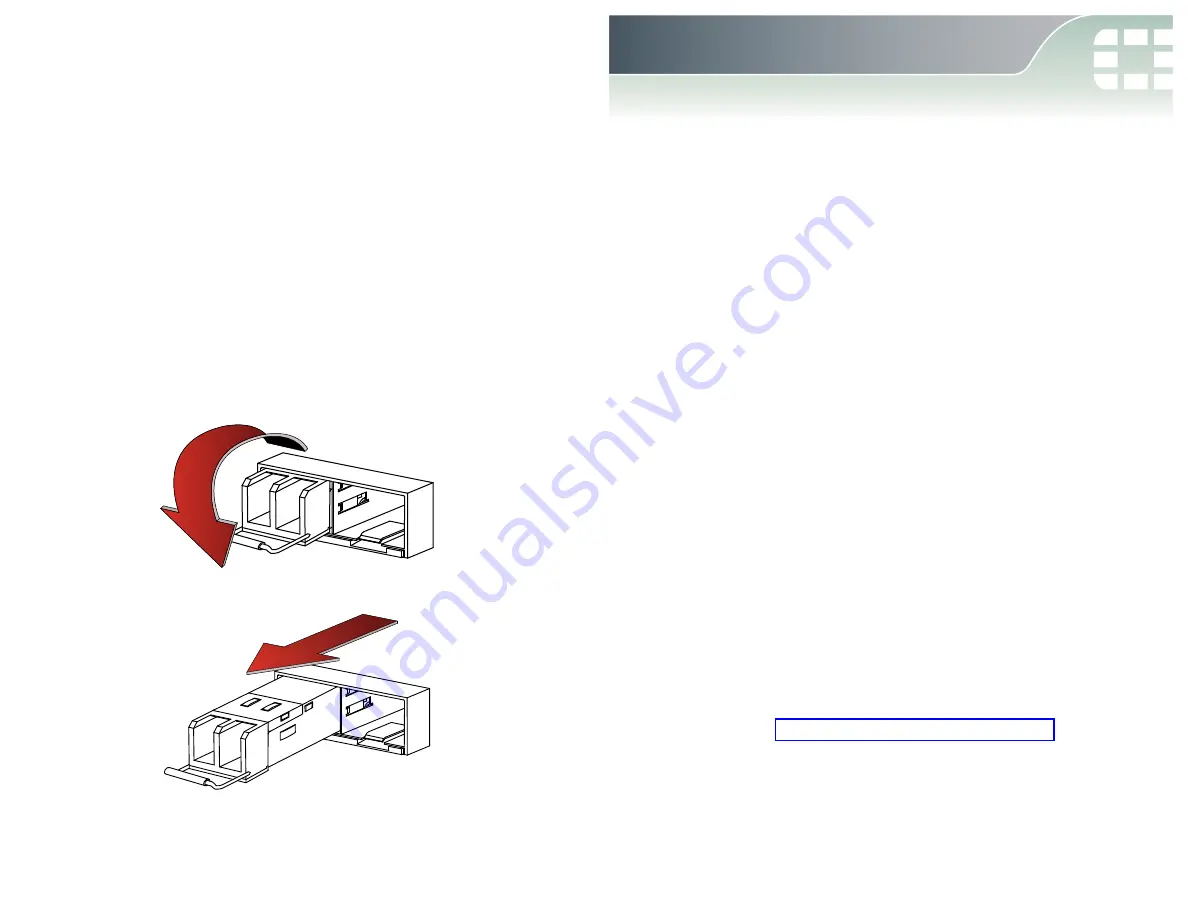
To remove the SFP transceiver modules:
1. 

Ensure that you are properly grounded.

2. 

If applicable, disconnect the fiber-optic cable from the SFP transceiver module 
connector and install a clean dust plug in the module’s optical bores.

3. 

Pull the extraction lever out and down to eject the module.
If you are unable to use your finger to open the lever, use a small flat-head 
screwdriver or other similar tool to open the lever.

4. 

Hold the sides of the SFP transceiver module and carefully pull it away from the 
cage socket.

5. 

Replace the cap on the SFP cage socket and place the removed SFP transceiver 
module into an antistatic bag.

Note

: Follow proper fibre-optic handling procedures when installing and removing 

SFP transceiver modules to ensure the devices remain clean and are not damaged.

Summary of Contents for FortiGate 60C-SFP

Page 1: ...FortiGate 60C SFP QuickStart Guide ...

Page 2: ... the identified product will perform according to certain expressly identified performance metrics and in such event only the specific performance metrics expressly identified in such binding written contract shall be binding on Fortinet For absolute clarity any such warranty will be limited to performance in the same ideal conditions as in Fortinet s internal lab tests In no event does Fortinet m...

Page 3: ...etter ventila tion Required Materials Drill bit Size is determined by the screw size Anchors Two for mounting on dry wall plasterboard or gyprock Screws Two appropriate for anchors Maximum diamter of 3 5mm Instructions 1 Tape this template to the wall in the desired location 2 Mark the position of the drill holes on the wall 3 Drill two holes 4 Insert anchors into drilled holes 5 Insert the screws...

Page 4: ... 3 The FortiExplorer Easy Configuration Utility opens when the USB cable is connected Select Install the hardware automatically and select Next 4 After a moment FortiExplorer will launch CONSOLE WAN1 WAN2 USB DC 12V 5 1 2 3 4 USB MGMT WAN3 USB A to USB B Cable USB A cable end into Management Computer USB B cable end into FortiWiFi Unit 3 FortiExplorer To attach your unit to a wall refer to the wal...

Page 5: ...t to your network These basic steps include assigning IP addresses DNS settings and the default gateway Until these steps are completed traffic will not flow through the device In addition to FortiExplorer the FortiGate unit can be configured using the Web based Manager or the CLI This section will step you through both methods of connecting to the unit Use whichever method you are most comfortabl...

Page 6: ...ortiExplorer 5 Technical Specifications To Connect to the CLI You can configure all FortiGate configuration options from the CLI using config commands The CLI also includes get show diagnose and execute commands for performing various configuration and monitoring tasks 1 Connect the FortiGate unit console port to the management computer using the provided console cable 2 Start a terminal emulation...

Page 7: ... handling transceiver modules Caution Do not install or remove SFP transceiver modules while fiber optic cables are still attached This can cause damage to the cables cable connectors and the optical interfaces It may also prevent the transceiver module from latching correctly into the socket connector Note Installing and removing SFP transceiver modules can shorten their useful life Do not instal...

Page 8: ...igned correctly or may be upside down If this happens remove the SFP transceiver realign it or rotate it and slide it in again 5 Press the module firmly into the cage socket with your thumb 6 Verify that the module is latched correctly by grasping the sides of the transceiver and trying to pull it out without lowering the extraction lever If the module cannot be removed it is installed and latched...

Page 9: ...ature Therefore make sure to install the equipment in an environment compatible with the manufacturer s maximum rated ambient temperature Storage temperature Refer to the product datasheet Humidity Refer to the product datasheet Air flow For rack installation make sure that the amount of air flow required for safe operation of the equipment is not compromised For free standing installation make su...

Page 10: ...repair or replace the defective Hardware at no charge to the original owner This obligation is exclusive of transport fees labor or installation costs and any other cost which are not directly associated to the Product Such repair or replacement will be rendered by Fortinet at an authorized Fortinet service facility as determined by Fortinet The replacement Hardware need not be new or of an identi...

Page 11: ...ads commands interactively when run you must cause it when started running for such interactive use in the most ordinary way to print or display an announcement including an appropriate copyright notice and a notice that there is no warranty or else saying that you provide a warranty and that users may redistribute the program under these conditions and telling the user how to view a copy of this ...

Page 12: ...ns of the Library and distribute that work under terms of your choice provided that the terms permit modification of the work for your own use and reverse engineering for debugging such modifications You must give prominent notice with each copy of the work that the Library is used in it and that the Library and its use are covered by this License You must supply a copy of this License If the work...

Page 13: ......

Page 14: ......

Reviews: