

Specifications
Cutting Style:
Cross Cut
Shred Size:
5/32” x 1 7/16”
Sheet Capacity:
Up to 17 sheets, 1 CD, 1 Credit Card
Speed:
Up to 8.8 feet per minute
Feed Opening:
9”
Dimensions:
23.4” H x 15.4” W x 11.8” D
Bin Capacity:
6.9 gal.
Weight:
28.7 lbs.
Security Level:
DIN 66399 P-4 / O-3 / T-4 / E-4 / F-1
Power supply:
120V, 60Hz
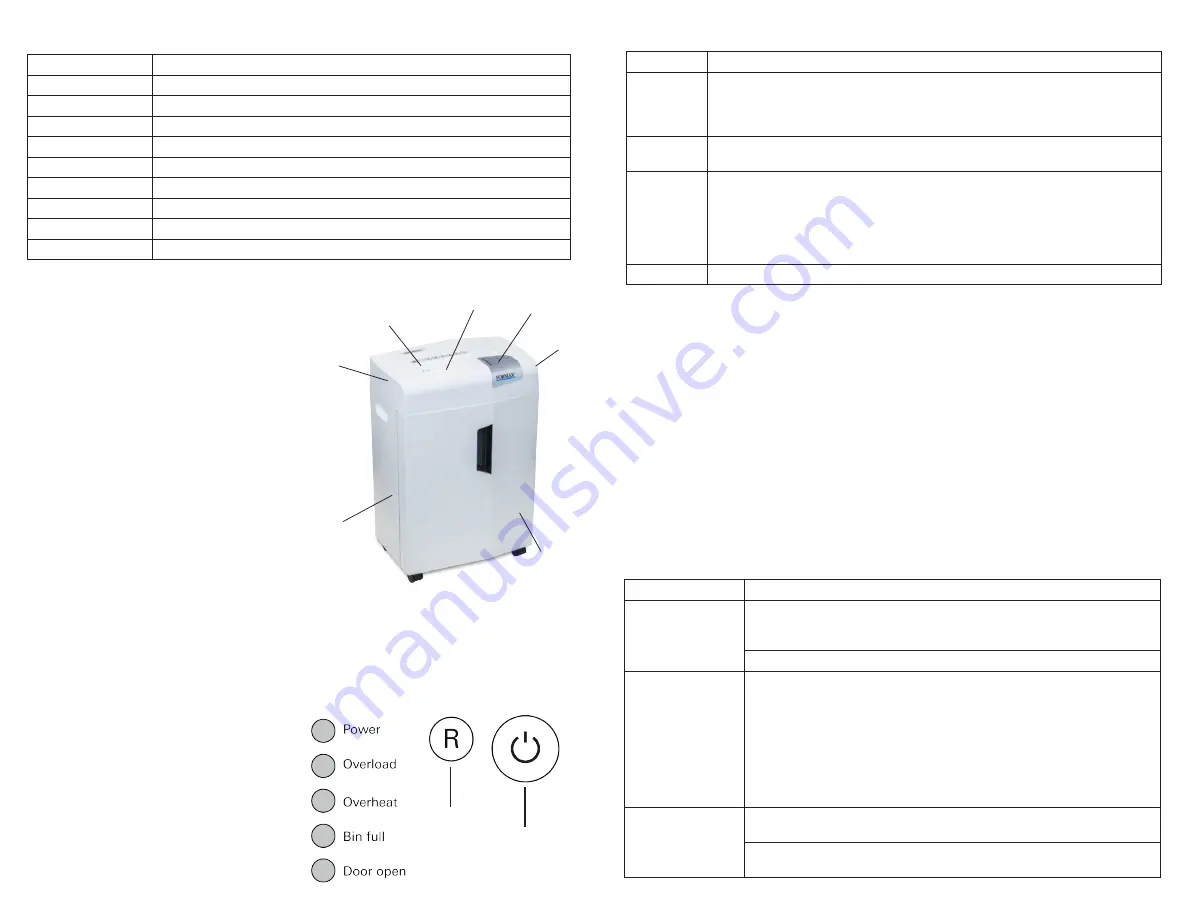
Parts Identification
Control Panel
1
3
4
2
7
1. Base Cabinet
2. Cutting Head
3. Paper Infeed
4. CD Infeed
5. Control Panel
6. Main Power Switch
7. Paper Waste Bin
CD Waste Bin (not shown)
Set-up
1. Unpack and set the shredder upright on a
level surface.
2. Remove the main waste bin. Insert the CD
waste bin into the bracket on the inside of the
main waste bin.
3. Reinstall the main waste bin.
4. Plug in the power cord to an appropriate
outlet.
Operation
1.
Turn on main power switch on rear of shredder.
2.
Press the power button on the control panel. The Power LED will illuminate.
3.
Insert paper into the infeed slot. The light sensor will automatically detect the paper and
engage the cutting blades. The cutting blades will stop automatically when the paper has
been shredded.
NOTE: Do not feed more than 17 sheets at one time.
NOTE: Do not use both infeed slots at the same time.
4.
To shred a CD, DVD or credit card, insert through the dedicated CD infeed slot. Insert only
one (1) CD, DVD or credit card at a time.
NOTE: Do not use both infeed slots at the same time.
NOTE: Empty the CD waste bin after shredding up to 5 CDs/DVDs.
5.
After shredding, press the control panel power button to turn off the shredder.
Problem
Solution
No LEDs are
illuminated,
shredder will not
operate
Be sure shredder is plugged in to an appropriate power source.
Be sure main power switch is in the ON position.
Press “Power” button on the control panel.
Be sure the waste bin is fully inserted into the base.
Paper jam
Press and hold the Reverse button to clear the jam. Press the power button
and continue shredding.
If the jam cannot be cleared with this method:
a) tear or cut the remaining paper just above the shredder infeed,
b) press the power button to switch OFF,
c) press the power button to switch ON,
d) repeat steps c and d until the paper is cleared.
NOTE: Do not reach underneath the cutting head to remove jammed paper.
Serious injury may result due to sharp cutting blades.
Cutting blades run
continuously
The light sensor in the paper infeed is blocked. Feed another sheet through
to help clear the piece of paper blocking the sensor.
The light sensor is blocked by paper dust. Turn off the power. Clear the
sensor with a short blast of canned air, a soft cloth or a paintbrush.
Troubleshooting
Power ON / OFF
5
Reverse
6
The Control Panel includes the Power ON/OFF
button, Reverse button, and LEDs which indicate
the status of the shredder.
Control Panel LEDs
Power
LED is illuminated when shredder is ON and ready to use.
Overload
Too much paper has been fed into the infeed. The shredder will run in reverse for
a few seconds to allow the paper to be removed. If necessary, press and hold the
Reverse (R) button to back out the paper. Reduce the paper stack size and feed in
smaller increments.
Overheat
Motor has overheated. Switch off the main power and allow the shredder to cool
down for 30 minutes before using.
Bin Full
When this LED is illuminated, the waste bin is full. Turn off the power. Slide out the
bin, empty and replace. The window on the front of the bin gives an idea of when
the bin is getting full.
NOTE: The fill level sensor is on the underside of the cutting head. If, after
emptying, the LED remains lit, remove the bin and clean the sensor with a soft
cloth.
Door Open
Be sure the waste bin is installed correctly.


