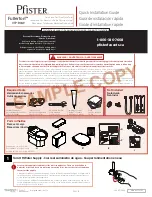
Install metal washers and nuts onto the floor bolts. (Figure 6).
Tighten the bolts alternately until the toilet is firmly seated on the floor.
CAUTION: DO NOT OVERTIGHTEN NUTS - SEVERE DAMAGE
MAY OCCUR.
Instalar tuercas y arandelas de metal en los pernos para el piso.
(Figura 6). Apretar alternadamente los pernos hasta que el
inodoro quede bien asentado en el piso.
PRECAUCIÓN: NO APRETAR DEMASIADO LAS TUERCAS -
ESTO PUDIERA OCASIONAR DAÑOS GRAVES.
Attach the plastic decorative caps on each side of the bowl.
Fijar las tapas decorativas de plástico a cada lado de la taza.
Connect water supply line to shutoff valve. Tighten securely. Turn on
supply valve and allow tank to fill until float rises to shutoff position.
Conectar la línea de suministro de agua a la válvula de cierre.
Apretar firmemente. Abrir la válvula de suministro y dejar que el
tanque se llene hasta que el flotador emerja en la posición de cierre.
Check for leakage at fittings, tighten or correct as needed.
Comprobar si hay filtración en los acoplamientos y apretar o
rectificar según sea necesario.
Place the toilet seat on top of the bowl. Insert the provided seat
bolts (E) into the holes of the toilet seat and the bowl. (Figure 7)
Colocar el asiento del inodoro sobre la taza. Insertar los pernos
para asiento incluidos (E) en los orificios del asiento y la taza
del inodoro. (Figura 7)
Align the toilet seat to the top rim of the toilet bowl.
Use a screwdriver
to firmly tighten both seat bolts down to the bowl. (Figure 8)
Alinear el asiento del inodoro con el borde superior de su taza.
Usar un destornillador para ajustar bien ambos pernos del asiento
a la taza. (Figura 8)
Close the decorative bolts caps down over the bolts. (Figure 8)
NOTE: Do not push down on the seat with force, as doing so
may damage the close mechanism.
Fijar las tapas decorativas para pernos sobre estos. (Figura 8)
NOTA: No empujar hacia abajo con fuerza sobre el asiento,
ya que hacerlo pudiera dañar el mecanismo de cierre lento.
E
E
D
D
E
2
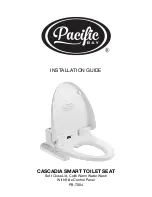
pg 3/6
Instructions
STEP-BY-STEP
ILLUSTRATED
CON ILUSTRACIÓN
ELONGATED 1-PIECE TOILET
INODORO ALARGADO DE 1 PIEZA
PASO A PASO
INSTALLATION PROCEDURE /
PROCEDIMIENTO DE INSTALACIÓN
8
7
9
FIG 6
11
10
FIG 7
FIG 8
13
12
•
•
•
•
•
•
•
•
•
•
•
•
•
•
1
F
© 2019 Foremost Groups, Inc
6241 Northwind Parkway, Hobart, Indiana 46342
www.ForemostBath.com