background image

9.-

100 V INPUT

: 100 V line signal input. The 100 V line inputs have priority through signal level which 

attenuates the level of the rest of the inputs. 

10.-

LINE OUT

: aux line output. Signal output for recording, mixer, power amp, etc., 2 x RCA connectors. 

11.-

AUX

: aux input. Signal source input, allowing the connection of audio sources via 2 x RCA connectors. 

12.-

INPUT 1-2

: microphone/line inputs that use an XLR connector, accepting balanced and unbalanced 30-

600 Ω microphone signals and balanced electret condenser microphones that require 24 V phantom  
power, present in pins 2 and 3 on the XLR connector. They accept line level, balanced or unbalanced 
signals equally whether they come from mixers or audio players, etc. 

Select the appropriate position using the switch, making sure the volume controls are at their minimum 
to avoid making noise. 

Microphone 1 and 2 inputs have priority depending on the signal level, which attenuates the level of the 
rest of the inputs to give preference to paging. 

 
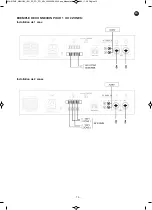
CONNECTION 

- Make the connetions with the amplifier and all the components of the installation switched off and 

disconnected from the mains. 

-  Connect the audio equipment or the required microphones to the corresponding inputs. If a dynamic 

microphone is connected to input 1 or 2, place the selector in the MIC position. If a condenser microphone 
is connected, place the selector in the PHANTOM 24 V position. 

If a line level source is connected to input 1 or 2, place the selector in the LINE position. 

- If you wish, a line level source can be connected to the aux input designed for this purpose, on the front 

panel as well as on the rear panel. 

- If the low impedance output is used, the loudspeakers must be connected in a series/parallel circuit so 

that the loudspeaker load impedance is the same as the amplifier output impedance and the power 
supplied by the amplifier does not exceed that withstood by the loudspeakers. 

- If the 100 or 70 V high impedance output is used, all the loudspeakers must be connected in parallel and 

the sum of the power of all the speakers must not exceed the power supplied by the amplifier. 

- Power the amplifier mod. 

MA-91RUZ

 using the AC mains connection. 

- Once the connections have been made according to your needs, connect the equipment to the mains and 

switch it on. After use, do not forget to switch it off and disconnect the equipment from the mains. 

- 4 -

EN

MA-91RUZ_MANUAL_(EN_ES_FR_PT)_A5c_20200506-2020.qxp_Maquetación 1  6/5/20  11:38  Página 4

Summary of Contents for MA-91RUZ

Page 1: ...A USB SD MP3 FM AMPLIFICATEUR DE SONORISATION USB SD MP3 FM AMPLIFICADOR DE MEGAFONIA USB SD MP3 FM INSTRUCTION MANUAL MANUAL DE USUARIO MODE D EMPLOI MANUAL DE INSTRU ES MA 91RUZ_MANUAL_ EN_ES_FR_PT...

Page 2: ...radio mode it allows moving to the previous following frequency point in steps of 0 1 MHz 3 VOL VOL USB SD MP3 player with digital FM tuner volume controls 4 SD card slot 5 USB storage device connect...

Page 3: ...require 24 V phantom power can be connected to the inputs MIC in this position the inputs can be connected to low impedance 30 600 dynamic microphones 5 AC power supply 6 GND earth screw to be used i...

Page 4: ...nnect the audio equipment or the required microphones to the corresponding inputs If a dynamic microphone is connected to input 1 or 2 place the selector in the MIC position If a condenser microphone...

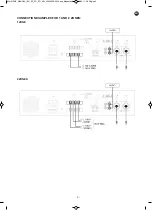
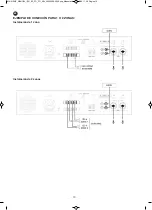
Page 5: ...CONNECTION EXAMPLES FOR 1 AND 2 ZONES 1 ZONE 2 ZONES 5 EN MA 91RUZ_MANUAL_ EN_ES_FR_PT _A5c_20200506 2020 qxp_Maquetaci n 1 6 5 20 11 38 P gina 5...

Page 6: ...mm jack 85 mV RMS and 80 mV RMS 1 100 V line spring terminals OUTPUTS 1 line out 2 x RCA 700 mV CONTROLS Tone Bass 10 dB Treble 10 dB Volume inputs 1 to 2 zones 1 to 2 aux mp3 general volume and USB...

Page 7: ...do radio permiten pasar al anterior siguiente punto de frecuencia con un paso de 0 1 MHz 3 VOL VOL controles de volumen del reproductor USB SD MP3 con sintonizador digital FM 4 Perto de conexi n de ta...

Page 8: ...reproductores de CD etc PHANTOM 24 V en esta posici n a las entradas pueden conectarse micr fonos de condensador electret que requieran alimentaci n phantom 24 V MIC en esta posici n a las entradas p...

Page 9: ...la alimentaci n Conecte los equipos de audio o micr fonos deseados a las entradas correspondientes Si conecta un micr fono din mico en la entrada 1 2 sit e el selector en la posici n MIC Si conecta un...

Page 10: ...EJEMPLO DE CONEXI N PARA 1 O 2 ZONAS Instalaci n de 1 zona Instalaci n de 2 zonas 10 ES MA 91RUZ_MANUAL_ EN_ES_FR_PT _A5c_20200506 2020 qxp_Maquetaci n 1 6 5 20 11 38 P gina 10...

Page 11: ...RCA y jack 3 5 mm 85 mV RMS y 80 mV RMS 1 l nea 100 V terminales a presi n SALIDAS 1 line out 2 x RCA 700 mV CONTROLES Tono Graves 10 dB Agudos 10 dB Volumen entradas 1 a 2 zonas 1 a 2 aux mp3 volumen...

Page 12: ...de radio permettent de passer le point de fr quence ant rieur suivant avec un pas de 0 1 MHz 3 VOL VOL contr les de volume du reproducteur USB SD MP3 avec syntoniseur num rique FM 4 Port de connexion...

Page 13: ...ANTOM 24 V peuvent se connecter aux entr es des microphones de condensateur lectret qui demandent une alimentation phantom 24 V MIC peuvent se connecter aux entr es des microphones de basse imp dance...

Page 14: ...appareils audio ou microphones souhait s aux entr es correspondantes Si vous connectez un microphone dynamique l entr e 1 ou 2 placez le s lecteur en position MIC Si vous connectez un microphone de c...

Page 15: ...EXEMPLE DE CONNEXION POUR 1 OU 2 ZONES Installation de 1 zone Installation de 2 zones 15 PT FR MA 91RUZ_MANUAL_ EN_ES_FR_PT _A5c_20200506 2020 qxp_Maquetaci n 1 6 5 20 11 38 P gina 15...

Page 16: ...iaire 2 x RCA y jack 3 5 mm 85 mV RMS et 80 mV RMS 1 ligne 100 V borniers pression SORTIES 1 line out 2 x RCA 700 mV CONTR LES Ton Graves 10 dB Aigus 10 dB Volume entr es 1 2 zones 1 2 aux MP3 volume...

Page 17: ...o ponto de frequ ncia anterior seguinte a um intervalo de 0 1 MHz 3 VOL VOL controlos de volume do leitor USB SD MP3 com sintonizador digital FM 4 Porta para ligar cart es SD 5 Porta para ligar dispo...

Page 18: ...in micos 5 Alimenta o CA 6 GND parafuso para tomada de terra para usar caso a tomada de corrente n o a tenha incorporada 7 Sa da para colunas Para ligar colunas em baixa imped ncia 4 e em alta imped n...

Page 19: ...o MIC Se ligar um microfone de condensador coloque o seletor na posi o PHANTOM 24 V Se ligar uma fonte de n vel de linha na entrada 1 ou 2 coloque o seletor na posi o LINE Se desejar pode ligar uma f...

Page 20: ...20 PT EXEMPLOS DE CONEX O PARA ZONAS 1 E 2 Instala o de 1 zona Instala o de 2 zona MA 91RUZ_MANUAL_ EN_ES_FR_PT _A5c_20200506 2020 qxp_Maquetaci n 1 6 5 20 11 38 P gina 20...

Page 21: ...ar 2 x RCA y jack 3 5 mm 85 mV RMS e 80 mV RMS 1 linha 100 V terminais a press o SA DAS 1 line out 2 x RCA 700 mV CONTROLOS Tom Graves 10 dB Agudos 10 dB Volume entradas 1 a 2 zonas 1 a 2 aux mp3 volu...

Page 22: ...22 MA 91RUZ_MANUAL_ EN_ES_FR_PT _A5c_20200506 2020 qxp_Maquetaci n 1 6 5 20 11 38 P gina 22...

Page 23: ...23 MA 91RUZ_MANUAL_ EN_ES_FR_PT _A5c_20200506 2020 qxp_Maquetaci n 1 6 5 20 11 38 P gina 23...

Page 24: ...www fonestar com MA 91RUZ_MANUAL_ EN_ES_FR_PT _A5c_20200506 2020 qxp_Maquetaci n 1 6 5 20 11 38 P gina 24...

Reviews: