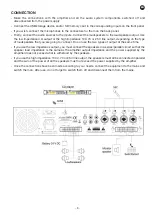
microphones that need 24 V phantom power, present in pins 2 and 3 of the XLR connector. Balanced
or unbalanced line level signals from mixers, audio players, etc. are accepted.
Select the appropriate position using the switch, making sure that the volume controls have been moved
to minimum to avoid noises.
The microphone 1 input has priority function that deletes all the other inputs to give priority to paging,
emergencies, etc. The amplifier is supplied with priority deactivated. To activate this function you must
turn the MUTE/SEN control on the back panel clockwise, until it reaches its maximum (maximum
priority).
CAUTION
: when connecting or disconnecting an unbalanced microphone, the switch must be in the
MIC position. If the switch is in the PHANTOM 24 V position, the microphones could be damaged due
to the voltage in pins 2 and 3 of the XLR connector.
11.-
MUTE SEN
: control for activating/deactivating priority in INPUT 1 and TEL inputs. Turn the control
wheel clockwise to its maximum and the rest of the inputs will be automatically weakened when a signal
is detected in the INPUT 1 or TEL inputs. Turn it anticlockwise and the priority function will go back to
its minimum level.
Note
: the amplifier is supplied with priority deactivated. To activate this function you must turn the
MUTE SEN control wheel clockwise, up to its maximum (maximum priority).
12.-
DC 24 V
: 24 V DC power supply terminals. For the amplifier to work with 24 V DC power, batteries,
emergency power supply systems, etc. Make the connection with 2.5 mm
2
section cable to the -
negative and + positive terminals.
13.- Output for loudspeakers. For connecting the loudspeakers in 4 Ω low impedance and 100/70/25 V high
impedance lines. Connect the loudspeaker line between the COM terminal and the impedance or line
in desired V.
14.-
MOH LEVEL
: volume control for the monitor output. By turning the control clockwise, the volume is
raised and in the other direction, lowered.
15.- Output terminals for 1 W 8 Ω - 600 Ω auxiliary loudspeaker (Monitor). For connecting an external
loudspeaker as monitor. It has an internal 1 W amplifier. It only monitors the AUX input, controlled by
the the AUX volume. It has an adjustable level using the MOH LEVEL control on the back panel.
16.-
TEL INPUT
: telephone input terminals. For connecting to telephone switchboard to give
announcements from the switchboard with priority over the rest of the inputs. See the
characteristics of the switchboard to adjust the input level of the amplifier. The signal level can be
adjusted using the TEL LEVEL control on the back panel.
17.-
TEL LEVEL
: TEL INPUT volume control. For adjusting the telephone switchboard volume that is
connected to the TEL INPUT terminals. By turning the control clockwise, the volume is raised and in
the other direction it is lowered.
INSTRUCTIONS FOR USE
DIGITAL FM TUNER
This model lets you tune in digitally to FM radio frequencies.
To select the FM radio tuner as an audio source, press the MP3/FM button choosing the FM option.
The radio stations are tuned using buttons
7
and
8
on the front panel. By pressing one of these buttons,
you automatically tune into the previous/following frequency. By holding them down, you automatically
tune into the previous/following digital FM station.
MEMORISING THE FM RADIO STATIONS
Select the desired frequency using buttons
7
and
8
on the front panel until you find the chosen station.
Press the MEMORY button for a few seconds and then one of the M1 to M4 buttons to save the selected
station in this memory position.
EN
- 7 -
Summary of Contents for MA-125RGUB
Page 10: ...BLOCK DIAGRAM 10 EN...


