background image

SPEAKER CONNECTION  

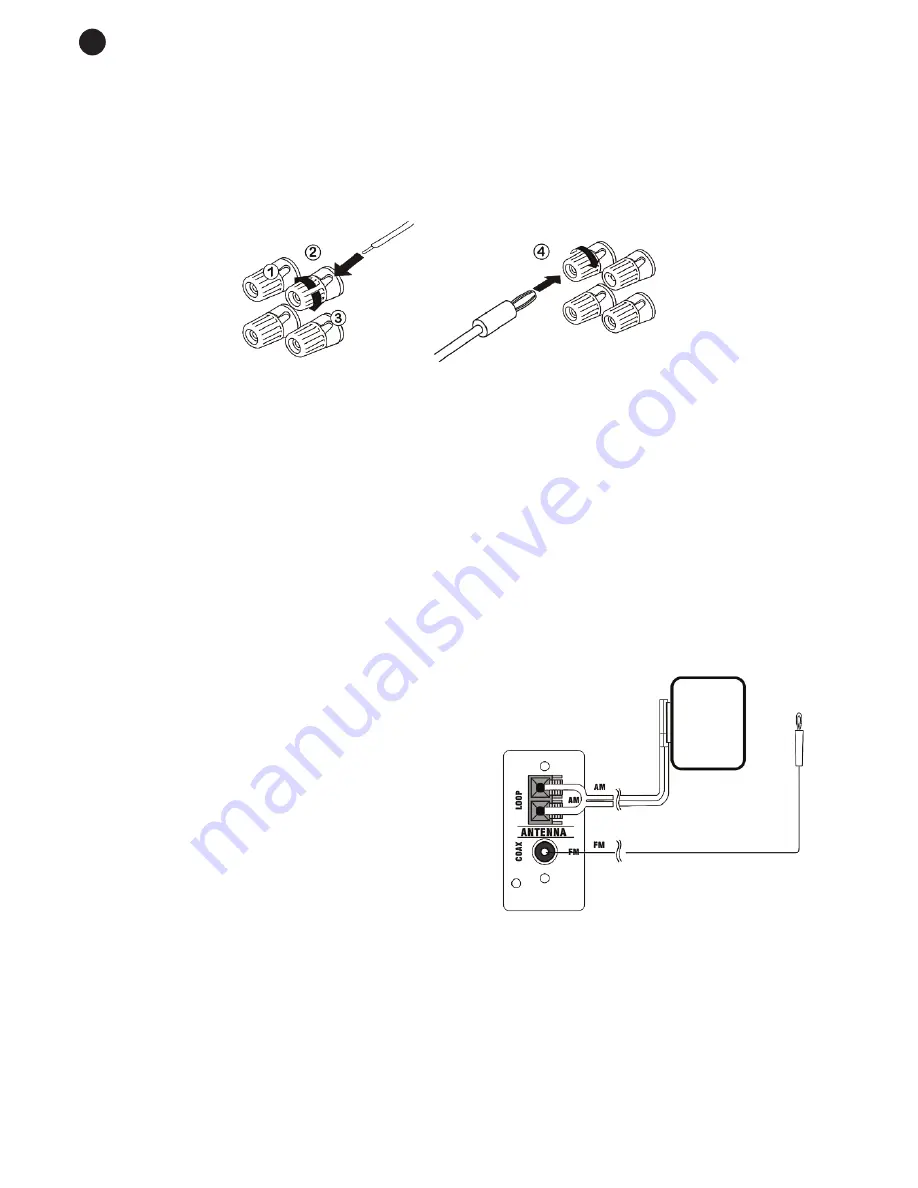
SPEAKER CABLE CONNECTION

1. Loosen the connectors from the speaker output.

2. Insert the stripped end of the cable (remove approximately 5 mm of the insulation from the cable).

3. Tighten the connectors from the speaker output.

4. The connection can also be made with banana plugs.

When you connect the speakers make sure you respect the polarity between the speaker cables and

connection terminals (the + speaker terminal is connected to the + amplifier terminal).

If the polarity is inverted in one of the speakers, the sound could be distorted due to bass cancelation.

If you use the stripped end cable connection be especially careful with stripped cable not sticking out and

touching the amplifier chassis.

LOCATION OF SPEAKERS

- The speakers must have a distance of 2 or 3 m between them. If you place them closer together or further

apart the sound could be distorted.

- To achieve a stereo sound image, the speakers must be placed at an angle of 45° from the perpendicular

of the optimum listening point.

AERIAL CONNECTION

Connect  the  AM  and  FM  aerials  to  the  AM  and  FM
terminals on the back panel. The aerials make it possible to
receive a clear signal.

The AM aerial is shaped like a ribbon. It has to be unrolled
and then connected to the AM pressure terminals.

Press the terminal tab, insert the cable and then let go of
the tab so that it is connected properly.

Connect the FM aerial to the Coaxial FM connector.

After connecting the aerials extend them and adjust their
position to achieve optimal signal reception.

When all the connections have been made, connect the sound equipment to the mains. Firstly, switch on the
sound sources and lastly, the amplifier.

When you switch off the equipment, do the same but in reverse order.

- 10 -

EN

Summary of Contents for AS-150R

Page 1: ...AS 150R AS 170RU STEREO HI FI AMPLIFIERS EN Instruction Manual AS 150R AS 170RU...

Page 2: ...to allow ventilation Avoid direct sunlight heat sources and excessive dust Do not place the machine near magnetic elds or static electricity Do not use surfaces which vibrate or receive impact Do not...

Page 3: ...atos El ctricos y Electr nicos in a special section REI Registro de establecimientos Industriales with the entry number 001851 The symbol RoHS Restriction of Hazardous Substances shows that the produc...

Page 4: ...button again the display will show TUNER EXIT and then press the button for the chosen input This button also works to reset the ampli er and recharge the default values To do this with the ampli er s...

Page 5: ...uned channels 1 to 8 With the USB player activated it chooses the random order track playback function RANDOM 11 POWER Power supply button 12 LED power indicator The LED indicator will light up and st...

Page 6: ...tion or similar 6 DVD Input for a DVD player audio signal connection or similar 7 VCR Input for a video recorder audio signal connection or similar 8 AUX PHONO Input for the audio signal connection of...

Page 7: ...the ID3 button once it will show the name of the artist if you press it again it will show the name of the le and pressing it again will show the name of the folder A forth press deactivates the ID3 f...

Page 8: ...d at the same volume as before 16 SLEEP Press repeatedly to activate or deactivate the SLEEP function and to select the time it is to be activated 30 60 90 120 minutes 17 TONE Press this button to adj...

Page 9: ...Take the following indications into account Connect all the components together before connecting them to the mains Before making any connection or disconnection switch the ampli er off Make sure that...

Page 10: ...e of 2 or 3 m between them If you place them closer together or further apart the sound could be distorted To achieve a stereo sound image the speakers must be placed at an angle of 45 from the perpen...

Page 11: ...other sound source press the USB TUNER EXIT button twice until the message TUNER EXIT appears on the display Then press the button for the desired sound source DVD CD VCR or AUX PHONO When you select...

Page 12: ...it is tuned into at that moment AUTOMATIC STORAGE OF PRE TUNED CHANNELS To automatically store stations with enough signal power press the AUTO button on the remote control It will sweep through the...

Page 13: ...me Once connected and in place raise the volume to an appropriate level Do not use them with the volume too high Listening at too high a volume for a long time can cause hearing loss TROUBLESHOOTING R...

Page 14: ...overload and overvoltage USB PLAYER Plays MP3 les ID3 information tag Maximum number of folders and les can be indexed 65 534 Maximum 8 levels of folders TUNER Digital AM FM with 64 pre tuned channel...

Page 15: ...ds or other substances excessive humidity battery deterioration and internal manipulation of the device the software or its components by unauthorized persons and in general any use that is unrelated...

Page 16: ...16 www fonestar com...

Reviews: