background image

Low Mid Eq and High Mid Eq

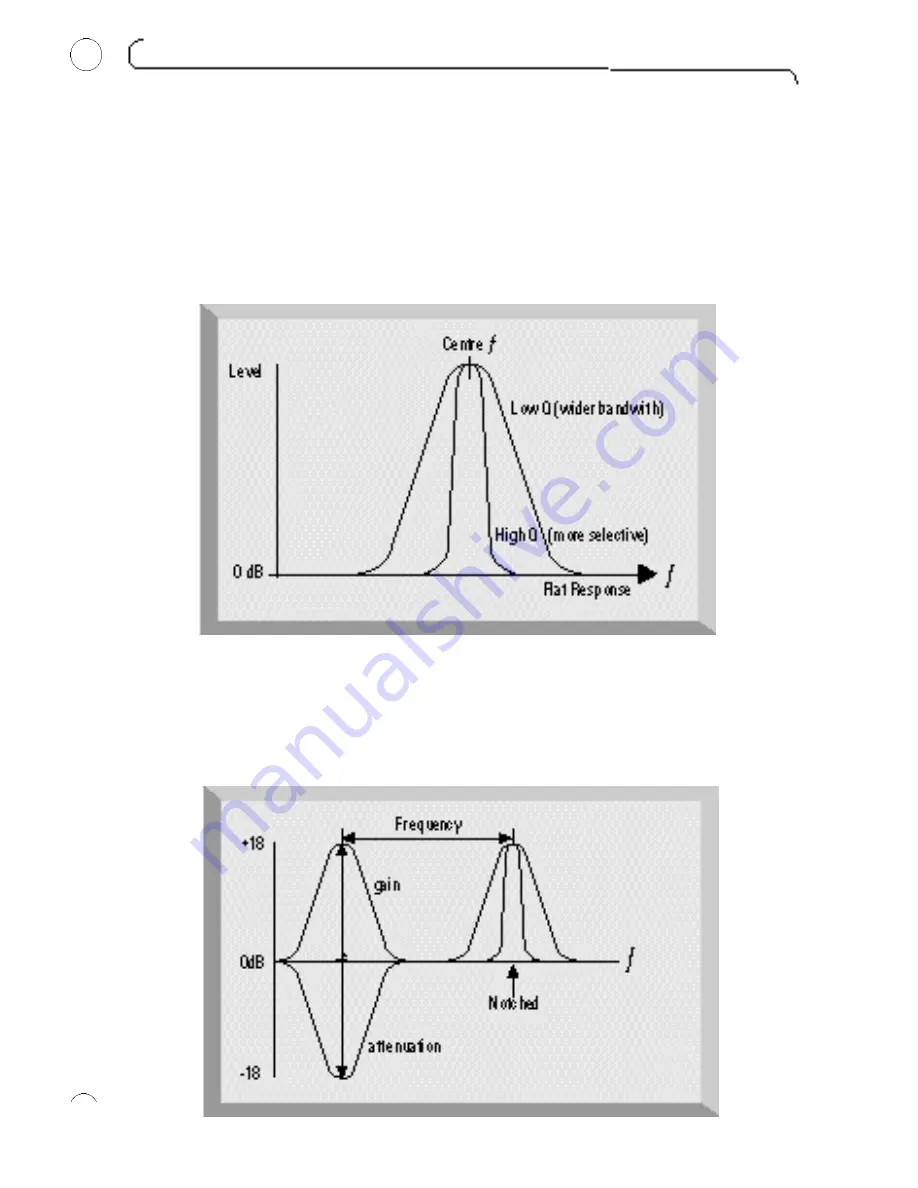
The Low Mid Eq and High Mid Eq are parametrics, which give you control over the

entire frequency spectrum. Unlike the filters, the parametrics affect only a given fre-

quency, plus some frequencies to either side. The range of frequencies affected is

determined by the bandwidth (also known as Q). Low Q has a wide bandwidth, and

high Q has a nar row bandwidth.

Controls

The parametrics let you set e very parameter: the gain or attenuation, the frequency

affected, and bandwidth.

t r o u b l e   s h o o t i n g

12

iii

Summary of Contents for Green 2 focus EQ

Page 1: ...rding path for Microphones and instruments Better than an average console EQ because More Inputs Mic A superb quality MicPre stage Line Instrument Guitar More EQ bands 6 stages High Low Filters High and Low Shelving Filters 2 Mid Parametric Bell shape EQ can also be switched to either 4 bands of bell shape curves or 2 bands of bell plus 2 bands of shelving for greater control and flexibility Has t...

Page 2: ......

Page 3: ...ng the Phase 8 Equaliser 8 Low and High Filters 9 Controls 9 Using Low and High Filters 10 Low and High EQ 10 Controls 11 Using the Low and High EQ 11 Low Mid and High Mid EQ 12 Controls 12 Using Parametrics 14 How to use equalisation 14 When to use equalisation 15 Bringing an instrument forward in the mix 15 Section iii Trouble Shooting Non Operation 17 Changing A Fuse 17 Worldwide Distributors 1...

Page 4: ... with for example run a favourite CD through the unit Try all of the controls in turn and hear how they affect the sound Working with a familiar track makes interpretation of the results easier There are two separate parts to the Focus EQ Preamplifier Equaliser Within the equaliser there are three types of equalisation Low and High filters Low and High Eq Low Mid Eq and High Mid Eq parametrics Pow...

Page 5: ...eset to the local supply voltage which is clearly marked on the rear of the module Check that the voltage is set cor rectly Signal Connections All the signal connections are via connectors mounted on the rear panel Standard XLR connectors are used for all mic and line level signals and are wired to the AES standard which are Pin 1 Screen chassis Pin 2 Live audio 0 Pin 3 Return audio 180 For all in...

Page 6: ...se of the channel when lit see the sec tion Setting the Phase The Mic and Inst buttons select the input signal see the section Selecting the Input Signal Selecting the Input Signal On the back of the unit are three input sockets Mic For microphones only Line For line level signals such as the output from a tape machine Inst For instruments from guitars with single coil pickups to keyboards Note th...

Page 7: ...Use the meter and the correct rotary control to match the incoming level and gain to the internal operating level With an input signal coming into the channel watch the meter as you use the rotary control to modify the gain and set the control so that the meter registers between 3 VU and 0 VU This sets the level above the noise level of the unit and leaves room for any sudden increase in performan...

Page 8: ...another microphone for example by an ambient microphone then you need to ensure that you do not put your two close microphones out of phase with the ambi ent microphone If you think two signals are out of phase listen for phase as follows 1 On your monitor system pan one signal to the left and the other to the right 2 Use the phase switch to reverse the phase on one of the signals When the two sig...

Page 9: ...requency attenuates all fre quencies above that Controls Note that you cannot change the amount of attenuation setting one of these filters always attenuates the affected frequencies by a preset amount of 12 dB per octave For example setting the High filter at 12 kHz attenuates the signal at 24 kHz by 12 dB and the signal at 48 kHz by 24 dB for any frequency the octave above it is at double the fr...

Page 10: ...ough from other sources when recording bassy signals such as bass drum A possible creative use of the Low and High filters is to put them full on together which gives an effect similar to a telephone or transistor radio Low and High Eq The Low and High Eq are very flexible as they can be used in either shelf mode or bell mode When the switch is not lit the Low and High Eq are in shelf mode which i...

Page 11: ...ntroduction to this section Off position To turn off Low or High Eq set the gain control in the middle position so that it is neither boosting nor cutting frequencies Using the Low and High Eq Like the Low and High filters the Low and High Eq are often used to correct prob lems with a signal To compensate for a lack of something in the original recording for example if you had to roll off a lot of...

Page 12: ...ics affect only a given fre quency plus some frequencies to either side The range of frequencies affected is determined by the bandwidth also known as Q Low Q has a wide bandwidth and high Q has a narrow bandwidth Controls The parametrics let you set every parameter the gain or attenuation the frequency affected and bandwidth t r o u b l e s h o o t i n g 12 iii ...

Page 13: ...f its spectrum Instead its range is split into two this means that the control does not have to cover its entire spectrum in a single sweep so increasing its sensitivity Thus the Low Mid Eq covers 40 Hz to 400 Hz or 120 Hz to 1 2 kHz and the High Mid Eq covers 600 Hz to 6 kHz or 1 8 kHz to 18 kHz You determine the range of the parametric by using the x3 button When it is not lit the parametric cov...

Page 14: ...ow to Use Equalisation 1 When using a microphone ensure that the microphone placement is correct Listen to the sound from the microphones with no equalisation applied and modify the microphone placement until you get the sound you want 2 Set the operating level 3 Consider what you don t want for example you don t want too much bass on an analogue tape machine This varies with the recording format ...

Page 15: ...g the Low and High filters Boost lows and highs when recording loud acts by using the Low and High fil ters Bringing an Instrument Forward in the Mix You can use equalisation to bring an instrument forward in the mix that is to make it easier to hear when mixed with the other instruments However when doing this beware of using equalisation simply to make the instrument louder by boosting the funda...

Page 16: ...llness 240 Hz Bite 2 5 kHz Bass guitar Attack or pluck 700 1000 Hz Bottom 60 80 Hz String noise 2 5 kHz Bass drum Slap 2 5 kHz Bottom 60 80 Hz Snare drum Fatness 240 Hz Crispness 5 kHz Hi hat and cymbals Shimmer 7 5 10 kHz Clank or bell 200 Hz Tom toms Attack 5 kHz Fullness 24Ø Hz Floor toms Attack 5 kHz Fullness 80 120 Hz f o c u s e q 16 ...

Page 17: ...re in any doubt whatsoever contact your dealer or the factory before you open the module To change a fuse if you are certain of your technical ability 1 Disconnect the mains cable 2 Viewing the module from the back remove the four screws that secure the back panel there are two at each end 3 Carefully slide out the inside of the unit with a downward motion see diagram 4 The fuse is in a holder clo...

Page 18: ...iokotsis 32 Katechaki Str 115 25 Athens 00 30 167 48514 5 00 30 167 46414 Holland TM Audio Peter de Fouwe Zonnebaan 52 3606 CC Maarsenbrock 00 31 30 2 414070 0 31 30 2 410002 Hong Kong Digital Media Technology Clement Choi Flat C 1 F Comfort Building 00 852 2721 0343 00 852 2366 6883 86 88 Nathan Road Tsim Sha Tsui Kowloon Iceland Audio Solutions Ari Dan Asvallagata 10 101 Reykjavik 00 354 896 562...

Page 19: ...lla Tannheim CH 5012 Schonenwerd 00 41 62 849 5722 00 41 62 849 3830 Taiwan Advancetek Frank Wang No 6 Alley 5 Lane 130 00 886 2716 8896 00 886 2716 0043 International Co Ltd Sec 3 Ming Sheng E Rd Taipei Taiwan R O C Thailand KEC Mr Sira Hanbuntrong 665 Machachai Road Bangkok 10200 00 662 222 8613 4 00 662 225 3173 UK Focusrite Audio Nathan Eames 19 Lincoln Road Cressex Business Park 44 0 1494 462...

Page 20: ...n o t e s ...

Page 21: ...n o t e s ...

Reviews: